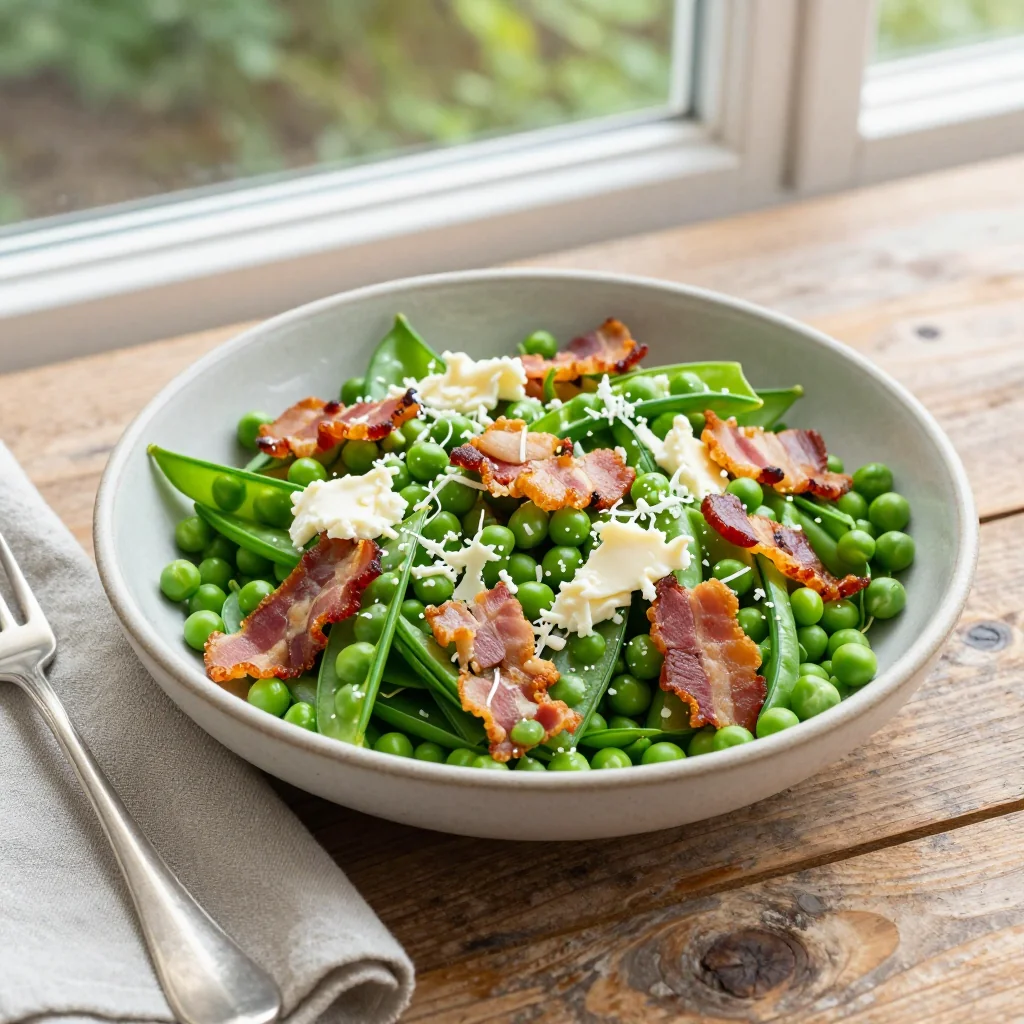
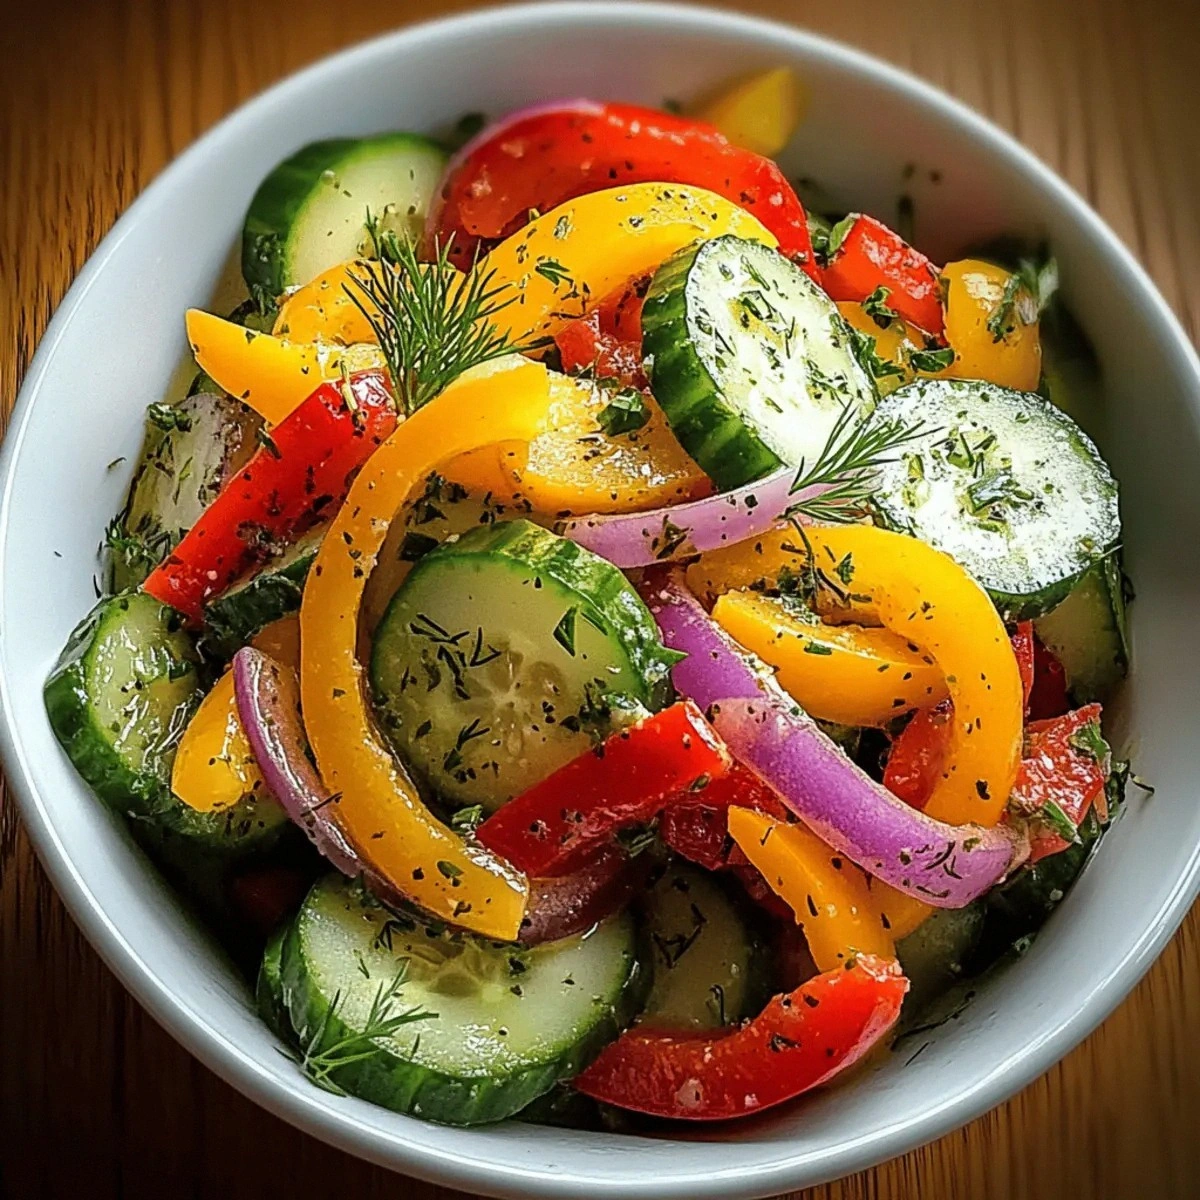
A bright, crunchy salad that marries sweet peas with smoky bacon and creamy cheese for a perfect spring feast.
When the first shoots of peas start to peek through the soil, I’m reminded of my grandmother’s garden, where the air smelled of fresh earth and anticipation. One summer afternoon, while chopping crisp peas for a simple side, a strip of sizzling bacon fell onto the cutting board, and the idea for this salad was born. The combination of sweet, tender peas with the salty crunch of bacon and the richness of sharp cheddar feels like a celebration of the season’s best flavors.
This salad hails from the French countryside, where peas are a staple of spring meals, often paired with fresh herbs and a touch of cheese. I’ve added a twist with caramelized bacon and a bright lemon‑mint dressing, turning a humble garden dish into a show‑stopper for brunches, picnics, or a light dinner.
In this article, you’ll learn how to select the freshest peas, achieve perfectly crisp bacon, and balance the dressing so that every bite sings. I’ll walk you through each step, share tips for ingredient swaps, and give you ideas for plating that will impress even the most discerning guests.
Let’s dive into the garden‑fresh goodness and create a salad that’s as vibrant as the first day of spring.
🌟 Why This Recipe Will Captivate You
From the first forkful, this salad delivers a symphony of textures and flavors that keep you coming back for more.
- ✨ Perfect Balance of Sweet and Savory: Fresh peas provide a natural sweetness that is perfectly offset by smoky bacon and tangy cheddar, creating a harmonious flavor profile.
- ✨ Crunchy Texture in Every Bite: The crispness of bacon and the bite of raw peas contrast beautifully with the creamy cheese, ensuring an exciting mouthfeel from start to finish.
- ✨ Quick and Easy Weeknight Meal: With only 25 minutes from start to finish, this dish fits seamlessly into busy schedules without sacrificing taste.
- ✨ Nutrient‑Rich Spring Ingredients: Peas are packed with protein, fiber, and vitamins A, C, and K, while the greens add iron and antioxidants.
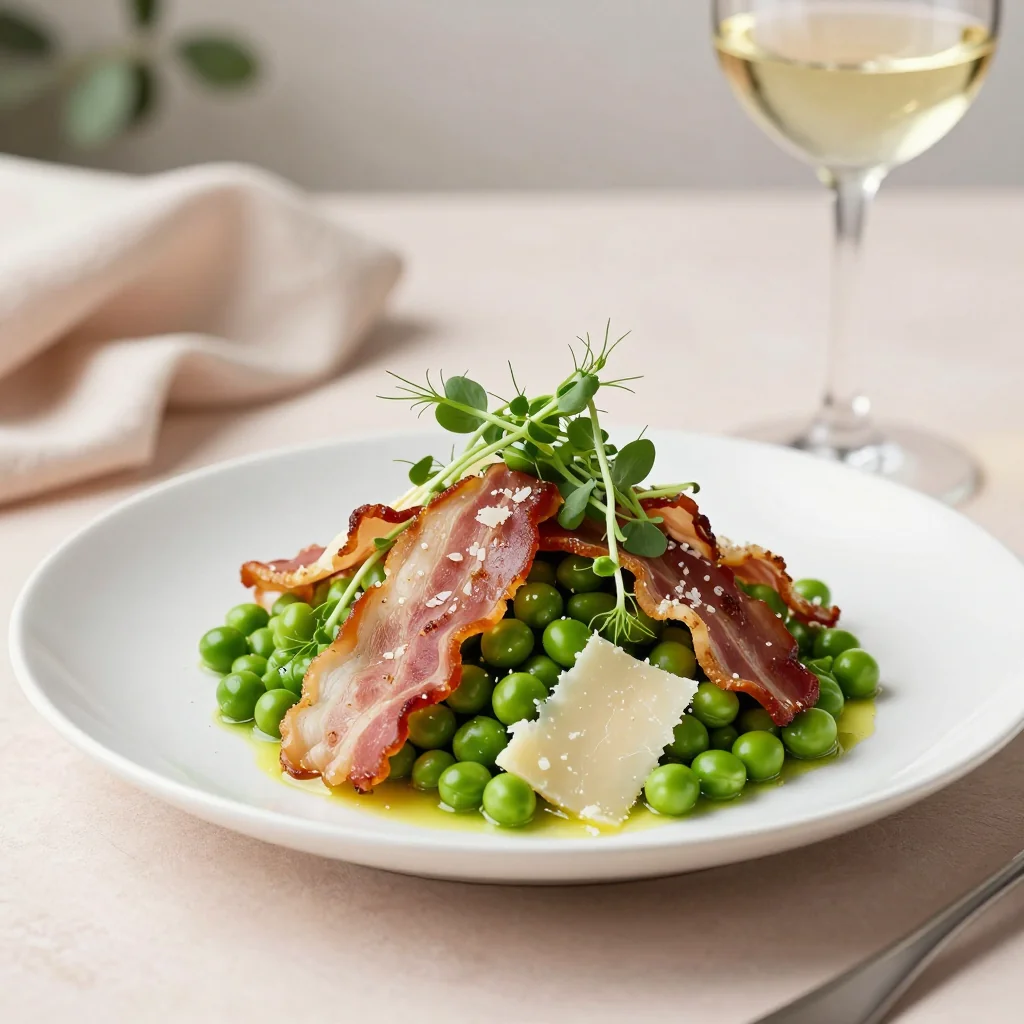
- ✨ Versatile Presentation: Serve it on a rustic wooden board, in elegant glass bowls, or as a side to grilled fish for a polished look.
- ✨ Crowd‑Pleaser for All Ages: The familiar flavors of bacon and cheese make it instantly appealing to kids, while the fresh herbs keep it sophisticated for adults.
🥗 Ingredients
📝 Complete Ingredient List
For the Salad Base:
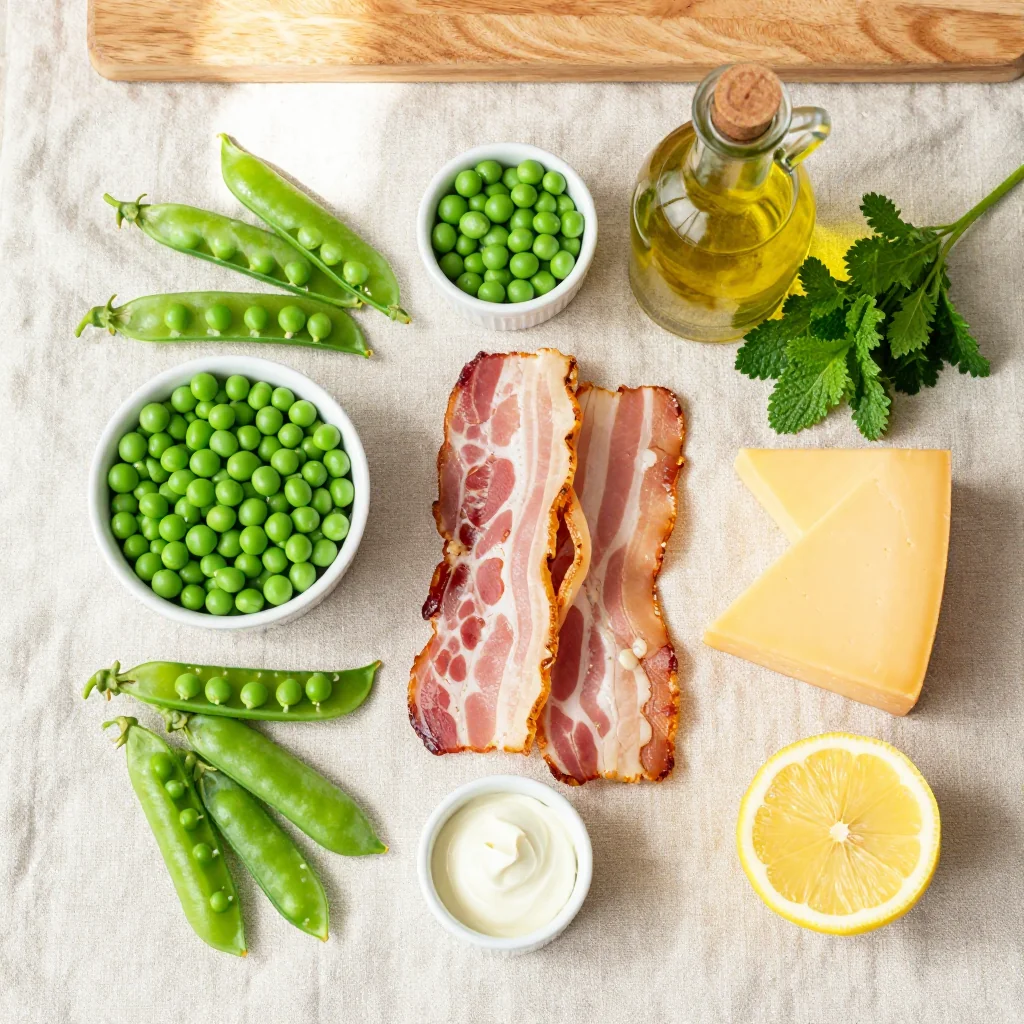
- 200 g fresh peas (or 1½ cups)
- 100 g arugula (about 2 cups, loosely packed)
- 50 g baby spinach
- 1 small red onion, thinly sliced
- 2 tbsp fresh mint leaves, chopped
- 1 tsp lemon zest
For the Bacon & Cheese:
- 150 g bacon, sliced into strips
- 100 g sharp cheddar cheese, grated
- 2 tbsp olive oil (for cooking bacon)
For the Dressing:
- 3 tbsp extra‑virgin olive oil
- 1 tbsp white wine vinegar
- 1 tsp Dijon mustard
- 1 tsp honey
- to taste salt
- to taste freshly ground black pepper
🔍 Focus on Key Ingredients
Fresh Peas
Fresh peas are the heart of this salad, offering a sweet, buttery flavor and a satisfying snap. Choose peas that are bright green, firm, and free of blemishes. If you’re using frozen peas, make sure they’re thawed and patted dry to avoid excess water in the salad.
Sharp Cheddar Cheese
Sharp cheddar adds a rich, tangy depth that balances the sweetness of the peas and the saltiness of the bacon. Grate it just before mixing to ensure it melts slightly into the warm bacon, creating a silky coating on each bite.
Smoked Bacon
The smoked bacon brings a smoky, savory crunch. Render it over medium heat until it’s crispy but not burnt, then let it drain on paper towels. The rendered fat can be used to add a subtle flavor boost to the dressing if desired.
🔄 Quick Substitutions
| If you don’t have... | Use instead... |
|---|---|
| Fresh peas | Frozen peas (thawed) |
| Sharp cheddar | Gruyère or aged Gouda |
| Bacon | Smoked turkey bacon or pancetta |
👨🍳 Step‑by‑Step Instructions
Follow these detailed steps to create a salad that looks as good as it tastes, with each component prepared perfectly.
📋 Phase 1: Preparation & Mise en Place
Gather and prep all ingredients before you start cooking.
Blanch the Peas
Bring a large pot of salted water to a rolling boil. Add the peas and cook for 2‑3 minutes until they turn a vivid emerald green. Immediately transfer them to a bowl of ice water to halt cooking and preserve their color. Drain and set aside.
Prepare the Greens and Herbs
Rinse arugula and baby spinach under cold water, spin dry, and gently pat with a clean kitchen towel. Roughly tear the leaves if they’re large. Chop the fresh mint leaves finely and zest one lemon, setting both aside for the dressing.
Slice the Onion
Peel the small red onion and slice it as thinly as possible using a sharp knife or a mandoline. Soak the slices in cold water for 5 minutes to mellow the sharpness, then drain and pat dry.
🔥 Phase 2: Cooking & Assembly
Cook the bacon, make the dressing, and bring everything together.
Render and Crisp the Bacon
Heat 2 tbsp olive oil in a large skillet over medium‑high heat. Add the bacon strips in a single layer; cook, turning occasionally, for 6‑8 minutes until they are golden and crisp. Transfer the bacon to a paper‑towel‑lined plate. Reserve a tablespoon of the rendered fat for the dressing if you like extra richness.
Whisk the Dressing
In a small bowl, combine 3 tbsp extra‑virgin olive oil, 1 tbsp white wine vinegar, 1 tsp Dijon mustard, 1 tsp honey, lemon zest, and a pinch of salt and pepper. Whisk vigorously until the mixture emulsifies into a glossy vinaigrette.
Combine the Salad
In a large mixing bowl, gently toss the blanched peas, arugula, spinach, sliced onion, and chopped mint. Drizzle the dressing over the greens and toss again until everything is lightly coated. Sprinkle the grated cheddar over the top, followed by the crisp bacon pieces.
✨ Phase 3: Finishing & Serving
Final checks and plating.
Check Seasoning
Taste a small spoonful and adjust salt, pepper, or a squeeze of fresh lemon juice if needed. The dressing should be bright, the bacon salty, and the peas sweet.
Plate the Salad
Divide the salad among four shallow bowls or onto a large platter. Garnish with an extra pinch of mint leaves and a light drizzle of olive oil for shine.
Serve Immediately
This salad is best served at room temperature, allowing the bacon’s warmth to melt the cheese slightly and the flavors to meld.
💡 Expert Tips & Tricks
🛒 Choosing the Best Ingredients
Look for peas that snap cleanly when bent; they should be bright green without any yellowing. For the bacon, thick‑cut smoked varieties provide a richer flavor and stay crisp longer. When selecting cheddar, opt for a cheese that’s aged at least 12 months; the sharper profile cuts through the sweetness of the peas and adds depth.
🔪 Preparation Techniques
Use a mandoline for uniformly thin onion slices; this reduces the pungency and ensures even texture. When chopping mint, a quick roll of the knife helps release the essential oils without bruising the leaves. Blanching peas for exactly 2‑3 minutes locks in their natural sweetness and prevents them from becoming mushy.
🌡️ Mastering the Cooking
Render bacon over medium‑high heat, not high, to allow the fat to melt slowly, producing an even crispness. If the bacon releases too much fat, drain it off before adding it to the salad to avoid a greasy finish. Keep the dressing temperature room‑cold; a warm vinaigrette can wilt the delicate greens.
🍽️ Presentation & Service
For a restaurant‑style look, arrange the salad on a wide, shallow platter, scattering the bacon strips artistically. Add a few whole pea pods and a sprig of mint for visual contrast. Pair the dish with a crisp white wine and a slice of crusty baguette to round out the experience.
🏆 Pro‑Chef Secrets
Professional chefs differentiate a good dish from a great one through precision, balance, and technique.
- 🎯 Control the Salt Balance: Salt the blanching water for peas and season the dressing separately. This layered salting ensures each component is seasoned without over‑salting the final salad.
- 🎯 Use a Cold‑Shocked Dressing: After whisking, place the dressing bowl over an ice bath for 30 seconds. The chilled vinaigrette clings better to the greens, preserving their crispness.
- 🎯 Render Bacon Fat for Flavor: Reserve a tablespoon of the rendered bacon fat and whisk it into the vinaigrette. This subtle infusion adds a smoky depth without overwhelming the palate.
- 🎯 Temperature Contrast: Serve the salad at room temperature. The warm bacon and slightly cooled greens create a comforting contrast that elevates the eating experience.
- 🎯 Micro‑Herb Finishing: Finish with a few torn micro‑mint leaves just before serving. Their delicate texture adds a fresh burst and a visual pop.
- 🎯 Plate with Geometry: Use a ring mold to shape the salad into a neat cylinder on the plate. This professional presentation makes the dish look polished and intentional.
“A salad should be a celebration of texture, color, and balance. When each element sings, the whole dish becomes unforgettable.” — Chef Thomas Keller
🔄 Variations & Adaptations
This salad is a versatile canvas. Below are several ways to tailor it to different tastes, dietary needs, and cuisines.
🥬 Vegetarian / Vegan Version
Swap the bacon for smoked tempeh strips and use a plant‑based cheddar alternative. Replace the honey in the dressing with agave syrup for a vegan‑friendly sweetener.
- 200 g smoked tempeh, sliced thin
- 100 g vegan cheddar, shredded
- 1 tsp agave syrup instead of honey
🌶️ Flavor Twists
Play with additional aromatics or spices to shift the flavor profile.
Spicy Kick:
Add ½ tsp crushed red pepper flakes to the dressing and finish with a drizzle of sriracha.
Mediterranean Touch:
Replace mint with fresh basil, add crumbled feta, and swap white wine vinegar for lemon juice.
Asian Inspiration:
Use sesame oil in the dressing, add 1 tsp soy sauce, and garnish with toasted sesame seeds and thinly sliced scallions.
⚠️ Dietary Adjustments
Gluten‑Free:
All ingredients are naturally gluten‑free; ensure the bacon is not processed with wheat‑based additives.
Lactose‑Free:
Replace cheddar with a lactose‑free cheese or a dairy‑free alternative such as aged plant‑based cheddar.
Low‑Calorie:
Reduce the bacon to 75 g, use reduced‑fat cheddar, and cut the olive oil in the dressing by half, supplementing with a splash of low‑fat yogurt for creaminess.
👶 Kid‑Friendly Version
Kids love the crunch but may shy away from strong flavors. Omit the mint, use mild cheddar, and crumble the bacon into smaller pieces. Serve with a side of apple slices for a sweet‑savory combo.
📦 Storage & Reheating
🧊 Storage
Refrigerator:
- Duration: 2 days
- Container: Airtight glass or plastic container
- Tip: Keep the dressing separate and add just before serving to maintain crispness.
Freezer:
- Duration: 1 month (best for cooked bacon and cheese only)
- Method: Portion the bacon and cheese in a freezer‑safe bag; freeze peas separately.
- Defrosting: Transfer to refrigerator overnight, then re‑heat bacon and combine with fresh greens.
💡 Avoid freezing the dressed salad; the greens will become soggy.
♨️ Reheating
🔥 Oven (Recommended):
- Preheat to 180 °C (350 °F).
- Cover the dish loosely with foil.
- Heat for 8‑10 minutes until bacon is crisp again.
- Remove foil, toss gently, and serve.
⚡ Microwave (Quick):
- Place a portion in a microwave‑safe bowl.
- Cover with a microwave‑safe lid.
- Heat on medium power for 45 seconds, stir, then repeat if needed.
🍳 Stovetop:
Re‑heat bacon in a dry skillet over medium heat for 2‑3 minutes, then fold into fresh greens and peas.
🍷 Perfect Pairings
🥗 Side Dishes
- Grilled Asparagus: Lightly seasoned with lemon and olive oil, it adds a smoky green contrast.
- Herbed Couscous: Fluffy couscous with parsley and a hint of lemon balances the richness of the bacon.
- Garlic‑Roasted Potatoes: Crispy potatoes provide a hearty, comforting complement.
🍷 Wine & Beverage Pairings
- Sauvignon Blanc: Its crisp acidity cuts through the bacon’s fat and highlights the peas.
- Chardonnay (unoaked): Offers a buttery mouthfeel that mirrors the cheddar.
- Non‑Alcoholic: Sparkling water with a splash of lime or a chilled apple‑cinnamon mocktail.
🍰 To Complete the Meal
Start with a light citrus‑infused gazpacho, follow with the pea salad, and finish with a delicate lemon tart or a raspberry panna cotta. The progression from fresh to rich to sweet creates a harmonious dining experience.
❓ Frequently Asked Questions
Q: Can I use frozen peas instead of fresh?
A: Absolutely. Thaw the peas, rinse them under cold water, and pat dry. Frozen peas retain most of their flavor and texture when blanched briefly, making them a convenient year‑round alternative.
Q: How do I prevent the bacon from getting soggy?
A: Render the bacon on medium‑high heat until it’s fully crisp, then place it on paper towels to absorb excess fat. Adding the bacon at the very end of assembly ensures it stays crunchy.
Q: Is it possible to make this salad dairy‑free?
A: Yes. Substitute the cheddar with a plant‑based cheese that melts well, such as a sharp vegan cheddar. The rest of the recipe is already dairy‑free.
Q: What if I don’t have mint?
A: Fresh basil or a handful of chopped parsley work nicely as alternatives. They provide a fresh herbal note without overwhelming the other flavors.
Q: Can I prepare the salad ahead of time?
A: You can prep the peas, greens, and bacon up to 24 hours in advance. Keep the dressing separate and combine just before serving to maintain texture.
Q: How do I adjust the recipe for more or fewer servings?
A: Use the portion adjuster on the recipe card. The script automatically recalculates ingredient quantities based on the number of servings you select.
🎉 Let’s Get Cooking!
This Spring Pea Salad with Bacon and Cheese captures the essence of the season—bright, fresh, and indulgent. The sweet peas, smoky bacon, and sharp cheddar create a harmonious blend that’s perfect for brunches, picnics, or a light dinner. By following the detailed steps, you’ll achieve a salad that looks as vibrant as it tastes, with textures that keep you intrigued from the first bite to the last.
Give it a try, snap a photo, and share your results in the comments below. Your feedback helps me refine recipes and inspire new creations. Don’t forget to rate the recipe and tag your photos with #SpringPeaBaconCheese on Instagram for a chance to be featured!
Have you tried this recipe?
Leave a comment and rating below! Share your photos on Instagram with #SpringPeaBaconCheese to be showcased.
Spring Pea Salad with Bacon and Cheese
A bright, crunchy spring salad with sweet peas, smoky bacon, and sharp cheddar.
📝 Ingredients
Salad Base
Bacon & Cheese
Dressing
👨🍳 Instructions
- 1
Blanch peas in boiling salted water for 2‑3 minutes, shock in ice water, then drain.
- 2
Rinse and dry arugula and spinach; set aside.
- 3
Slice red onion thinly and soak in cold water for 5 minutes.
- 4
Heat olive oil in a skillet, add bacon strips, and cook until crisp. Drain on paper towels.
- 5
Whisk together olive oil, vinegar, mustard, honey, lemon zest, salt, and pepper to form the dressing.
- 6
In a large bowl, combine peas, greens, onion, and mint; drizzle dressing and toss gently.
- 7
Fold in grated cheddar and crumble crispy bacon over the top.
- 8
Adjust seasoning if needed, then serve immediately.
- 9
If preparing ahead, keep dressing separate and combine just before serving.
- 10
Enjoy with your favorite side dish and a glass of chilled Sauvignon Blanc.
🥗 Nutrition (per serving)
*Values are estimates based on standard ingredient data.
📚 You Might Also Like
Lemon Herb Quinoa Salad
Roasted Asparagus with Parmesan
Garlic Lemon Shrimp Pasta


💬 Comments & Reviews
Leave a Comment
Comments will appear here once readers start sharing their thoughts.