Picture this: it’s 2 a.m., the kitchen lights are dim, and you’re staring at the fridge like a detective at a crime scene. The only thing that could salvage the night is a quick, comforting dessert that doesn’t require a full oven or a dozen ingredients. I was staring at a handful of flour, cocoa, and milk, and I thought, “Why not?” That single moment sparked the creation of a mug cake that would become my midnight lifesaver. The idea was simple—three ingredients, one mug, and a microwave. I dared myself to turn a basic pantry stash into a decadent treat that could be whipped up in minutes.
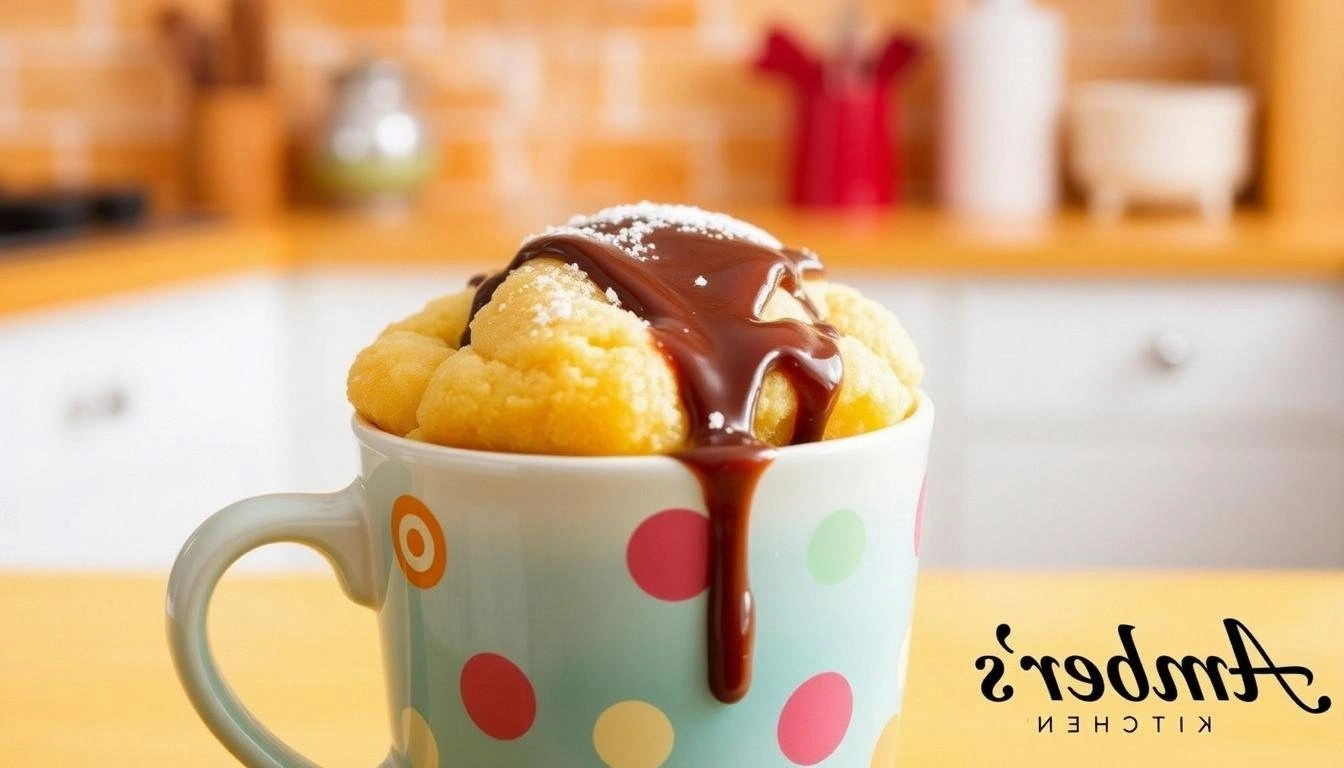
The first time I mixed the dry flour and cocoa together, the kitchen smelled faintly of chocolate—like a promise of sweetness that would soon bloom. I added the milk, and the batter thickened into a silky, glossy batter that glistened like a freshly polished spoon. When the microwave started, the air filled with the faint sizzle of batter expanding, and the aroma of caramelizing sugar began to wrap around the room. By the time the timer beeped, a golden dome was rising from the mug, its edges crisp and inviting. I couldn’t resist the urge to taste the first bite, and it was a revelation—rich, moist, and utterly satisfying.
If you’ve ever tried a mug cake that turned out dry, uneven, or just plain flat, you’ll feel a pang of sympathy. I’ve seen countless recipes that promise the moon but deliver a sad, lumpy mess. This version, however, is hands down the best you’ll ever make at home. It’s a single-serving masterpiece that balances texture and flavor perfectly, thanks to a carefully chosen ratio of flour, cocoa, and milk. I dare you to taste this and not go back for seconds—though I’ll be honest, I ate half the batch before anyone else got to try it. The result is a cake that feels like a hug in a mug, with a caramelized rim and a molten center that melts in your mouth.
What makes this recipe stand out? It’s the marriage of simplicity and indulgence, a dish that feels luxurious yet requires only a handful of pantry staples. The magic happens when the dry and wet ingredients combine, creating a batter that expands beautifully in the microwave. The result is a cake that’s both fluffy inside and slightly crisp on the edges—a texture contrast that feels like a culinary triumph. The best part? No need to preheat an oven, no fancy equipment, and no time to waste. Let me walk you through every single step—by the end, you’ll wonder how you ever made it any other way.
What Makes This Version Stand Out
Here’s why this mug cake is the ultimate go-to for quick, satisfying treats:
- Flavor: The cocoa provides a deep chocolatey punch that pairs perfectly with the mild sweetness of the batter.
- Texture: A moist, airy interior with a crisp, caramelized rim that feels like a crunchy crust on a soft cake.
- Simplicity: Only three ingredients—no measuring cups, no spoons, no mixing bowls.
- Speed: Ready in under two minutes from start to finish.
- Versatility: Works as a dessert, snack, or even a quick breakfast if you add a drizzle of peanut butter.
- Scalability: Easy to double or halve for individual or group servings.
Alright, let’s break down exactly what goes into this masterpiece…
Inside the Ingredient List
The Flour
The foundation of any cake, flour gives structure to the batter. In this recipe, all-purpose flour is the go-to choice because it balances density and lightness. If you want a slightly lighter crumb, you can switch to cake flour, but it will change the batter’s consistency. The flour also absorbs the liquid, preventing the cake from becoming too runny.
Using the right amount of flour is crucial—too much makes the cake dry, too little makes it soggy. The 1 cup measurement is calibrated to create a batter that expands just enough in the microwave. If you accidentally add extra flour, you can add a splash of milk to compensate, but the texture will shift slightly. For best results, sift the flour to avoid lumps and ensure an even distribution.
When selecting flour, look for a brand with a consistent particle size; this helps the batter rise evenly. Avoid using self‑raising flour, as it contains baking powder that can cause over‑blooming. If you’re in a hurry, you can use a pre‑sifted blend, but the difference is subtle. The key is to keep the flour fresh and free of moisture, as damp flour can affect the batter’s rise.
The Cocoa
Cocoa is the star that brings depth and richness to the mug cake. I use unsweetened cocoa powder to keep the sweetness balanced, allowing the milk to mellow the bitterness. If you prefer a sweeter cake, you can add a teaspoon of sugar, but that changes the flavor profile.
Unsweetened cocoa also provides antioxidants, making the cake a bit healthier than a sugar‑laden version. The cocoa’s fine texture integrates smoothly with the flour, creating a uniform batter. If you’re using a dark chocolate alternative, be sure to whisk it well to avoid clumps.
Cocoa can be a bit tricky—if you use a low‑quality brand, you might notice a chalky aftertaste. To avoid this, choose a reputable brand that’s known for its smooth flavor. A pinch of sea salt can enhance the cocoa’s flavor, but this recipe keeps it simple with just the three core ingredients.
The Milk
Milk is the liquid that hydrates the flour and cocoa, turning the dry mix into a silky batter. Whole milk provides a richer, creamier texture, but skim or plant‑based milks work just as well. The key is to use a temperature that’s close to room temperature, as cold milk can cause the batter to seize.
The milk also helps the cocoa dissolve completely, preventing any gritty bits in the final cake. If you prefer a dairy‑free version, oat milk or almond milk can be used, but the taste will slightly shift. A splash of vanilla extract can add a subtle aroma, but this recipe keeps it minimal.
When measuring milk, use a clear measuring cup so you can see the exact amount. If the batter looks too thick, add a tablespoon of milk to loosen it. The right consistency is thick enough to hold its shape but thin enough to expand in the microwave.
The Final Flourish
The final flourish in this recipe is the microwave itself—an appliance that turns the batter into a cake in minutes. The heat causes the batter to rise, creating a fluffy interior and a caramelized crust. The microwave’s uneven heat can sometimes lead to uneven baking, but this recipe’s simple batter composition mitigates that risk.
After cooking, let the cake rest for a minute or two—this allows the steam to settle and the center to finish setting. A quick dip in the microwave can also give the cake a slightly glossy finish. If you want to add extra flair, top the finished cake with a dusting of powdered sugar or a drizzle of chocolate sauce.
The final flourish is about presentation—serve the mug cake straight from the mug for an authentic experience, or transfer it to a plate for a more polished look. A small garnish, like a mint leaf or a dusting of cocoa powder, can elevate the appearance. Remember, the goal is to keep it simple yet satisfying.
Everything’s prepped? Good. Let’s get into the real action…
The Method — Step by Step
- Grab a microwave‑safe mug—any size will do, but a 12-ounce mug works best for volume and heat distribution. The mug should be ceramic or glass; avoid plastic as it can melt or leach chemicals. Clean it thoroughly to prevent any residue from affecting the batter’s flavor.
- Measure out one cup of all‑purpose flour and pour it into the mug. Use a spoon to tap the sides, ensuring no lumps remain. A level surface will help the batter rise evenly during microwaving.
- Add one cup of unsweetened cocoa powder to the flour, then stir until the mixture is a uniform beige color. This step is crucial because it ensures the cocoa is evenly distributed, preventing pockets of chocolatey bitterness.
- Pour in one cup of milk, then stir with a silicone spatula until the batter is smooth and glossy. If you notice any lumps, keep whisking until they dissolve. The batter should be thick enough to hold its shape but not so thick that it clumps.
- Place the mug in the microwave and cook on high for 90 seconds. The batter will rise dramatically, creating a dome that’s almost too beautiful to touch. Watch the edges—when they start to pull away from the mug, the cake is nearing completion.
- Carefully remove the mug from the microwave—use oven mitts if it’s hot. The cake will be hot, so let it rest for 30 seconds to a minute. This brief rest allows the steam to settle, ensuring a moist center.
- Optional: Sprinkle a pinch of sea salt or a drizzle of melted chocolate on top for added flavor. This step is purely decorative, but it enhances the taste profile. Serve immediately for the best experience.
That’s it— you did it. But hold on, I’ve got a few more tricks that'll take this to another level.
Insider Tricks for Flawless Results
The Temperature Rule Nobody Follows
Microwave power varies widely—what works on a 700-watt microwave might be overkill on a 1200-watt one. I recommend starting with 90 seconds and adjusting by 10-second increments. If the cake still looks undercooked, add a few more seconds; if it’s overdone, cut back. This subtle tweak ensures a consistent rise every time.
Some microwaves have a “quick start” mode that heats unevenly—avoid it for delicate batter like this. Instead, use the standard “high” setting. If you’re unsure of your microwave’s wattage, run a 1-cup water test: it should take about 1 minute and 30 seconds to boil. Adjust your cake’s timing accordingly.
Why Your Nose Knows Best
Your nose can detect when the cake is perfectly cooked—look for a sweet, chocolate aroma that’s not overpowering. If you smell burnt sugar, stop the microwave immediately. The aroma is a reliable indicator of doneness, often better than a timer.
I’ve had friends who rely solely on the timer and end up with a rubbery cake. Trust your senses; they’re more precise than any digital clock. A quick sniff can save you from a culinary disaster.
The 5-Minute Rest That Changes Everything
After microwaving, let the cake rest for a full 5 minutes before eating. This pause allows the steam to distribute evenly, resulting in a tender interior. Skipping this step can leave the cake too dense or unevenly cooked.
During the rest, the cake’s outer layer will slightly firm up, creating a pleasant contrast with the soft center. If you’re in a hurry, you can skip it, but the flavor and texture will suffer.
Use a Spoon to Stir, Not a Fork
Stirring with a fork can break the batter’s structure, causing a denser cake. A silicone spatula or a spoon keeps the batter smooth and airy. The utensil’s flexibility also allows you to reach the bottom of the mug more easily.
I’ve seen many people use a fork out of habit, only to end up with a cake that feels like a chocolate cookie. Stick to a spoon or spatula for the best results.
Don’t Overfill the Mug
Overfilling can cause the batter to spill over the mug’s rim, making a mess and ruining the texture. Keep the batter level at about 3/4 of the mug’s height. This gives the cake room to rise without spilling.
If you accidentally overfill, simply let the excess bubble out before microwaving. The batter will still rise, but you’ll avoid a sticky cleanup.
Microwave Power Variance
Microwave ovens can have hotspots that cause uneven baking. To mitigate this, rotate the mug halfway through the cooking time if your microwave has a turntable. This ensures even heat distribution.
If your microwave doesn’t turn, you can pause the timer and manually rotate the mug. This small adjustment can make a big difference in the cake’s texture.
Creative Twists and Variations
This recipe is a playground. Here are some of my favorite ways to switch things up:
Vanilla Bean Splash
Add a teaspoon of vanilla extract to the batter for a subtle floral note that balances the chocolate. The vanilla also adds a hint of sweetness without extra sugar.
If you’re feeling adventurous, scrape a vanilla bean seed into the batter for a richer flavor. The result is a cake that feels like a dessert and a coffee shop treat.
Nutty Crunch
Stir in a handful of chopped walnuts or pecans before microwaving. The nuts add a satisfying crunch and a nutty aroma that pairs well with chocolate.
For a lighter version, use pistachios or almonds. The nuts also provide protein, making the cake a more balanced snack.
Berry Burst
Fold in fresh blueberries or raspberries into the batter. The berries burst in the heat, creating a sweet, juicy burst in every bite.
If fresh berries are out of season, frozen berries work just as well—just thaw them slightly to prevent excess liquid.
Minty Chocolate
Add a few drops of peppermint extract to the batter for a refreshing twist. The mint enhances the chocolate flavor and gives the cake a cool aftertaste.
Serve with a dollop of whipped cream for a classic chocolate‑mint dessert. The combination is reminiscent of a chocolate mint brownie.
Spiced Surprise
Stir in a pinch of cinnamon or nutmeg for a warm, aromatic flavor. The spices add depth and complexity to the simple batter.
You can also add a dash of cayenne pepper for a subtle kick—this is a secret trick for those who love a little heat.
Cheese‑Infused Delight
Mix in a spoonful of cream cheese or mascarpone before microwaving. The cheese adds creaminess and a slightly tangy flavor that contrasts with the chocolate.
The result is a silky, indulgent cake that feels like a dessert and a comfort food rolled into one.
Storing and Bringing It Back to Life
Fridge Storage
After the cake has cooled completely, cover it with plastic wrap and store it in the refrigerator for up to 2 days. The cake will stay moist and flavorful, but be sure to keep it sealed to avoid drying out.
When you’re ready to eat it, let it sit at room temperature for 10 minutes before microwaving again for 15-20 seconds to revive the warmth.
Freezer Friendly
Wrap the cooled cake tightly in foil, then place it in a freezer bag. It can stay in the freezer for up to a week without losing quality. The freezing process preserves the cake’s texture and flavor.
To reheat, remove the cake from the freezer, let it thaw at room temperature for 10 minutes, then microwave for 20-25 seconds. The cake will regain its softness.
Best Reheating Method
The most effective way to reheat a mug cake is to add a splash of milk or water to the mug before microwaving. The liquid creates steam, which keeps the cake moist and prevents it from drying out.
Microwave on high for 15-20 seconds, then let it rest for 30 seconds. The result is a cake that tastes as fresh as when you first made it.
With these storage tips, you can enjoy a fresh mug cake anytime—whether it’s a late‑night craving or a quick breakfast on the go.
Now that you’ve mastered the basics, it’s time to experiment with flavors, textures, and presentation. The beauty of this recipe is its flexibility—you can tweak it to suit your mood, your pantry, or your taste buds. The possibilities are endless.
Remember, the secret to a great mug cake lies in the simplicity of the ingredients and the precision of the timing. Keep the batter smooth, avoid overcooking, and let your senses guide you. With practice, you’ll be whipping up these mini masterpieces in no time.
So go ahead, gather your ingredients, and let the microwave work its magic. Your taste buds will thank you for the instant gratification and the comforting warmth of a homemade chocolate mug cake.
Enjoy the process, savor the results, and share the joy with friends and family. After all, food is meant to bring people together—one mug at a time.