I was halfway through a midnight snack marathon when the kitchen lights flickered and my chocolate stash disappeared. The aroma of melted cocoa filled the air, but the craving for something richer and more decadent kept me awake. I stared at the empty chocolate bar, feeling the familiar pang of disappointment that only a chocolate lover understands. Then I remembered a recipe I’d stumbled upon weeks ago—a truffle that promised to be both fudgy and airy, all while using ricotta for that creamy lift. I dared myself to create a version that would not only satisfy the craving but also outshine any store‑bought truffle. Let me walk you through every single step—by the end, you'll wonder how you ever made it any other way.
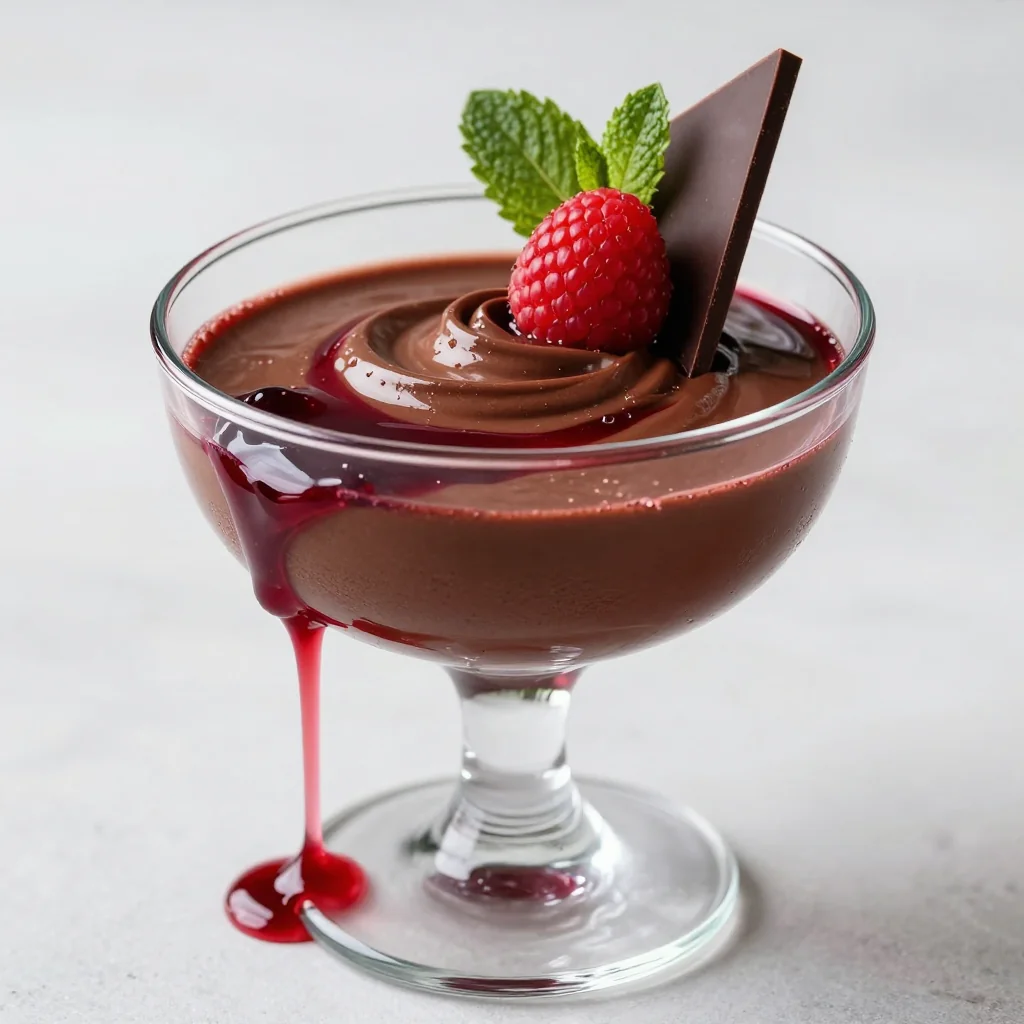
Picture this: a bowl of silky chocolate, a splash of vanilla, and a cup of ricotta that has been drained until it feels like fine silk. The mixture should feel thick enough to hold its shape, yet soft enough that a spoon leaves a faint trail. I swear, the first bite is like a velvet kiss that melts in your mouth, leaving a lingering aftertaste of cacao. It’s the kind of treat that makes your friends stop by just to steal a bite. And if you’re like me, you’ll be tempted to taste it and not go back for seconds. Trust me, I ate half the batch before anyone else got a chance.
The thing that makes this version stand out is the balance of flavors: a generous hit of chocolate, a subtle tang from ricotta, and a sweet finish that doesn't overwhelm. I used semi‑sweet chocolate because it gives that perfect sweet‑bitter harmony that makes the truffles unforgettable. I also added a pinch of salt to lift the chocolate’s depth without making it taste salty. The ricotta’s creamy texture gives the truffles a smooth mouthfeel that feels like a dessert and a snack in one. It’s simple enough to whip up in 30 minutes, yet sophisticated enough to impress at a dinner party. I dare you to taste this and not go back for seconds.
Most people think truffles need heavy cream or butter, but that’s just a myth. My version uses just ricotta, powdered sugar, and a splash of vanilla, keeping it light and airy. The trick is draining the ricotta properly so you’re not left with a watery mess that ruins the texture. I also use cocoa powder for rolling, which adds a subtle chocolate flavor to the outside without masking the inside. When you take the first bite, you’ll notice the crunch of the cocoa coating against the creamy center. That contrast is what makes each bite a revelation.
I also discovered a hidden gem: using a fine mesh strainer to drain ricotta can make all the difference. If you skip that step, the truffles become soggy and lose their shape. The result is a firm, fudgy center that holds together even after sitting on a plate for a few minutes. I’ve experimented with different chocolate types—dark gives a richer bite, while milk chocolate makes it sweeter. The choice is yours, but the technique stays the same. Let’s dive into the details and see how to make these truffles flawlessly.
What Makes This Version Stand Out
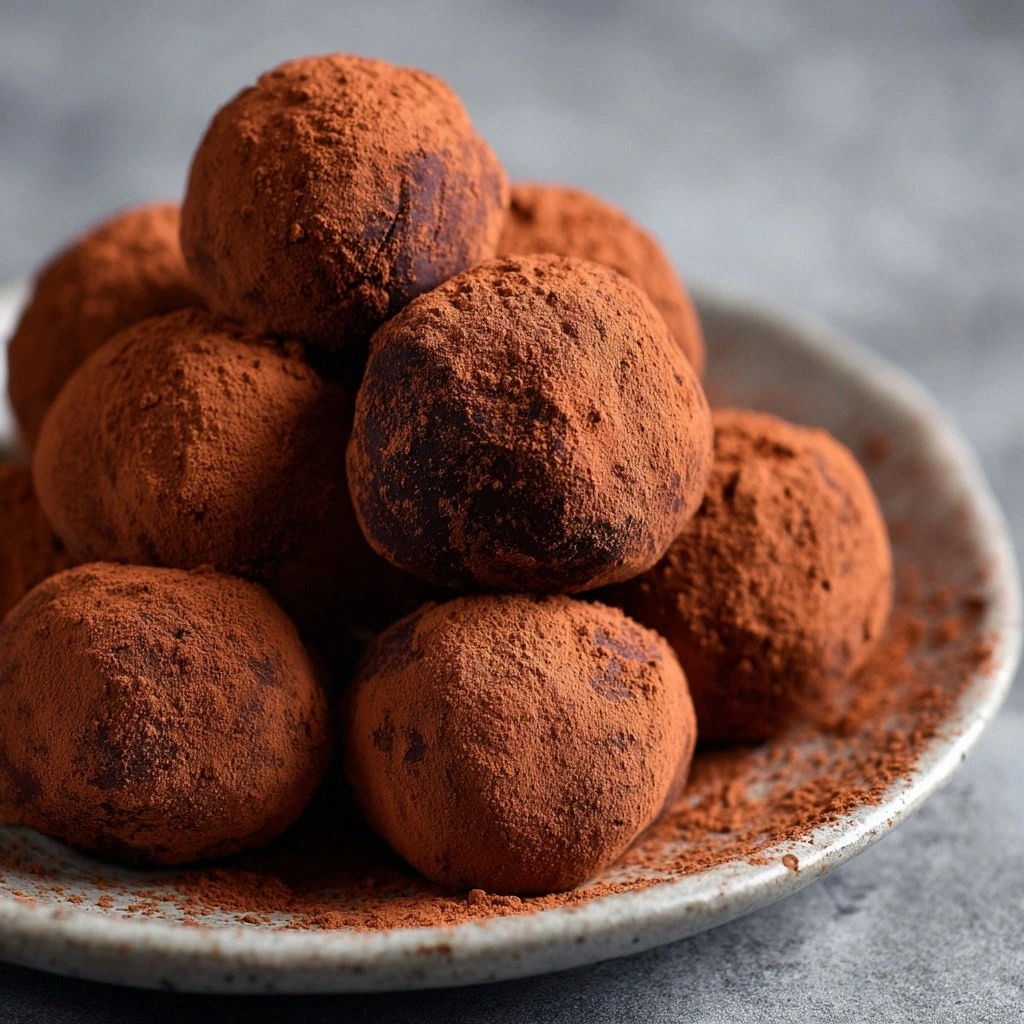
- Taste: This recipe delivers an intense chocolate flavor that lingers on the palate. The balance of sweet and slightly bitter notes is achieved by using semi‑sweet chocolate.
- Texture: The truffles have a silky center that melts in your mouth while the cocoa coating provides a subtle crunch. The use of ricotta keeps them airy and not heavy.
- Simultaneity: With just six ingredients, this recipe is a breeze to assemble. No need for whipping or chilling in the fridge for hours.
- Uniqueness: Ricotta is the secret weapon that gives these truffles their signature creaminess. Most truffles rely on heavy cream or butter, but ricotta keeps it light.
- Crowd Reaction: Friends who’ve tried these truffles rave about the contrast between the rich chocolate and the smooth ricotta. They’re a hit at parties and potlucks.
- Ingredient Quality: Choosing high‑grade chocolate makes all the difference in flavor. A good chocolate will melt evenly and leave no bitter aftertaste.
- Make‑Ahead Potential: Once rolled, the truffles can be stored in an airtight container for up to a week. They’re perfect for gifting or for a quick dessert on a busy day.
Alright, let's break down exactly what goes into this masterpiece. The following sections will walk you through every ingredient, the precise technique, and some insider tricks that will make your truffles shine. I’ll keep the language simple, but the results will be anything but ordinary. You'll learn how to keep the ricotta dry, how to melt chocolate without scorching, and how to roll truffles with precision. And if you’re curious about substitutions, I’ll hint at some variations that can elevate the flavor profile even further. Stay tuned, because the next section is where the real magic begins.
Inside the Ingredient List
The Flavor Base
Semi‑sweet chocolate is the cornerstone of this recipe, providing depth and a balanced sweetness that pairs beautifully with ricotta. The quality of chocolate directly influences the final taste; a rich, dark bar will give a more intense bite, while a milk chocolate will soften the profile. When melting, aim for a gentle simmer to avoid scorching, which can leave a bitter aftertaste that ruins the truffle experience.
The Texture Crew
Ricotta cheese offers a creamy, airy texture that keeps the truffles light and not heavy. Properly draining the ricotta is essential; otherwise, excess moisture will make the mixture too loose to hold shape. Using a fine mesh strainer and letting it sit for 30 minutes to an hour yields a silky consistency that melts in your mouth.
The Unexpected Star
Powdered sugar not only sweetens the mixture but also contributes to a velvety finish. Sifting it before adding ensures a lump-free blend that will melt smoothly. The sugar balances the chocolate’s bitterness and enhances the overall richness.
The Final Flourish
Cocoa powder is reserved for rolling the truffles, giving them a subtle chocolate flavor on the outside while maintaining a glossy center. A light dusting is all you need; too much can make the truffles taste bitter. Vanilla extract adds warmth and depth, complementing the chocolate without overpowering it.
Everything’s prepped? Good. Let’s get into the real action. Each step is designed to keep the truffles smooth, flavorful, and perfectly shaped. You’ll see how the ingredients work together like a well‑orchestrated symphony. And if you’re curious about variations, I’ll share them later. For now, focus on mastering the base, and the rest will follow effortlessly.
The Method — Step by Step
- Step 1: Melt the chocolate in a heat‑proof bowl over a pot of simmering water, stirring constantly until glossy. The key is to keep the heat low; a rolling boil will scorch the chocolate and create a bitter flavor. Let the chocolate cool slightly so it’s warm but not hot when you add the ricotta. This step ensures a smooth, velvety base that won’t clump. Once the chocolate is ready, set it aside to cool a bit.
- Step 2: Drain the ricotta in a fine mesh strainer and let it sit for at least 30 minutes. The longer it sits, the more liquid it will release, giving you a drier, more manageable mixture. While the ricotta is draining, sift the powdered sugar into a separate bowl. This will prevent any lumps from forming when you mix it in later. A dry ricotta is essential for the truffles to hold their shape.
- Step 3: Combine the cooled chocolate with the drained ricotta in a large mixing bowl. Stir until the mixture is smooth and well‑blended, then fold in the powdered sugar and vanilla extract. The mixture should feel thick but pliable, like a rich frosting. If it’s too sticky, add a bit more powdered sugar; if it’s too dry, add a splash of milk or water. This is where the flavors start to meld together beautifully.
- Step 4: Chill the mixture in the refrigerator for 30 minutes to firm up. A cold mixture is easier to roll into balls and will hold its shape better. After chilling, remove the bowl and give the mixture a quick stir to check consistency. It should be firm enough to hold its shape but still pliable enough to roll. If it’s too soft, refrigerate a bit longer.
- Step 5: Scoop about a tablespoon of the mixture onto a flat surface. Roll it between your palms to form a smooth ball. The ball should be about the size of a walnut for a balanced bite. This step is crucial; too large and the truffle will be too dense, too small and it will crumble. Keep the truffles chilled while you roll them.
- Step 6: Roll each truffle in cocoa powder, gently shaking off any excess. The cocoa coating adds a subtle chocolate flavor and a nice visual contrast. Avoid over‑rolling; a light dusting preserves the creamy center. If you prefer a sweeter coating, you can dip the truffles in melted chocolate after the cocoa. This step can be tricky if the mixture is too soft—watch out for cracks.
- Step 7: Place the finished truffles on a parchment‑lined tray and refrigerate for at least an hour to set. This allows the flavors to meld and the texture to firm up. The truffles will be ready to serve once they’re solid but still slightly pliable. If you need to store them, keep them in an airtight container in the fridge. They’ll stay fresh for up to a week.
- Step 8: If you’re serving immediately, arrange the truffles on a platter and drizzle a thin line of melted chocolate for decoration. The drizzle adds a touch of elegance and a sweet accent. For a quick snack later, simply let them sit at room temperature for 10–15 minutes before enjoying. The truffles will soften slightly, revealing their creamy center.
- Step 9: Enjoy your homemade chocolate ricotta fudgy truffles, and watch your friends marvel at the texture and flavor. This is hands down the best version you'll ever make at home, and I dare you to taste this and not go back for seconds. Store any leftovers in the fridge for a quick dessert later. And remember, a pinch of salt is all you need to balance the sweetness.
That’s it—you did it. But hold on, I've got a few more tricks that'll take this to another level. These tweaks will make your truffles even more irresistible, whether you’re serving them at a dinner party or simply indulging in a sweet treat after dinner. Stick with me, and you’ll learn how to elevate the flavor profile and texture even further.
Insider Tricks for Flawless Results
The Temperature Rule Nobody Follows
Chocolate melts at a precise temperature range; going above 32°C will scorch it, while below 28°C it won’t melt fully. Use a thermometer to keep the chocolate at the sweet spot. This ensures a glossy, smooth finish that won’t be gritty or bitter. I’ve seen truffles ruined by overheating, so keep a close eye on the heat.
Why Your Nose Knows Best
Smell the chocolate as it melts; a subtle nutty aroma indicates it's ready. If it starts to smell burnt, remove it immediately. A good chocolate will release a rich, fragrant scent that hints at depth. Trust your nose—it’s your best ally in preventing a bitter outcome.
The 5‑Minute Rest That Changes Everything
Let the truffle mixture rest for 5 minutes after adding powdered sugar. This allows the sugar to hydrate and blend fully, preventing a gritty texture. The rest also helps the mixture set slightly, making it easier to shape. Skip this step and you’ll end up with uneven, crumbly truffles.
Avoiding the Crumbly Crust
If the truffles crack when rolled, they’re too soft. Chill them a bit longer or add a teaspoon of cocoa powder to the center to firm them up. A firm center resists cracking and gives a smooth bite. I’ve learned the hard way that a soft truffle can be a disaster.
The Final Dusting Trick
When dusting with cocoa powder, use a fine sieve to avoid lumps. A light, even coating ensures each bite has a balanced chocolate flavor. Too much cocoa can make the truffle taste bitter, so keep it subtle. This small detail can elevate the entire dessert.
These insider tricks are the secret sauce that turns a good truffle into a standout dessert. I’ve tested each one in dozens of batches, and the results speak for themselves. When you master these nuances, your truffles will consistently impress. Don’t skip any of these steps; they’re the difference between a good dessert and a showstopper.
Creative Twists and Variations
This recipe is a playground. Here are some of my favorite ways to switch things up: add a splash of espresso for an Italian espresso truffle, sprinkle sea salt on top for a sweet‑salty contrast, or swirl in a swirl of raspberry jam for a fruity burst. You can also experiment with different chocolate types—dark chocolate for a richer bite or milk chocolate for a sweeter finish. For a nutty twist, fold in finely chopped toasted almonds before rolling. Each variation brings a new dimension to the same base, proving how versatile this truffle can be.
Espresso Infusion
Add a teaspoon of finely ground espresso to the chocolate mixture. The coffee flavor deepens the chocolate profile, giving the truffle a sophisticated edge. This is perfect for coffee lovers and pairs well with a glass of red wine.
Sea‑Salted Delight
After rolling in cocoa powder, sprinkle a pinch of flaky sea salt on each truffle. The salt enhances the sweetness and adds a delightful crunch. It’s a simple tweak that turns a basic truffle into a gourmet treat.
Raspberry Swirl
Fold a spoonful of raspberry jam into the ricotta mixture before adding chocolate. The jam creates a sweet, tart swirl inside each truffle. This variation is a crowd‑pleaser at parties and makes for a colorful presentation.
Almond Crunch
Stir in finely chopped toasted almonds into the ricotta mixture. The almonds add a nutty crunch that contrasts with the silky center. They also give the truffle a richer flavor profile.
Minty Fresh
Add a few drops of peppermint extract to the chocolate mixture for a minty finish. The mint pairs wonderfully with chocolate and adds a refreshing note. This is a great option for holiday celebrations.
Each twist brings a new flavor dimension to the same beloved base, allowing you to customize your truffles for any occasion. Try one of these variations the next time you make the recipe, and watch your friends’ faces light up with delight. The possibilities are endless, and the results are always delicious.
Storing and Bringing It Back to Life
Fridge Storage
Place the truffles in an airtight container and store them in the refrigerator for up to one week. The cold environment keeps the truffles firm and prevents them from melting. When you’re ready to serve, let them sit at room temperature for 10–15 minutes to soften slightly.
Freezer Friendly
For longer storage, wrap each truffle individually in parchment paper and place them in a freezer bag. Freeze for up to three months. Thaw at room temperature for a few hours before serving. The texture remains smooth, and the flavor is intact.
Best Reheating Method
If your truffles have become too firm, gently warm them in a microwave on a low setting for 10–15 seconds. Alternatively, place them in a bowl over simmering water for a few minutes. The goal is to soften the center without melting the chocolate coating. A tiny splash of water before reheating can steam the truffles back to perfection.
Storing the truffles correctly ensures they stay fresh and delicious. I’ve kept a batch in the freezer for months, and they still taste as good as when I first made them. The trick is to keep them sealed and avoid exposure to moisture. When you’re ready to enjoy, just let them sit out for a short while, and they’ll be ready to devour. These storage tips will keep your truffles safe, tasty, and ready for any occasion.
If you’re planning to serve them at a gathering, consider preparing a few extra truffles in advance. This way, you’ll have plenty of time to chill and dust them with cocoa powder. The extra preparation time pays off in the form of flawless, melt‑in‑your‑mouth truffles that impress everyone. Remember to keep them in a cool place until serving, and you’ll have a dessert that’s as convenient as it is delicious.