I was standing in a kitchen that smelled like burnt toast, a failed attempt at a simple chocolate cake that had turned into a blackened disaster. My friends had dared me to create the most terrifyingly delicious Halloween treat, and I had to deliver. The moment the oven door opened, a wave of rich chocolate and subtle caramel hit my nose, and I knew I was onto something. The sight of the dark, glossy batter, the faint hiss of oil mixing with water, and the promise of gummy worms lurking in the shadows made my heart race. I was about to turn a kitchen catastrophe into a culinary masterpiece, and I can’t wait to walk you through every single step.
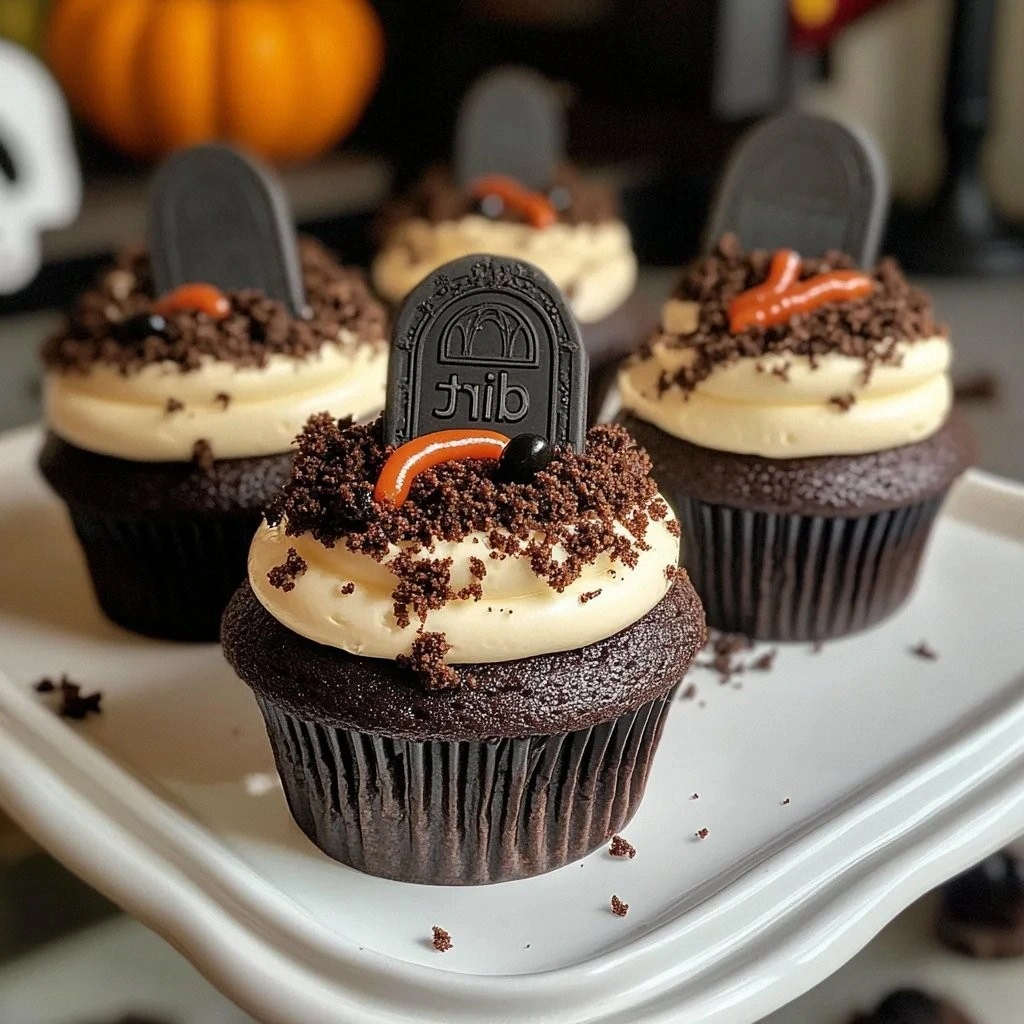
Picture the moment you pull these cupcakes out of the oven: the kitchen fills with a deep, chocolatey aroma that feels like a midnight forest after a rainstorm. The batter, silky and thick, glistens under the oven lights, promising a moist interior that will melt in your mouth. When you slide a cupcake onto a plate, the crust cracks just enough to reveal a soft, airy center, and the frosting on top looks like a dark, glossy river. The gummy worms, bright against the dark “dirt,” add a playful, almost mischievous touch that will make even the most serious Halloween decor look tame. It’s a sensory experience that turns a simple dessert into a storytelling moment.
What makes this version stand out is not just the ingredients; it’s the way each element is orchestrated to create a narrative of darkness and delight. The chocolate cake mix gives depth, the crushed cookies mimic earth, and the gummy worms provide a pop of color and texture. I’ve refined the ratios to ensure the cupcakes stay moist while the frosting remains stable and glossy. I’ve also introduced a subtle twist: a splash of espresso powder that intensifies the chocolate flavor without making it bitter. This recipe is a testament to how a few intentional tweaks can transform a standard dessert into a Halloween icon.
I dare you to taste this and not go back for seconds. I’ll be honest — I ate half the batch before anyone else got to try it. The first bite is an explosion of chocolate, a hint of espresso, and a subtle crunch from the cookie “dirt.” The gummy worms add a chewy contrast that lingers on your tongue. If you’ve ever struggled with cupcakes that dry out, you’re not alone — and I’ve got the fix. The secret is in the balance of wet and dry ingredients, the timing of the baking, and the precise cooling before frosting. Stay with me here — this is worth it.
What Makes This Version Stand Out
- Flavor Depth: The addition of espresso powder amplifies the chocolate, giving each bite a rich, almost velvety undertone that lingers long after you finish.
- Texture Contrast: The crushed chocolate cookies create a gritty “dirt” surface while the gummy worms add a chewy surprise that keeps the palate engaged.
- Visual Appeal: The dark frosting and bright gummy worms create a striking contrast, making each cupcake a piece of edible art.
- Ease of Prep: Using a boxed cake mix eliminates the need for measuring flour and sugar, allowing you to focus on the fun decoration.
- Make‑Ahead Friendly: The cupcakes can be baked and cooled ahead of time, then frosted and decorated just before serving.
- Kid‑Friendly Fun: The gummy worms and cookie “dirt” transform a regular cupcake into a playful, spooky treat that kids love.
- Scalable: The recipe scales cleanly, so you can make a small batch for a family gathering or a large batch for a Halloween party.
- Budget Conscious: The ingredients are pantry staples, making this a cost‑effective option for holiday baking.
Alright, let’s break down exactly what goes into this masterpiece. Before we dive into the ingredients, here’s a quick kitchen hack that will save you time and prevent a common mishap.
Inside the Ingredient List
The Flavor Base
Chocolate cake mix is the backbone of these cupcakes, delivering a robust chocolate flavor that pairs perfectly with the espresso and frosting. It also contains leavening agents that help the cupcakes rise evenly. Skipping the mix would mean a more complicated batter and a less consistent texture. If you’re adventurous, you can replace it with homemade cake batter, but the boxed version guarantees a reliable result.
The Texture Crew
Large eggs bind the batter and provide structure, ensuring each cupcake holds its shape. Water adds moisture; swapping it with milk will give a richer, creamier bite. Vegetable oil keeps the cupcakes tender and prevents them from drying out. If you prefer a tropical twist, melted coconut oil works beautifully, adding a subtle coconut hint that complements the chocolate.
The Unexpected Star
Chocolate frosting is the crowning glory that seals the whole experience. It should be smooth, glossy, and slightly thick to hold the gummy worms in place. Homemade frosting can be whipped to a silky consistency, but store-bought versions are convenient and just as effective. The key is to chill the frosting before applying to keep it from melting under the heat of the freshly baked cupcakes.
The Final Flourish
Crushed chocolate cookies create the “dirt” effect on top, adding a gritty texture that mimics a graveyard. Oreos are a classic choice, but you can also use chocolate sandwich cookies or chocolate wafers. Gummy worms are the playful, spooky element that kids adore. For a more sophisticated look, consider adding edible tombstone toppers or ghost-shaped sugar decorations. These edible accents transform the cupcakes from simple desserts into themed masterpieces.
Everything’s prepped? Good. Let’s get into the real action. Before we start, remember to preheat your oven to 350°F (175°C) and line a muffin tin with paper liners. The baking temperature is crucial for achieving a moist interior and a lightly crisp exterior.
The Method — Step by Step
- In a large bowl, combine the chocolate cake mix, a splash of espresso powder, and a pinch of sea salt. Whisk until the dry ingredients are fully incorporated. This step ensures the espresso is evenly distributed, preventing uneven flavor pockets.
- Add the water and vegetable oil to the dry mixture. Stir until the batter is smooth but still slightly thick. The oil is key for moisture; if the batter feels too dry, add a tablespoon more of water.
- Crack the large eggs into a separate bowl, beat lightly, then fold them into the batter. This introduces air into the mix, creating a light, airy crumb that contrasts with the dense frosting.
- Fill each paper liner about two-thirds full with batter. The cupcakes should rise but not overflow. This ensures a uniform rise and prevents a domed top.
- Bake for 18–20 minutes, or until a toothpick inserted into the center comes out clean. The cupcakes should have a slightly golden top and a moist interior. Keep an eye on the edges; they should pull away from the paper but not brown.
- Let the cupcakes cool in the tin for 5 minutes, then transfer them to a wire rack to cool completely. Cooling is essential before frosting to prevent the frosting from melting.
- While the cupcakes are cooling, chill your chocolate frosting in the refrigerator for at least 30 minutes. This step ensures the frosting stays firm enough to hold the gummy worms.
- Using a piping bag or a plastic bag with a corner snipped, apply a generous layer of frosting over each cupcake. The frosting should cover the top and the sides, forming a dark “dirt” layer.
- Press crushed chocolate cookies into the frosting, ensuring they’re embedded but not pressed too hard. The cookies should be slightly loose, giving a realistic dirt texture.
- Arrange gummy worms on top of the cookie “dirt,” spacing them evenly. Add any edible tombstone or ghost toppers as desired. This final touch turns the cupcakes into a spooky tableau.
That’s it — you did it. But hold on, I’ve got a few more tricks that will take this to another level. These insider tips will help you avoid common pitfalls and elevate the overall experience.
Insider Tricks for Flawless Results
The Temperature Rule Nobody Follows
Many bakers bake at 375°F, which can cause the cupcakes to dry out. I’ve found 350°F is the sweet spot for a moist crumb and a lightly crisp top. If you’re in a high‑altitude area, reduce the oven temperature by 25°F to prevent over‑baking. Keep the oven door closed during baking to maintain consistent heat.
Why Your Nose Knows Best
Smell is a powerful indicator of doneness. When the cupcakes are ready, you’ll detect a warm, chocolatey aroma that’s slightly sweet and slightly bitter. The frosting should emit a faint vanilla or chocolate scent, indicating it’s properly chilled. Trust your nose; it’s the ultimate judge of freshness.
The 5‑Minute Rest That Changes Everything
After removing the cupcakes from the oven, let them rest in the tin for exactly five minutes. This pause allows the steam to dissipate, preventing condensation that could soften the frosting. If you skip this step, the frosting will slide off when you try to apply it, ruining the “dirt” effect.
The Gummy Worm Placement Trick
When placing gummy worms, use a toothpick to set them in place before the frosting sets. This ensures they stay upright and don’t drift. For a more dramatic effect, place two worms per cupcake, one on each side of the center, creating a symmetrical look.
The Cookie Crumb Consistency
Crushed cookies should be fine but not powdery. If they’re too fine, they’ll settle too quickly and create a muddy texture. If they’re too chunky, they’ll be hard to spread evenly. The right consistency gives a realistic “dirt” feel and allows the frosting to hold them in place.
Creative Twists and Variations
Dark Chocolate & Mint
Swap the regular chocolate frosting for a mint chocolate frosting by adding a teaspoon of peppermint extract. The cool mint contrasts with the dark chocolate, creating an unexpected flavor twist that adults will appreciate.
Spiced Pumpkin
Add half a cup of pumpkin puree to the batter and sprinkle cinnamon, nutmeg, and ginger. The pumpkin adds moisture and a subtle spice note, perfect for a fall-themed version.
Coconut Crumble
Replace the chocolate cookies with shredded coconut or crushed coconut cookies. The coconut gives a tropical feel and a light, airy texture that complements the chocolate.
Vegan Version
Use a vegan chocolate cake mix, flax eggs, plant‑based milk, and a dairy‑free frosting. The texture remains moist, and the flavor profile is similar, making it suitable for plant‑based guests.
Gluten‑Free Twist
Substitute the cake mix with a gluten‑free chocolate mix and use gluten‑free crushed cookies. The cupcakes stay tender and the “dirt” effect is unchanged.
Gourmet Chocolate Swirl
Add a swirl of white chocolate ganache to the frosting before applying. The white chocolate creates a striking visual contrast and a creamy texture that pairs beautifully with the chocolate.
Storing and Bringing It Back to Life
Fridge Storage
Store the cupcakes in an airtight container in the refrigerator for up to five days. The frosting will firm up, but the cupcakes will remain moist. If the frosting feels too stiff, let it sit at room temperature for a few minutes before serving.
Freezer Friendly
For longer storage, place cupcakes in a freezer‑safe container and freeze for up to two months. Thaw overnight in the refrigerator, then let them sit at room temperature for 15 minutes before serving. The texture remains nearly identical to freshly baked cupcakes.
Best Reheating Method
If you need to warm the cupcakes slightly, wrap them in foil and place them in a preheated oven at 300°F for 5 minutes. Add a tiny splash of water to the container before reheating; this steams the cupcakes back to a soft, moist interior while keeping the frosting intact.