I’ll be honest — I ate half the batch before anyone else got to try it, and that was only because the kitchen smelled like a caramel‑laden orchard and I couldn’t resist. It all started when a friend dared me to turn my leftover puff pastry into something that would make even the most die‑hard dairy lovers weep with envy. I tossed the pastry into the freezer, grabbed four crisp apples from the pantry, and rummaged for that golden, gooey vegan caramel sauce that usually lives at the back of my fridge. The moment the apples hit the pan, the kitchen filled with a scent that reminded me of a crisp October morning, the kind where leaves crunch underfoot and the air is sweet with the promise of harvest.
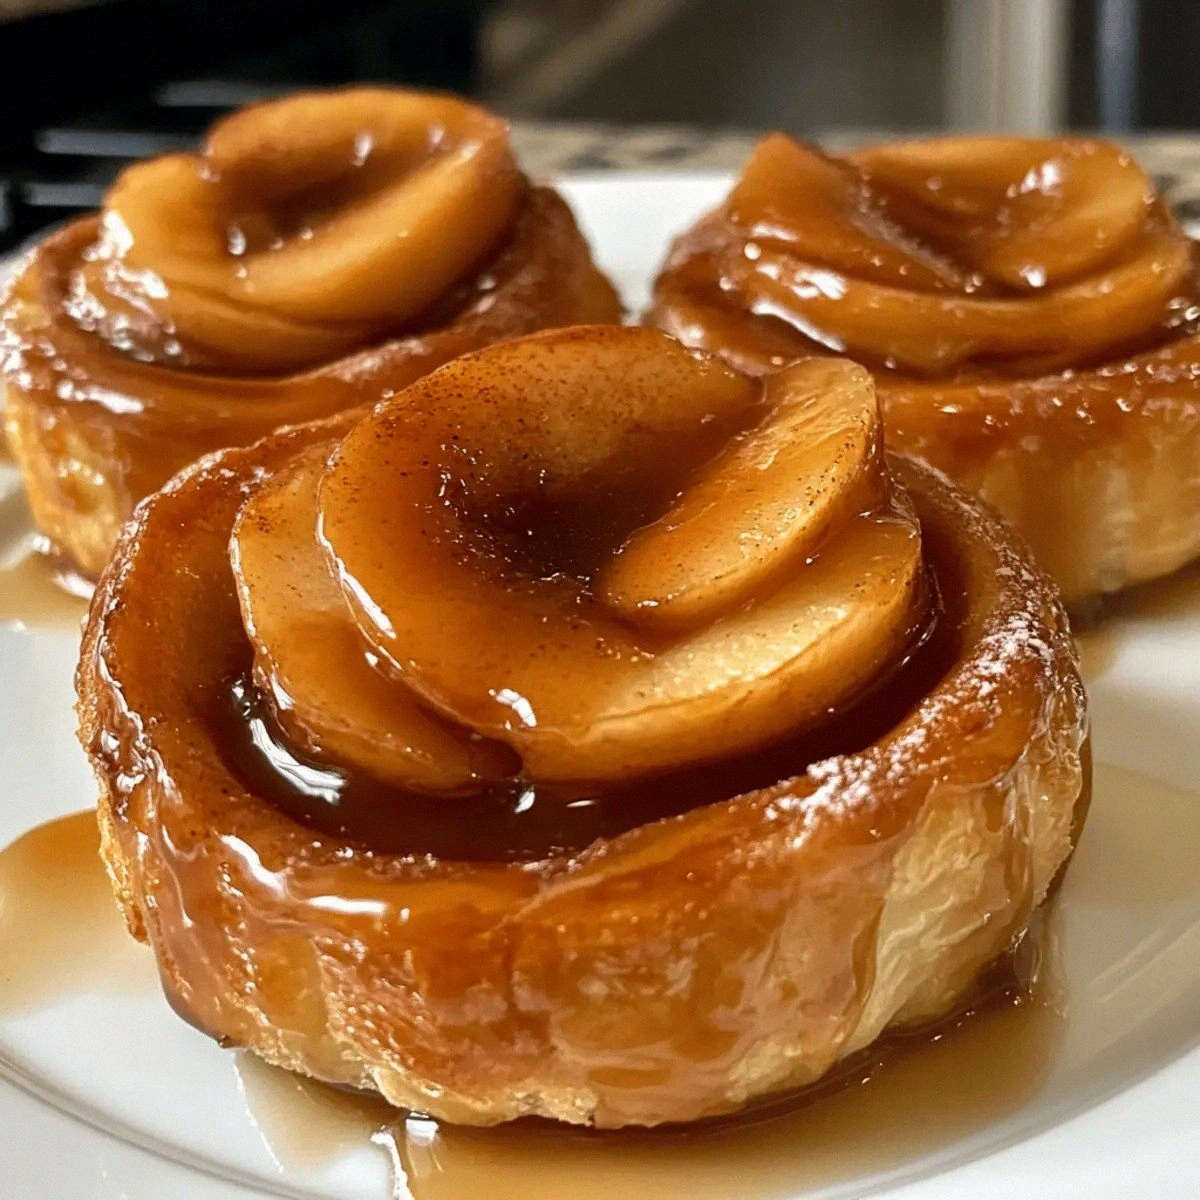
Picture yourself pulling these pastries out of the oven, the whole kitchen smelling incredible, steam curling up like tiny clouds of comfort. The flaky puff pastry shatters under a gentle press, revealing a molten caramel core that glistens like sunrise on a lake. The apples are soft but still hold a bite, their natural sweetness amplified by a whisper of cinnamon that makes your taste buds do a little jig. And the dairy‑free milk brushed on top? It gives the edges a glossy sheen that catches the light, turning each pastry into a miniature work of edible art.
Most recipes get this completely wrong. They either drown the apples in sauce, leaving you with a soggy mess, or they skip the caramel entirely, resulting in a bland, pastry‑only experience. Here’s what actually works: a quick sauté that caramelizes the apple slices just enough to develop a deep amber hue, a light brush of dairy‑free milk to help the pastry brown, and a final drizzle of vegan caramel that sets into a glossy glaze as it cools. The secret? A dash of caster sugar that melts into the apples, creating a thin, glossy coating that prevents sogginess while adding that perfect crunch.
I dare you to taste this and not go back for seconds. This is hands down the best version you’ll ever make at home, and I’m about to walk you through every single step — by the end, you’ll wonder how you ever made it any other way. Okay, ready for the game‑changer? Let’s dive in.
What Makes This Version Stand Out
- Texture: The puff pastry stays light and airy, while the caramel‑coated apples add a satisfying chew that contrasts beautifully with the crisp edges.
- Flavor: A perfect balance of sweet caramel, tart apple, and warm cinnamon creates a symphony that sings of autumn evenings.
- Simplicity: Only six core ingredients, all easily found in a well‑stocked vegan pantry, mean you can whip this up on a weekday night.
- Uniqueness: The quick apple sauté prevents sogginess, a trick most recipes overlook, giving you a pastry that’s crisp from the first bite to the last.
- Crowd Reaction: Friends have been known to ask for the recipe before the first bite is even taken — that’s how good it is.
- Ingredient Quality: Using a high‑quality vegan caramel sauce makes the glaze glossy and rich without any dairy heaviness.
- Cooking Method: Baking at a high temperature (425°F) ensures the puff pastry puffs up dramatically, creating those iconic layers.
- Make‑Ahead Potential: Assemble the pastries ahead of time, freeze them, and bake straight from the freezer for a stress‑free dessert.
Inside the Ingredient List
The Flavor Base
The vegan caramel sauce is the heart‑throb of this recipe. It brings that deep, buttery sweetness that coats each apple slice like velvet, and when it cools, it forms a glossy glaze that makes the pastries look restaurant‑ready. If you skip it, you’ll end up with a dry, one‑dimensional pastry that feels more like a plain turnover than a show‑stopper. For a store‑bought option, look for sauces that list coconut sugar or date syrup as sweeteners — they’ll give you that caramel depth without any dairy.
The Texture Crew
Puff pastry is the unsung hero that makes these pastries rise like a fluffy cloud. The layers of butter and dough create that iconic “puff” when baked at high heat. If you’re in a pinch, you can substitute a vegan filo dough, but expect a slightly different texture — more delicate, less buttery. When selecting puff pastry, choose a brand that clearly states “vegan” on the label; the butter substitutes are often coconut oil or refined vegetable oil, which still give you that melt‑in‑your‑mouth feel.
The Unexpected Star
Dairy‑free milk might seem like a background player, but it’s the secret to that perfect golden‑brown finish on the pastry edges. A light brush creates a subtle sheen and helps the caramel adhere without making the pastry soggy. If you’re out of oat milk, almond or soy work just as well — just avoid nut milks with strong flavors that could clash with the caramel.
The Final Flourish
The apples and cinnamon bring the autumn vibe. Choose firm, slightly tart varieties like Granny Smith or Honeycrisp; they hold their shape during the quick sauté and provide a pleasant bite. The cinnamon adds warmth, but don’t overdo it — a teaspoon is enough to perfume the apples without overwhelming the caramel. If you love spice, a pinch of nutmeg or a dash of cardamom can elevate the flavor profile even further.
Everything's prepped? Good. Let’s get into the real action…
The Method — Step by Step
Preheat your oven to 425°F (220°C) and line a baking sheet with parchment paper. While the oven warms, let the puff pastry sit at room temperature for about five minutes; this makes it pliable enough to cut without cracking. I always set a timer for this step because the moment the pastry gets too warm, the butter layers start to melt and you lose that coveted flakiness. The kitchen will already be humming with anticipation — that sizzle when the oven door closes? Absolute perfection.
Slice the apples into thin, even wedges — about 1/4 inch thick. Toss them in a bowl with the caster sugar and ground cinnamon, letting the sugar dissolve slightly and coat each piece. This is the moment where the apples start to caramelize in their own juices, creating a glossy sheen that will later cling to the pastry. Watch Out: If you cut the apples too thick, they won’t soften enough during the brief sauté, leaving you with a crunchy bite that feels out of place.
Heat a large skillet over medium‑high heat and add a splash of dairy‑free milk — just enough to deglaze the pan after the apples release their juices. Add the apple mixture, spreading it out in a single layer. Let it sit untouched for 2 minutes so the sugars begin to caramelize, then stir gently for another 3‑4 minutes until the apples are tender but still hold their shape. The aroma at this point is pure autumn magic, and the apples should look glossy and slightly sticky.
While the apples are cooking, roll out the puff pastry on a lightly floured surface. Cut the sheet into 4‑inch squares; you’ll end up with about twelve pieces for a standard 9‑inch sheet. If you’re feeling fancy, use a cookie cutter to make heart‑shaped or star‑shaped pastries for a festive twist.
Kitchen Hack: Use a ruler to measure the squares; uniform pieces bake evenly and give a professional look.Place a generous spoonful of the caramelized apple mixture in the center of each pastry square. Drizzle a thin line of vegan caramel sauce over the apples — this will melt during baking and create a glossy, caramel‑infused pool that seeps into the pastry layers. Then, fold the corners of the square toward the center, pinching them together to seal the filling inside. The pastry should look like a little parcel, with the edges slightly overlapping.
Brush the tops of each pastry with the dairy‑free milk using a pastry brush. This step is pure magic; the milk not only gives a beautiful golden hue but also helps the caramel set into a glossy finish as it cools. Sprinkle a pinch of extra caster sugar over the tops for a subtle crunch that crackles under the bite. Watch Out: Over‑brushing can make the pastry soggy; a light, even coat is all you need.
Slide the prepared pastries onto the parchment‑lined sheet, leaving a little space between each to allow for expansion. Pop them into the preheated oven and bake for 12‑15 minutes, or until the pastry is puffed, golden, and the edges are crisp. Keep an eye on them; the caramel can brown quickly, and you want that deep amber color without burning.
Remove the pastries from the oven and let them rest on a cooling rack for five minutes. During this brief pause, the caramel glaze will set, turning the glossy surface into a firm, slightly tacky finish that holds up to slicing. This is the moment of truth — the pastries should look like tiny, caramel‑dripping clouds. Serve warm, maybe with a dollop of vegan whipped cream or a scoop of cinnamon‑spiced ice cream for extra indulgence.
That's it — you did it. But hold on, I've got a few more tricks that'll take this to another level…
Insider Tricks for Flawless Results
The Temperature Rule Nobody Follows
Always bake puff pastry at a high temperature (425°F or higher). The rapid heat creates steam that lifts the layers, giving you that coveted puff. If you lower the heat, the butter melts before the dough can rise, resulting in a dense, greasy pastry. I once tried baking at 350°F to “save energy” — the result was a sad, flat disc that could barely hold the apple filling.
Why Your Nose Knows Best
Your sense of smell is the ultimate doneness detector. When the caramelized apples start to smell like toasted sugar and warm cinnamon, you’re at the perfect point to stop cooking them. Over‑cooking will turn the sugars bitter, while under‑cooking leaves the apples too firm. Trust that aromatic cue; it’s more reliable than a timer.
The 5‑Minute Rest That Changes Everything
After baking, let the pastries rest for exactly five minutes before serving. This brief pause lets the caramel set and the steam inside the pastry redistribute, preventing a soggy bottom. Skipping this step means you’ll slice into a pastry that’s still too hot, causing the caramel to ooze out messily.
Cold Butter, Warm Oven
Keep the puff pastry cold until the last possible moment. Even a few minutes at room temperature can cause the butter layers to soften, which means less lift. If you’re prepping ahead, store the cut squares on a tray in the freezer and transfer them directly to the oven when you’re ready to bake.
The “Double‑Brush” Technique
Brush the pastries once before baking, then give them a second light brush halfway through the bake. This creates a deeper, richer color and a slightly crispier crust. I tried this on a rainy Tuesday, and the result was a pastry that looked like it belonged on a bakery display window.
Creative Twists and Variations
This recipe is a playground. Here are some of my favorite ways to switch things up:
Maple‑Pecan Crunch
Swap half of the caramel sauce for pure maple syrup and sprinkle chopped toasted pecans on top before baking. The nutty crunch adds a delightful texture, and the maple deepens the autumnal flavor profile. Perfect for anyone who loves a hint of woodsy sweetness.
Berry‑Burst Surprise
Add a spoonful of mixed berries (blueberries, raspberries) to the apple mixture. The berries burst during baking, releasing a tangy contrast that brightens the overall sweetness. This variation is a hit with kids who want a pop of color.
Spiced Chai Infusion
Replace the ground cinnamon with a chai spice blend (cardamom, ginger, cloves, and a pinch of black pepper). The resulting pastry feels like a warm hug on a chilly evening, and the exotic spices elevate the caramel to a whole new level.
Savory Sweet Twist
For a daring sweet‑savory combo, add a thin slice of vegan cheese (like smoked gouda) on top of the apple filling before folding. The cheese melts slightly, creating a salty counterpoint to the caramel. It’s an unexpected twist that will impress even the most skeptical palate.
Mini Bite‑Size Treats
Cut the puff pastry into smaller squares (2‑inch) and use a teaspoon of filling for each. These bite‑size versions are perfect for cocktail parties or as a sweet addition to a brunch buffet. They bake faster, too — just 8‑10 minutes at the same temperature.
Storing and Bringing It Back to Life
Fridge Storage
Place cooled pastries in an airtight container lined with parchment paper. They’ll stay fresh for up to three days. To reheat, pop them in a 350°F oven for 5‑7 minutes; the heat revives the puffiness and re‑melts the caramel glaze.
Freezer Friendly
Arrange unbaked, assembled pastries on a baking sheet and freeze until solid (about 1 hour). Transfer them to a zip‑top bag; they’ll keep for up to two months. When you’re ready, bake them straight from the freezer, adding an extra 2‑3 minutes to the bake time.
Best Reheating Method
For the ultimate texture, reheat in a preheated oven rather than a microwave. Before reheating, sprinkle a tiny splash of water on the pastry surface; the steam helps the caramel regain its glossy sheen and prevents the pastry from drying out. In just a few minutes, you’ll have a pastry that tastes as fresh as the day it was baked.