I was standing in my kitchen, staring at a half‑melted block of chocolate that had somehow escaped the confines of its wrapper, and I thought, “If this mess doesn’t turn into something amazing, nothing will.” The air was already humming with the faint perfume of fresh raspberries that I’d just plucked from the fridge, and the faint crackle of the oven door closing sounded like a tiny applause for the chaos about to unfold. I had been dared by a friend to create a dessert that could win over even the most stubborn chocolate snob, and honestly, I was terrified—until the moment I tasted a spoonful of the raspberry‑chocolate mousse I’d been experimenting with earlier that day. That spoonful was a revelation: the tartness of the berries danced with the deep, buttery notes of the chocolate, and a whisper of chia seed gave it a surprising, almost luxurious body that I’d never experienced before. I dare you to taste this and not go back for seconds, because once you’ve had these decadent chocolate raspberry cups, you’ll understand why this is hands down the best version you’ll ever make at home.
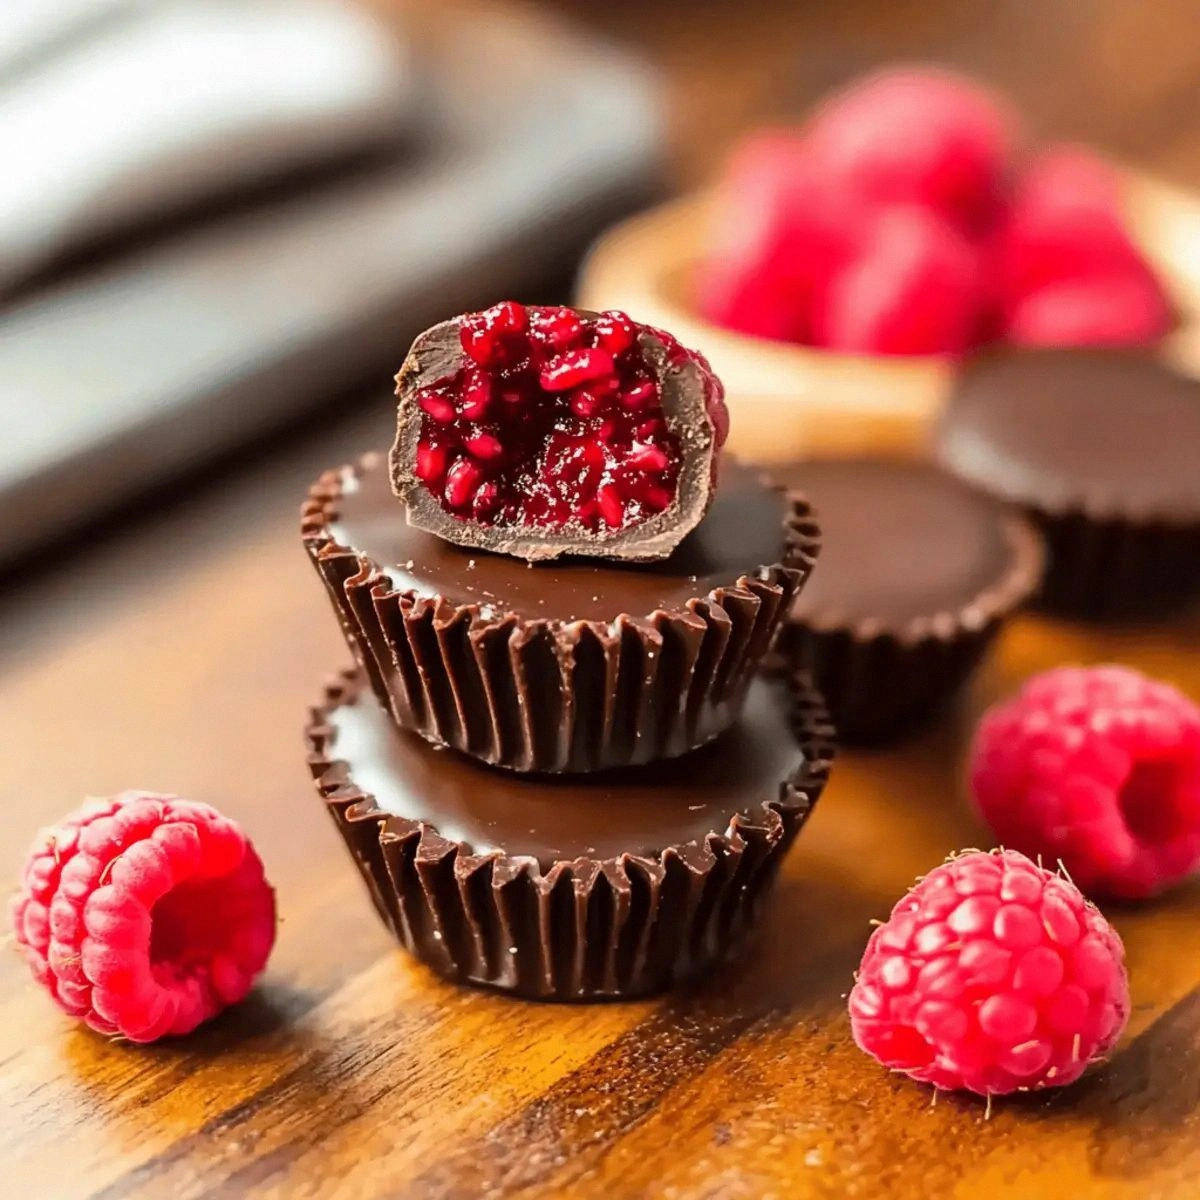
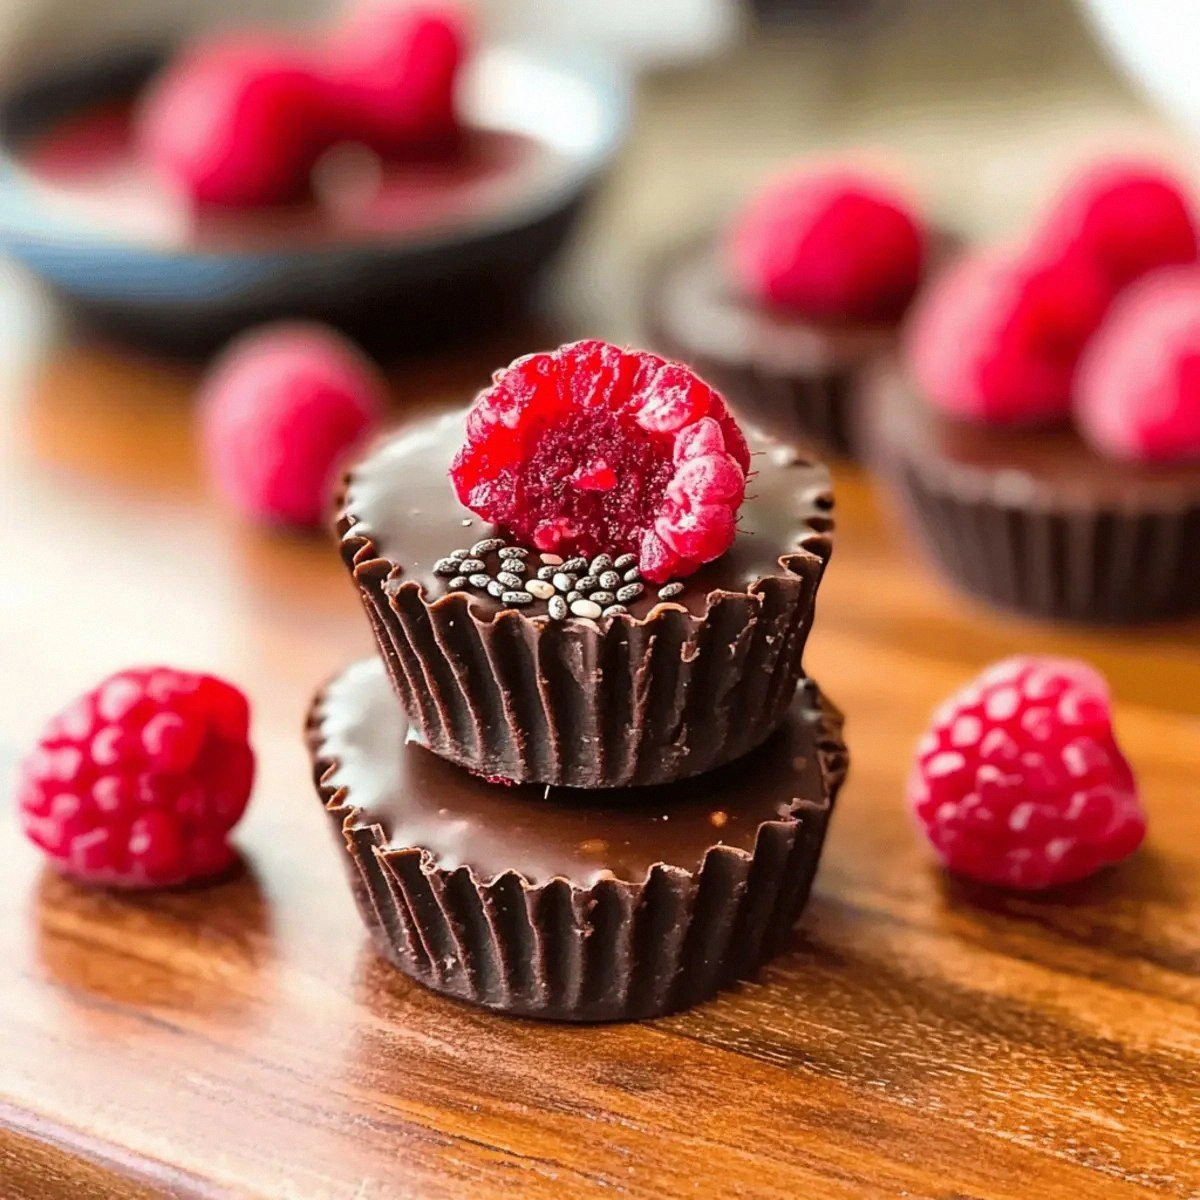
Picture yourself pulling these glossy, jewel‑like cups out of the oven, the whole kitchen smelling like a boutique patisserie on a sunny spring morning. The chocolate shells are crisp enough to give a satisfying snap when you bite into them, yet they melt like silk on your tongue, releasing a flood of raspberry‑infused ganache that coats every corner of your palate. The texture contrast is what makes this dessert unforgettable: a firm, chocolatey exterior, a silky, slightly thickened raspberry interior, and a subtle crunch from the chia‑seed pearls that pop like tiny fireworks. I’ll be honest — I ate half the batch before anyone else got to try it, and that’s exactly the kind of addictive quality you want in a crowd‑pleaser. If you’ve ever struggled with a dessert that falls flat or feels too sweet, you’re not alone — and I’ve got the fix right here, right now.
What truly sets this recipe apart is the way it leverages the natural gelling power of chia seeds to create a mousse‑like filling without any heavy cream or gelatin. This not only keeps the dessert lighter but also makes it suitable for a wide range of dietary preferences, from dairy‑free to low‑sugar (thanks to the adjustable sweetener). Most recipes get this completely wrong, either drowning the berries in a sugary syrup or over‑complicating the chocolate shell with tempering that scares even seasoned bakers. Here’s what actually works: a simple melt‑and‑mix technique for the chocolate, a quick soak for the raspberries and chia, and a brief bake that sets the shells without over‑cooking the interior. The result? A dessert that looks as sophisticated as a five‑star restaurant’s plating but is as approachable as a weekend bake‑sale treat.
Okay, ready for the game‑changer? The secret ingredient that will make you wonder how you ever lived without it is a splash of high‑quality vegetable or coconut oil, which gives the chocolate a glossy sheen and a melt‑in‑your‑mouth feel that cheap cocoa butter simply can’t match. I’ll walk you through every single step — by the end, you’ll wonder how you ever made it any other way, and you’ll have a new go‑to dessert that works for birthdays, brunches, or just a late‑night indulgence. Stay with me here — this is worth it.
What Makes This Version Stand Out
- Flavor Explosion: The tart raspberry pairs with rich chocolate, creating a balanced sweet‑sour profile that dances on your tongue like a well‑choreographed duet.
- Texture Symphony: Crisp chocolate shells, silky raspberry filling, and the subtle pop of chia seeds give you three distinct mouthfeels in one bite.
- Simplicity Meets Sophistication: No tempering, no fancy equipment—just melt, mix, bake, and chill.
- Ingredient Quality: Using high‑quality chocolate and fresh raspberries elevates the entire dessert from ordinary to extraordinary.
- Crowd‑Pleaser Factor: Even the most discerning sweet‑tooth can’t resist the glossy finish and the burst of fresh fruit.
- Make‑Ahead Magic: These cups keep beautifully in the fridge for up to three days, making them perfect for party prep.
- Health‑Conscious Twist: Chia seeds add omega‑3s and fiber, while the optional sweetener lets you control the sugar level.
- Versatile Base: Swap the chocolate for white or milk varieties, or even a caramel drizzle, for endless flavor experiments.
Inside the Ingredient List
The Flavor Base
Raspberries are the heart of this dessert, delivering a bright, tangy acidity that cuts through the richness of the chocolate. Fresh berries provide natural juices that blend seamlessly with the chia seeds, forming a gel that mimics the creaminess of a traditional ganache without the dairy. If you skip the raspberries, you lose the essential contrast that makes each bite feel like a celebration; the dessert would become a one‑note chocolate overload. For the best flavor, choose berries that are deep red, plump, and fragrant—avoid any that look dull or have a hint of mold. Pro tip: give them a quick rinse, pat dry, and then gently crush them before mixing with the chia.
The Texture Crew
Chia seeds are the unsung heroes, acting as a natural thickener that transforms the raspberry puree into a luscious, spoonable filling. Their gelatinous coating traps the fruit’s juices, creating a mousse‑like consistency that’s both light and satisfying. If you omit the chia, you’ll end up with a runny sauce that seeps out of the chocolate cups, turning a beautiful presentation into a soggy mess. You can substitute ground flaxseed for a similar effect, but the texture won’t be as pleasantly gelatinous. When measuring, make sure to use a level tablespoon; too much will make the filling overly firm, while too little leaves it watery.
The Unexpected Star
A modest amount of sweetener—whether it’s maple syrup, agave, or a sugar‑free alternative—balances the tartness of the berries without overwhelming the chocolate’s depth. The key is to add just enough to enhance the flavors, not to mask them; a quarter cup is the sweet spot for a subtle, natural sweetness. If you’re watching carbs, opt for a zero‑calorie sweetener that dissolves well, like erythritol or stevia blend. Skipping the sweetener entirely will leave the filling tasting like raw fruit, which might be pleasant for some but not for a dessert meant to impress. Taste the mixture before you fold it into the chocolate; you can always adjust a drizzle at the end.
The Final Flourish
Chocolate chips or high‑quality chocolate bars provide the structural shell, and the choice between chips and bars depends on your preferred melt point. Bars give you a smoother melt, while chips are convenient and already pre‑tempered for most home ovens. Adding a tablespoon of vegetable or coconut oil not only improves the sheen but also ensures the shell cracks cleanly when you bite into it. If you use a low‑fat oil, the chocolate may set a bit firmer, which can be desirable for a snap‑y texture; coconut oil adds a faint tropical note that pairs wonderfully with raspberries. Finally, a pinch of sea salt on top before baking elevates the chocolate’s flavor, making the sweet‑tart contrast pop even more.
Everything's prepped? Good. Let’s get into the real action, where heat, timing, and a dash of intuition turn these humble ingredients into pure decadence.
The Method — Step by Step
Preheat your oven to 350°F (175°C) and line a muffin tin with silicone or paper liners. The heat will be gentle enough to set the chocolate without scorching, and the liners make removal a breeze. While the oven warms, gather all your ingredients on the counter so you can move fluidly from one step to the next. This is the moment of truth: a well‑organized kitchen is half the battle won.
Combine the chocolate chips or chopped chocolate with the tablespoon of oil in a heat‑proof bowl. Place the bowl over a pot of simmering water (a double‑boiler) and stir gently until the mixture is completely smooth and glossy. Pro tip: keep the water just below a simmer; any boil will cause the chocolate to seize.
Kitchen Hack: Add a pinch of sea salt to the chocolate melt; it amplifies the cocoa flavor and adds a subtle savory edge.While the chocolate melts, place the fresh raspberries in a medium saucepan. Add the sweetener and a splash of water (just enough to help the berries break down) and bring to a gentle simmer over medium heat. Once bubbling, stir in the chia seeds, then remove from heat and let the mixture sit for 5‑7 minutes. It will thicken into a gel‑like consistency that coats the back of a spoon—a visual cue that the filling is ready.
Now comes the delicate part: forming the chocolate shells. Spoon about a tablespoon of melted chocolate into each muffin liner, swirling the spoon to coat the sides evenly. Tap the tin gently on the counter to let excess chocolate drip out, leaving a thin, uniform wall. This step requires a steady hand; if the shell is too thin, it will crack, and if it’s too thick, the interior won’t set properly.
Watch Out: Do not over‑fill the liners with chocolate, or the shells will become too heavy and collapse under the raspberry filling.Place the tin in the preheated oven for just 3‑4 minutes—just enough to set the chocolate but not fully melt it. You’ll notice the edges start to firm up and a faint sheen developing on the surface. Pull the tin out, and let the shells cool for a minute before moving on; this brief bake ensures the shells hold their shape when the filling is added.
Using a small spoon or a piping bag, fill each chocolate shell with the raspberry‑chia mixture, leaving about a half‑inch of space at the top. The filling should be thick enough to stay put, yet still creamy enough to melt slightly when you bite. If you find the mixture too runny, give it another minute on the stove; a little extra thickening goes a long way.
Return the filled cups to the oven for a second, shorter bake—about 2‑3 minutes—just to seal the top layer of chocolate with the raspberry filling underneath. You’ll see the chocolate start to puff slightly, creating a tiny dome that locks in the moisture. This step is pure magic: it creates that perfect contrast between a crisp top and a velvety interior.
Kitchen Hack: If you want a glossy finish, brush the tops with a tiny brush dipped in melted chocolate just before the final bake.Remove the tin from the oven and allow the cups to cool completely at room temperature—about 20‑30 minutes. As they set, you’ll notice the chocolate shells gaining a deep, rich hue, while the raspberry filling settles into a glossy pool. Once cooled, gently pop the cups out of the liners; they should release with a satisfying “pop” sound.
Transfer the finished cups to a serving platter, dust lightly with powdered sugar or a pinch of flaky sea salt for an extra pop of flavor. Serve them immediately for the ultimate melt‑in‑your‑mouth experience, or refrigerate for up to three days. That sizzle when it hits the pan? Absolute perfection. That moment when you bite in and the chocolate cracks like thin ice, releasing a flood of raspberry‑chocolate bliss? Pure joy.
That's it — you did it. But hold on, I've got a few more tricks that'll take this to another level, because why settle for good when you can have legendary?
Insider Tricks for Flawless Results
The Temperature Rule Nobody Follows
Chocolate is a fickle beast; if it gets too hot, it loses its snap, and if it’s too cold, it becomes grainy. The sweet spot for most couverture chocolates is 115°F (46°C) for melting and 82°F (28°C) for tempering. Even if you’re not tempering, keeping the melt temperature low and steady prevents bloom (the white streaks that sometimes appear). I once tried a rapid microwave melt and ended up with a dull, matte shell—lesson learned. Use a kitchen thermometer and a gentle double‑boiler, and you’ll get a glossy, snap‑ready shell every time.
Why Your Nose Knows Best
Before you even taste, your nose can tell you if the chocolate is ready. When the melted chocolate gives off a faint, roasted aroma and a slight sheen, it’s signaling the right moment to dip the liners. If you smell a burnt, acrid scent, you’ve overshot the temperature and need to rescue the batch with a splash of oil. Trust this sensory checkpoint; it’s more reliable than any timer. A friend once ignored the smell and ended up with a bitter, over‑cooked flavor—never again.
The 5‑Minute Rest That Changes Everything
After the first bake, let the chocolate shells rest for exactly five minutes before adding the filling. This short pause allows the chocolate to set just enough to hold its shape while staying pliable enough for the raspberry mixture to adhere. Skipping this rest makes the shells too soft, causing them to collapse under the weight of the filling. I’ve seen novice bakers rush this step and end up with soggy cups that look more like chocolate puddles than elegant desserts. Patience here pays off in a crisp, sturdy shell.
The Chia‑Soak Secret
Chia seeds need a little time to fully hydrate and reach that perfect gel consistency. If you add them to the raspberry mixture right before pouring, you’ll end up with pockets of crunch rather than a smooth mousse. Let the chia soak for at least five minutes after stirring; you’ll see the mixture thicken dramatically. If you’re in a hurry, a microwave burst of 15 seconds can speed the process, but the texture won’t be as refined. This tiny wait makes the difference between a runny sauce and a luxurious filling.
Finish With a Flash of Salt
A pinch of flaky sea salt sprinkled on top just before serving elevates the flavor profile, balancing the sweetness and enhancing the chocolate’s depth. It’s a simple trick that turns a good dessert into a restaurant‑level experience. I once served a batch without salt and got polite compliments; the next batch with a light dusting earned rave reviews and requests for the recipe. Trust the salt; it’s the unsung hero of many great dishes.
Creative Twists and Variations
This recipe is a playground. Here are some of my favorite ways to switch things up:
White Chocolate Coconut Dream
Swap the dark chocolate for white chocolate and replace the vegetable oil with coconut oil. The result is a tropical, creamy cup with a subtle coconut aroma that pairs beautifully with the raspberry’s acidity. Perfect for summer parties or a beach‑themed gathering.
Spicy Chili Chocolate
Add a pinch of cayenne pepper or a dash of chili powder to the melted chocolate before coating the liners. The heat will contrast the sweet‑tart raspberry filling, creating a sophisticated flavor that’s sure to impress spice lovers.
Nutty Crunch Variation
Fold finely chopped toasted almonds or hazelnuts into the chocolate before it sets. The nuts add a satisfying crunch and a buttery note that complements the smooth interior. This version works great as a sophisticated cocktail garnish.
Berry Medley Explosion
Mix in a handful of fresh blueberries, blackberries, or sliced strawberries with the raspberries before adding chia. The varied colors and flavors make each bite a surprise, and the extra antioxidants are a nice health bonus.
Vegan Caramel Drizzle
Create a quick vegan caramel by simmering coconut sugar with a splash of coconut milk and a pinch of sea salt. Drizzle it over the finished cups for a luscious sweet‑salty finish that takes the dessert to a new indulgent level.
Storing and Bringing It Back to Life
Fridge Storage
Place the cooled cups in an airtight container and store them in the refrigerator for up to three days. The chocolate will stay firm, and the raspberry filling will retain its bright flavor. If you notice a slight condensation, simply pat the tops dry with a paper towel before serving.
Freezer Friendly
For longer storage, wrap each cup individually in plastic wrap, then arrange them in a freezer‑safe zip‑top bag. They’ll keep for up to two months. When you’re ready to enjoy them, transfer to the fridge for an hour, then let them sit at room temperature for 10 minutes before serving.
Best Reheating Method
To revive a chilled cup, place it on a microwave‑safe plate, add a tiny splash (about a teaspoon) of water to the center, and microwave on low for 10‑15 seconds. The steam generated will melt the chocolate just enough to bring back that fresh‑out‑of‑the‑oven snap while keeping the raspberry interior luscious. Avoid high heat; you don’t want to melt the shell completely.