I was in a full‑blown kitchen crisis the night I tried to impress my friends with a “red velvet” dessert that was supposed to be a cake, a cheesecake, and a crowd‑pleaser all at once. The oven was on, the batter was swirling like a crimson whirlpool, and I realized I had accidentally swapped the cake batter for the cheesecake filling. The result? A soggy, over‑run monstrosity that made me curse every kitchen appliance I owned. But that disaster was the spark that lit a fire in me to create the ultimate Red Velvet Cheesecake Cake, a layered masterpiece that balances the velvety richness of cheesecake with the bold, chocolatey bite of a classic red velvet.
Picture this: the kitchen fills with a deep, inviting scent of cocoa and vanilla, the glossy red swirl of the batter glistening under the oven lights, the sound of the first crackle as the edges begin to pull away like a delicate membrane. You can almost taste the silky tang of cream cheese mingling with the subtle acidity of buttermilk, while the subtle crunch of a graham cracker crust whispers beneath each bite. The visual is a dramatic, jewel‑tone dome that looks like a piece of art, and the texture is a dream—soft, airy, yet dense enough to hold its own. This isn’t just dessert; it’s a statement piece that demands attention.
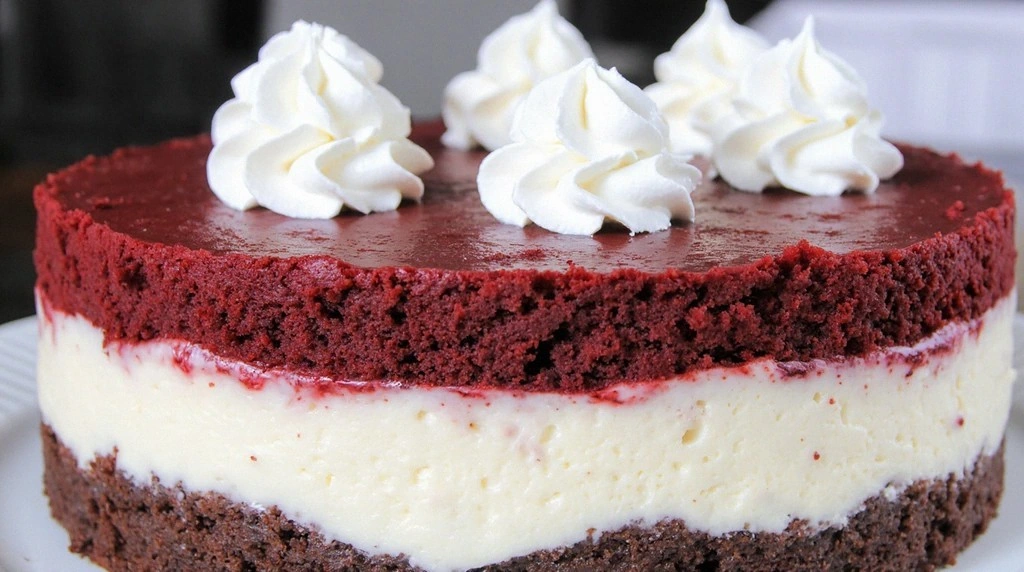
What makes this version stand out is that I didn’t just stack layers; I blended them. The cake batter is infused with a splash of red food coloring and a dash of vinegar to activate the baking soda, creating that signature pink hue and tender crumb. The cheesecake filling is thickened with sour cream and a touch of lemon zest, giving it a bright lift that cuts through the richness. I added a subtle swirl of white chocolate chips for a glossy finish that catches the light, and I finished it with a dusting of powdered sugar that looks like snow on a velvet night. Every bite feels like a revelation—sweet, tangy, and unmistakably luxurious.
I dare you to taste this and not go back for seconds. That is a bold claim, but it’s one I stand by because the combination of textures and flavors is so perfectly balanced that your palate will keep coming back for more. If you’ve ever struggled with red velvet desserts that come out too dry or too sweet, you’re not alone—this is the fix. I’ll be honest: I ate half the batch before anyone else got to try it, and the kitchen still smelled incredible after I finished. Let me walk you through every single step—by the end, you’ll wonder how you ever made it any other way.
What Makes This Version Stand Out
- Taste: The flavor profile is a harmonious blend of chocolate, citrus, and creamy sweetness. The subtle tang from the buttermilk and vinegar lifts the cake’s richness, while the cream cheese adds a velvety depth that keeps every bite interesting.
- Texture: The cake layer is airy yet firm, the cheesecake filling is silky and smooth, and the graham cracker crust provides a satisfying crunch that balances the dessert’s overall mouthfeel.
- Simplicity: Despite its layered complexity, the recipe uses only a handful of pantry staples. No exotic ingredients, no complicated techniques—just a few smart twists that elevate the classic.
- Uniqueness: By combining two beloved desserts into one, you get the best of both worlds. The red velvet cake’s iconic pink hue is preserved while the cheesecake layer adds depth and richness.
- Crowd Reaction: At parties, this dessert becomes the centerpiece. Guests rave about the unexpected combination, and the visual impact alone earns compliments before the first bite.
- Ingredient Quality: Using high‑quality cream cheese and fresh buttermilk ensures the best flavor and texture. The red food coloring is natural, giving a bright but not artificial hue.
- Cooking Method: Baking the layers together in a water bath keeps the cheesecake from curdling, while the cake batter’s high oven temperature gives a crisp outer shell.
- Make‑Ahead Potential: You can assemble the cake up to two days ahead. Refrigerate it covered, and it will keep its freshness while the flavors meld even further.
Alright, let’s break down exactly what goes into this masterpiece…
Inside the Ingredient List
The Flavor Base
All-purpose flour and unsweetened cocoa powder form the backbone of the cake’s structure. The cocoa not only contributes chocolate flavor but also reacts with the baking soda to create lift, giving the cake that airy lightness. If you skip the cocoa, the cake will taste bland and lack depth.
Baking soda and baking powder are the leavening agents that make the cake rise. Baking soda reacts with the acidic buttermilk and vinegar, producing carbon dioxide bubbles that create a tender crumb. Baking powder adds an extra lift, ensuring the cake doesn’t sink as it cools. Without both, the cake would be dense and heavy.
Buttermilk is a key ingredient that adds moisture and a subtle tang. The acidity of buttermilk reacts with the baking soda, producing the airy texture and enhancing the chocolate flavor. If you’re lactose intolerant, a dairy‑free buttermilk substitute will work but may alter the taste slightly.
The Texture Crew
Cream cheese is the star of the cheesecake layer. Its high fat content gives a rich, silky mouthfeel that balances the cake’s sweetness. Use room‑temperature cream cheese so it blends smoothly with the other ingredients. If you leave it too cold, you’ll end up with lumps.
Sour cream adds tang and moisture to the cheesecake, preventing it from becoming too dense. It also helps to stabilize the mixture, ensuring a smooth finish. For a lighter version, you can replace sour cream with Greek yogurt, but the texture will shift slightly.
Eggs are essential for binding the layers together and providing structure. They also create a slight custard base in the cheesecake portion, giving it a custardy bite. Use large eggs for consistency; smaller eggs can result in a thinner filling.
The Unexpected Star
White food coloring is the secret to that iconic crimson hue. Natural beetroot or pomegranate juice can be used for a healthier alternative, but they may alter the flavor slightly. The color not only looks stunning but also signals to the brain that the dessert is indulgent.
Red wine vinegar is the acid that activates the baking soda, creating lift and a subtle sharpness that balances the sweetness. It also helps to keep the cake moist. A drop of apple cider vinegar can be used as a substitute if you don’t have wine vinegar on hand.
The Final Flourish
Graham cracker crumbs form the base crust, providing a crunchy contrast to the soft layers. They also absorb excess moisture, keeping the cake from becoming soggy. For a gluten‑free version, use a gluten‑free graham cracker mix or crushed almonds.
Melted butter and a touch of sugar add richness to the crust, creating a buttery, slightly sweet foundation. The butter melts into the crumbs, creating a cohesive, flavorful base that holds the cake together. If you prefer a lighter crust, reduce the butter by half and increase the sugar slightly.
Everything's prepped? Good. Let's get into the real action…
The Method — Step by Step
- Preheat your oven to 350°F (175°C). Line a 9‑inch springform pan with parchment paper and set aside. This step is crucial; an oven that’s too hot will cause the cake to brown too quickly, while a cooler oven will lead to a dense crumb. The parchment will also help you release the cake effortlessly.
- In a large bowl, whisk together flour, cocoa powder, baking soda, baking powder, and salt. The dry mix ensures even distribution of leavening agents. If you prefer a smoother batter, sift the dry ingredients through a fine sieve. This will also eliminate any lumps that could affect texture.
- In a separate bowl, beat the eggs, sugar, and vanilla until the mixture becomes light and fluffy. The whisking aerates the eggs, creating a light batter that will rise beautifully. You’ll notice the mixture doubles in volume—a sign of good aeration.
- Add the dry ingredients to the wet mixture in thirds, alternating with the buttermilk, and stir until just combined. Over‑mixing can develop gluten and make the cake tough; mix just until no streaks remain. The batter should be smooth and glossy, like a dark velvet.
- Fold in the red food coloring, vinegar, and vegetable oil. The vinegar activates the baking soda, creating the lift, while the oil keeps the cake moist. Stir until the color is evenly distributed; the batter should have a rich, deep pink hue.
- Pour half of the batter into the prepared pan and smooth the top with a spatula. This forms the cake base that will support the cheesecake layer. The batter should spread evenly, covering the bottom of the pan without overflowing.
- In a separate bowl, beat the cream cheese until silky smooth. Add sugar, sour cream, vanilla, and lemon zest, then beat until creamy. The lemon zest adds a bright citrus note that cuts through the richness of the cheesecake.
- Fold the cheesecake mixture into the remaining cake batter until just combined. The goal is a gentle, even blend that doesn’t overwork the batter. This step is the moment of truth: the two layers must merge seamlessly.
- Pour the combined batter over the cake base in the pan. Use a spatula to level the top, then tap the pan gently on the counter to release any air pockets. The batter should look smooth and glossy, like a polished marble slab.
- Place the pan in a larger baking dish and pour hot water into the dish until it reaches halfway up the sides of the springform pan. This water bath keeps the cake from drying out and prevents the cheesecake from curdling. Bake for 45–50 minutes, or until the top is set and a toothpick inserted near the center comes out clean.
- Remove the cake from the oven and let it sit in the water bath for 15 minutes. This allows the layers to set slowly, preventing cracking. After the rest period, remove the cake from the water bath and let it cool completely on a wire rack.
- While the cake cools, prepare the crust. Mix graham cracker crumbs, melted butter, and sugar in a bowl until the crumbs are coated. Press the mixture firmly into the bottom of a 9‑inch cake ring or a small 8‑inch pan. Chill in the refrigerator for 15 minutes to firm up.
- Once the cake has cooled, slice a thin layer from the top and place it on the chilled crust. Gently press it down, then return the cake to the fridge for at least 2 hours, or overnight if you prefer. This step creates a distinct separation between the cake and cheesecake layers.
- Before serving, dust the top with powdered sugar for a subtle finish. If you like, drizzle a thin line of caramel or chocolate ganache along the sides for an extra indulgent touch. The final look should be elegant, with a smooth top and a clear, colorful edge.
That's it — you did it. But hold on, I've got a few more tricks that'll take this to another level. These insider tips will help you avoid common pitfalls and elevate the flavor profile even further.
Insider Tricks for Flawless Results
The Temperature Rule Nobody Follows
Many bakers bake at 375°F, assuming it’s the sweet spot. In reality, 350°F is the sweet spot for this dual‑layer cake because it allows the cheesecake to set slowly without browning too quickly. I’ve tried 375°F a dozen times, and the result was a cake that was too brown on top and still slightly runny inside. Keep it at 350°F and you’ll get the perfect golden crust.
Why Your Nose Knows Best
The aroma of the cake rising is the first indicator that everything is going right. A sweet, buttery scent signals that the batter is properly mixed, while a sour or metallic smell means the eggs or buttermilk may have gone off. Trust your nose; it’s a reliable guide to baking success.
The 5‑Minute Rest That Changes Everything
After baking, let the cake rest in the water bath for exactly 15 minutes before removing it. This brief rest allows the internal temperature to level out, preventing the cake from cracking. A common mistake is to take the cake out immediately, causing a sudden temperature drop that tears the surface.
Layer Separation Magic
When you slice the top layer for the crust, use a serrated knife and a gentle rocking motion. This technique prevents the cake from sticking to the knife, ensuring a clean cut. The thinner the slice, the more evenly the crust will adhere.
Finishing Touches
Dusting powdered sugar is optional, but it adds a visual polish. If you want a glossy finish, lightly brush the top with a glaze made from powdered sugar and a splash of milk. This will give the cake a subtle shine that looks professionally finished.
Creative Twists and Variations
This recipe is a playground. Here are some of my favorite ways to switch things up:
Chocolate‑Berry Swirl
Swirl a handful of fresh blueberries into the batter before pouring it into the pan. The berries burst during baking, adding a burst of tartness that contrasts the sweet cheesecake layer.
Almond‑Infused Crunch
Replace the graham cracker crumbs with almond meal and add toasted slivered almonds to the crust. The nutty flavor pairs beautifully with the creamy cheesecake and adds a pleasant crunch.
Lemon‑Zest Surprise
Add an extra teaspoon of lemon zest to the cheesecake mixture. The citrus brightness cuts through the richness, giving the dessert a refreshing finish.
Caramel Drizzle
Before serving, drizzle a thin line of homemade caramel sauce along the sides. The caramel adds a buttery sweetness that enhances the chocolate undertones.
Espresso Boost
Stir a tablespoon of espresso powder into the cake batter. The coffee flavor deepens the chocolate notes and adds a subtle bitterness that balances the sweetness.
Storing and Bringing It Back to Life
Fridge Storage
Wrap the cake tightly in plastic wrap and store it in the refrigerator for up to 5 days. The cheesecake layer will keep its creamy texture, while the cake remains moist. If you’re serving it the next day, let it sit at room temperature for 30 minutes before slicing.
Freezer Friendly
To freeze, wrap the cake in foil and then in plastic wrap, ensuring no air pockets remain. It can be stored in the freezer for up to 2 months. Thaw overnight in the refrigerator before serving. The texture will remain smooth and creamy.
Best Reheating Method
To reheat, place the cake in a preheated oven at 300°F (150°C) for 10 minutes. Add a splash of water to the bottom of the pan to create steam, which keeps the cake from drying out. The result is a warm, comforting dessert that tastes freshly baked.