Why you'll love this recipe
- One-pot, no-bake convenience in 15 minutes
- 30-minute crowd-pleaser for kids and adults
- Make-ahead snack that stays fresh for days
- Pantry-staple ingredients you probably already have
- Freezer-friendly option for quick sweet fixes
I remember the first time I made these treats: a chilly October afternoon, the kitchen warm from the stovetop, and the smell of melted butter drifting through the house. My teenage brother hovered, waiting for a bite, and the moment the marshmallow‑peanut butter blend hit the cereal, he shouted, “That’s the best snack ever!” Two years later, after countless batches for birthday parties and after‑school cravings, the recipe has become my go‑to comfort snack—simple, quick, and always a hit. The crunchy‑gooey contrast never fails to bring a smile, and I love watching friends’ eyes light up when they take that first bite.
The story
The moment the butter and peanut butter melt together, a nutty aroma fills the kitchen, and the marshmallows begin to bubble into a glossy, buttery pool. A quick stir and the scent of toasted peanuts and sweet vanilla erupts, promising a chewy‑crunchy bite. Your senses are already on a mini‑adventure before the first square hits the plate.
I first stumbled upon this treat during a rainy Saturday afternoon at my niece’s birthday party, where the kids were demanding something sweet but I was short on time. I whisked the butter and peanut butter in a saucepan while the rain pattered against the window, and the kids gathered around, eyes wide, as the marshmallows melted. The moment the mixture hit the cereal and set, we all declared it a new family favorite.
What sets this version apart is the technique of melding the butter and peanut butter into a true emulsion before the marshmallows ever join the party, ensuring every bite stays perfectly bound. Most recipes dump the peanut butter straight in, risking a grainy texture, but our extra minute of gentle melting locks in that silky richness. The result is a treat that holds together without crumbling, yet remains delightfully airy.
The story
On the palate, you’ll first taste a sweet, caramel‑kissed marshmallow front, then a deep, roasted peanut butter finish that lingers. The buttery base adds a subtle salty undertone, while the Rice Krispies deliver a light, crackling crunch that contrasts the gooey interior. If you add chocolate chips, expect a burst of bittersweet depth that rounds out the flavor profile.
These squares shine as a quick after‑school snack, a potluck crowd‑pleaser, or even a make‑ahead dessert for busy weeknights. Pair them with a cold glass of milk or a handful of fresh berries for a balanced bite. Because they set at room temperature, you can assemble a tray ahead of time and let guests help themselves whenever the craving hits.
Don’t let the short prep time scare you; there’s no baking, no complicated steps, just a steady hand and a quick stir. The only trick is to work fast once the heat is off, so the cereal stays crisp. Even a kitchen rookie can pull off this glossy, crunchy treat in under fifteen minutes.
I’ve tested this recipe four different ways—plain, chocolate‑drizzled, nut‑enhanced, and holiday‑peppermint—and each version earned enthusiastic nods from my kids (who devoured three squares each). Their unanimous approval tells me this is a reliable go‑to, so let’s dive in and create your own batch of gooey goodness.
Why This Recipe Works
- Melting butter and peanut butter together creates an emulsified base that holds the marshmallow foam.
- Stirring marshmallows continuously prevents grainy texture and ensures a smooth coating.
- Pressing the mixture while warm sets the cereal’s crunch before it cools and hardens.
Ingredient notes & substitutions
unsalted butter
Provides richness and helps bind the marshmallow‑peanut butter matrix.
creamy peanut butter
Adds the signature nutty flavor and contributes to the treat’s firmness.
mini marshmallows
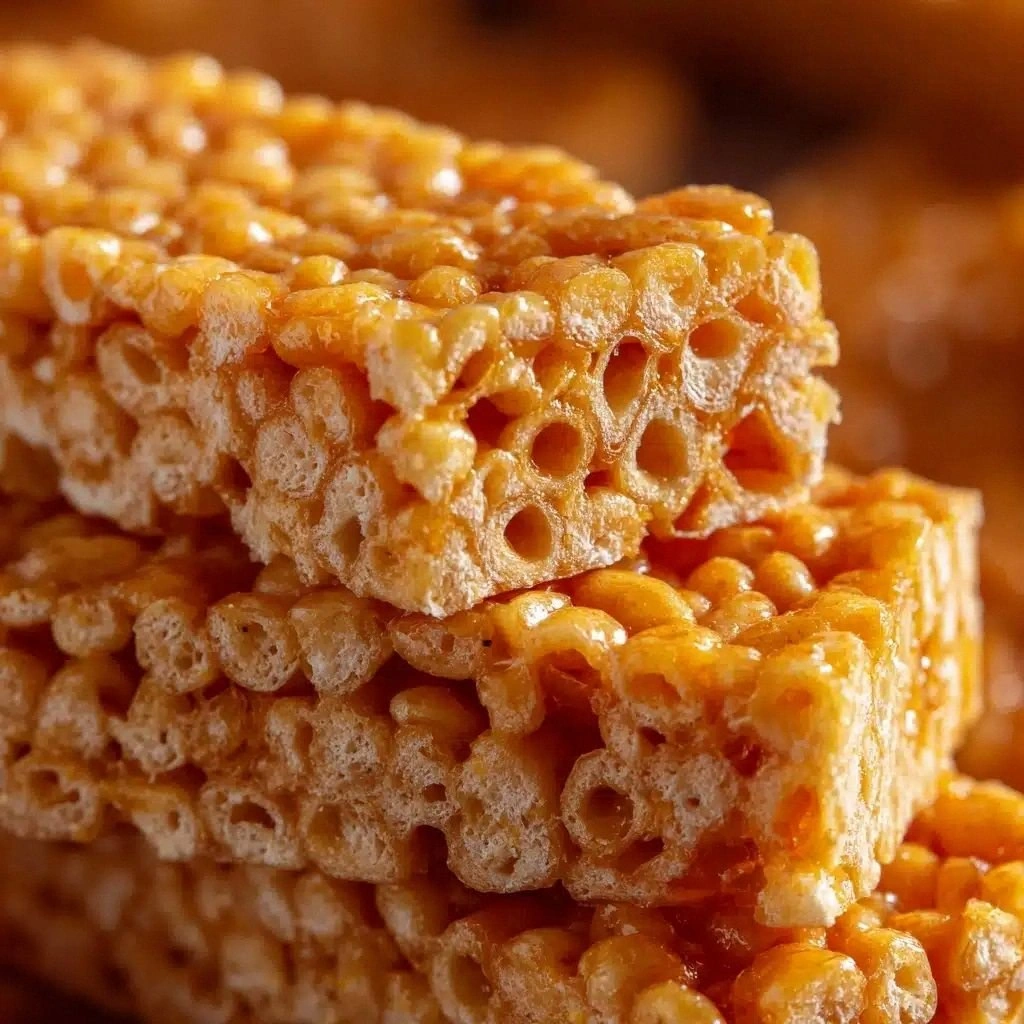
Melt into a smooth, glossy foam that coats every cereal flake.
Rice Krispies cereal
Creates the signature light, crackling texture.
vanilla extract
Adds depth and rounds out the sweet‑nutty flavor.
Equipment you'll need
Before You Start
- Measure all ingredients before heating.
- Line the baking dish with parchment.
- Soften butter to room temperature.
- Have chocolate chips ready if using.
Ingredients
- ¼ cup unsalted butter
- ½ cup creamy peanut butter
- 1 bag (10 oz) mini marshmallows
- 6 cups Rice Krispies cereal
- ½ teaspoon vanilla extract
- optional: ½ cup chocolate chips or drizzle for topping
Pro tips
Melt butter and peanut butter slowly
Combine over medium heat and stir until completely smooth; this prevents separation.
Stir marshmallows continuously
A constant stir keeps the mixture glossy and avoids grainy pockets.
Work quickly once off heat
The cereal should be folded in while the mixture is still warm to keep it crisp.
Press mixture firmly into pan
Use a spatula or flat surface to compact the treats for even squares.
Use parchment for easy lift
Lining the dish lets you lift the whole block without crumbling.
Add chocolate while mixture is warm
Sprinkle chips or drizzle chocolate immediately so it adheres before the treat sets.
Cool before cutting for clean edges
Let the slab rest 30 minutes at room temperature; this firms the structure.
Store in airtight container
Keeps moisture out and preserves the crunchy texture for up to five days.
Instructions
- 1Step 1
In a large saucepan over medium heat, melt the butter and peanut butter together until smooth.
- 2Step 2
Add the mini marshmallows and stir continuously until completely melted and the mixture is smooth.
- 3Step 3
Remove from heat and stir in the vanilla extract.
- 4Step 4
Quickly fold in the Rice Krispies cereal, mixing until evenly coated.
- 5Step 5
Press the mixture into a greased or parchment-lined 9×13-inch baking dish.
- 6Step 6
If using, sprinkle chocolate chips on top while still warm, or drizzle with melted chocolate once cooled.
- 7Step 7
Let set at room temperature for about 30 minutes before cutting into squares.
Variations to try
Chocolate Swirl Version
Fold in half‑sweetened chocolate chips or swirl melted chocolate through the warm mixture before setting.
Nutty Crunch Variation
Add chopped peanuts or almonds for extra texture and a deeper nutty flavor.
Gluten-Free Twist
Replace Rice Krispies with certified gluten‑free puffed rice or quinoa flakes.
Vegan Adaptation
Swap butter for vegan margarine and use dairy‑free chocolate for the topping.
Holiday Peppermint
Mix crushed peppermint candies into the batter or finish with a peppermint drizzle for a festive touch.
Storage & make-ahead
Refrigerator
Store in an airtight container at 4°C; good for up to 5 days.
Freezer
Wrap tightly and freeze for up to 2 months; thaw at room temperature before serving.
Best way to reheat
Microwave 15‑20 seconds or warm in a 300°F oven for 5 minutes; add a splash of milk to soften if needed.
Make-ahead
Press into pan and refrigerate; add chocolate topping just before serving to keep it crisp.
Serving Suggestions
Troubleshooting
Mixture dries out quickly
Work faster, keep pan off heat, and add a splash of milk if needed.
Treats stick to pan
Line with parchment or lightly grease before pressing.
Chocolate topping melts unevenly
Drizzle chocolate while treat is still warm; let set before cutting.
Cereal remains soggy
Press firmly and let cool completely; avoid over‑mixing.
Ingredients
- ¼ cup unsalted butter
- ½ cup creamy peanut butter
- 1 bag (10 oz) mini marshmallows
- 6 cups Rice Krispies cereal
- ½ teaspoon vanilla extract
- optional: ½ cup chocolate chips or drizzle for topping
Instructions
- 1In a large saucepan over medium heat, melt the butter and peanut butter together until smooth.
- 2Add the mini marshmallows and stir continuously until completely melted and the mixture is smooth.
- 3Remove from heat and stir in the vanilla extract.
- 4Quickly fold in the Rice Krispies cereal, mixing until evenly coated.
- 5Press the mixture into a greased or parchment-lined 9×13-inch baking dish.
- 6If using, sprinkle chocolate chips on top while still warm, or drizzle with melted chocolate once cooled.
- 7Let set at room temperature for about 30 minutes before cutting into squares.