Picture this: you’re standing in the middle of a chaotic kitchen, the clock is ticking down to the start of a party, and the only thing you can hear over the chatter is the faint, desperate hum of a friend begging, “What’s the snack?!” I’ve been there, and I’ve survived that culinary cliff‑hanger by inventing a snack that not only saves the day but also steals the spotlight. I dared to combine the creamy decadence of full‑fat cream cheese with the sharp bite of white cheddar, then tossed in a handful of crunchy nuts and a splash of sweet‑tart cranberries. The result? A cheese ball that practically sings “welcome home” the moment it hits the platter.
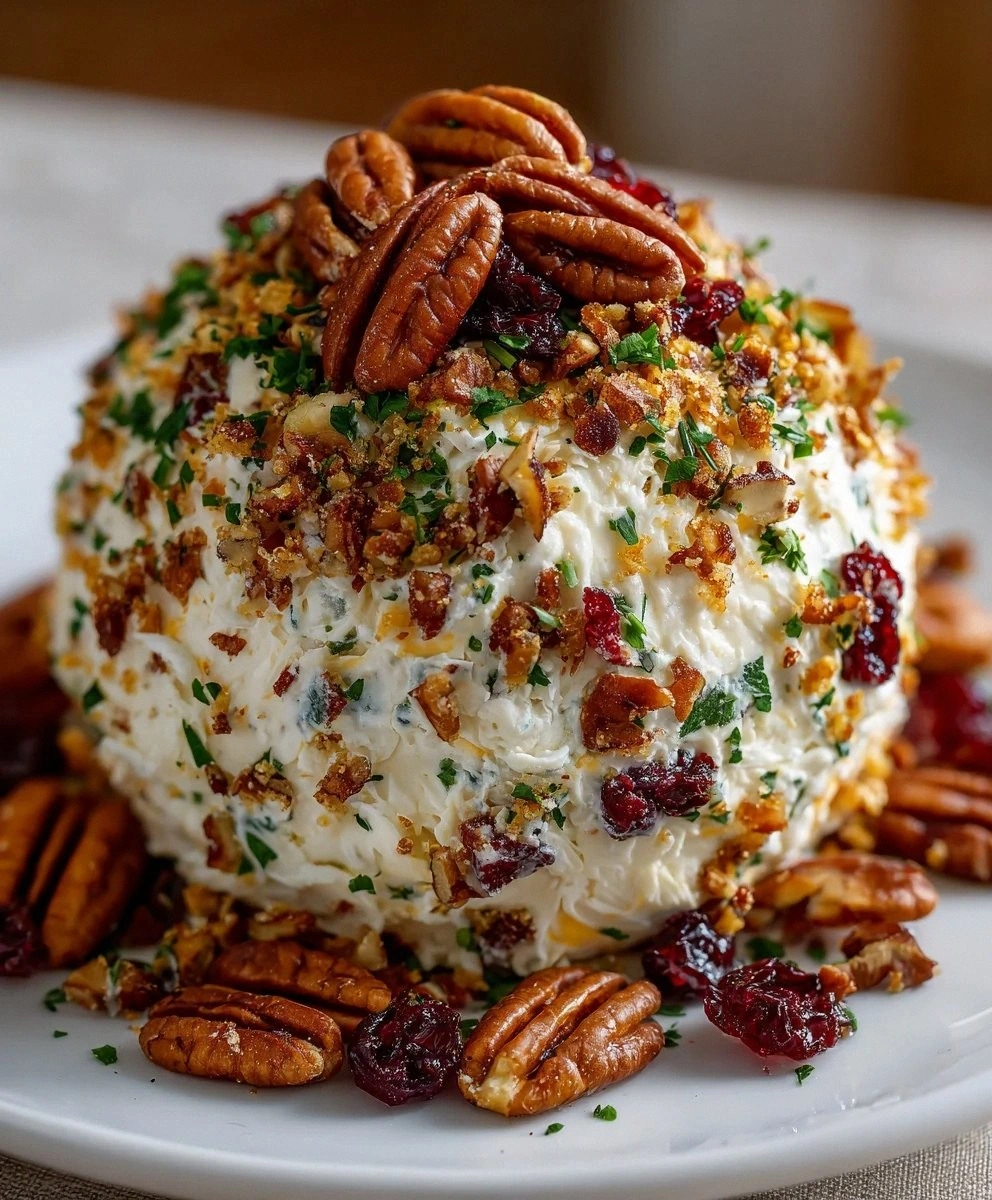
The moment you roll that glossy, buttery sphere onto the serving board, the room erupts. You’ll hear the soft gasp of anticipation, see eyes widen as the first bite is taken, and smell that intoxicating blend of toasted pecans and fresh herbs mingling with the warm, buttery aroma of melted cheese. It’s like a cozy fireplace in a bowl—comforting, inviting, and impossible to ignore. The texture is a symphony: the smooth, velvety interior meets a crunchy, nutty crust that shatters like thin ice under a fork. The flavor? Imagine a buttery whisper that quickly crescendos into a bold, tangy chorus, with a surprise pop of sweet cranberry that makes your taste buds do a little happy dance.
Most cheese‑ball recipes out there are either overly salty, too bland, or require a mountain of hard‑to‑find ingredients. This version stands out because it balances richness with crunch, tang with sweet, and all of it in under an hour. I’ve stripped away the unnecessary steps and replaced them with a few clever tricks that lock in flavor and texture. The secret? Toasting the pecans just right, folding the cheese gently so it stays airy, and using a blend of fresh herbs that brighten the whole thing like a splash of lemon on a rainy day. Trust me, this is hands down the best version you’ll ever make at home.
And here’s the kicker: I’m about to reveal a technique that most chefs keep under wraps—a quick chill‑and‑roll method that gives the ball a flawless, glossy finish without any fancy equipment. Okay, ready for the game‑changer? Let me walk you through every single step — by the end, you’ll wonder how you ever made it any other way.
What Makes This Version Stand Out
- Flavor Explosion: The marriage of sharp white cheddar with creamy full‑fat cream cheese creates a depth that’s both rich and tangy, while garlic powder adds a savory punch that lingers.
- Texture Contrast: Toasted pecans and pumpkin seeds give a satisfying crunch that contrasts beautifully with the smooth interior, making each bite an adventure.
- Simple Ingredients: No exotic spices or hard‑to‑find cheeses—just pantry staples and a few fresh herbs, making it accessible for any home cook.
- Quick Assembly: From start to finish it’s under 45 minutes, perfect for last‑minute gatherings or impromptu snack attacks.
- Make‑Ahead Friendly: The ball can be formed and chilled up to 24 hours ahead, allowing the flavors to meld and the texture to firm up.
- Visual Appeal: The vibrant red cranberries and green parsley specks make it look as festive as it tastes, turning any platter into a centerpiece.
- Versatile Pairings: Works with crackers, sliced baguette, fresh veggies, or even as a decadent dip for pretzel sticks.
- Crowd‑Pleaser: I dare you to taste this and not go back for seconds—people keep coming back for more, and the compliments keep rolling in.
Inside the Ingredient List
The Flavor Base
Full‑fat cream cheese is the star of our cheese ball. It gives a rich and creamy base that holds everything together while providing a buttery mouthfeel. If you skimp on the fat content, the ball will be dry and crumbly, losing that luxurious melt‑in‑your‑mouth quality. For the best results, let the cream cheese sit at room temperature for 20 minutes before mixing; this makes it easier to blend and prevents lumps. Swap tip: You can substitute with mascarpone for an even richer texture, though the flavor will shift slightly toward a subtle sweetness.
Sharp white cheddar adds delightful flavor and a hint of tanginess. The sharpness cuts through the cream cheese’s richness, creating a balanced palate that never feels one‑dimensional. Grating the cheese yourself yields a fresher, more vibrant taste compared to pre‑shredded options, which often contain anti‑caking agents that can affect texture. Swap tip: If you’re a fan of extra heat, try a pepper jack or a smoked cheddar for a smoky twist.
The Texture Crew
Toasted pecans bring a lovely crunch and nutty flavor. The toasting process releases oils that deepen the nut’s taste, turning a simple nut into a flavor bomb. Skip the toast and you’ll miss that aromatic, buttery note that makes the ball sing. Swap tip: Walnuts work just as well and add a slightly earthier flavor.
Pumpkin seeds add an extra crunch and a festive look, especially when you’re serving this at holiday gatherings. Their subtle, buttery flavor complements the cheese without overpowering it. If you’re allergic to seeds, try toasted sunflower seeds for a similar texture.
The Unexpected Star
Dried cranberries provide a burst of sweet‑tart contrast that brightens the whole composition. Their chewy texture pairs perfectly with the crunchy nuts, creating a delightful mouthfeel. If you’re not a fan of cranberries, raisins or dried cherries make excellent substitutes, each bringing its own unique twist.
Fresh parsley and chives are the final flourish that adds color, freshness, and a mild oniony bite. Parsley’s bright, grassy notes lift the richness, while chives contribute a subtle onion flavor that rounds out the profile. If you’re out of fresh herbs, a pinch of dried Italian seasoning can work in a pinch, though it won’t have the same vibrant pop.
The Final Flourish
Garlic powder, fine sea salt, and freshly ground black pepper are the seasoning trio that ties everything together. Garlic powder adds a savory depth without the moisture of fresh garlic, which could make the mixture soggy. Fine sea salt enhances all the flavors, while a pinch of black pepper introduces a subtle warmth. Remember, seasoning is a personal journey—taste as you go and adjust to your preference.
Everything's prepped? Good. Let's get into the real action...
The Method — Step by Step
Start by preheating your oven to 350°F (175°C). While the oven warms up, spread the pecans on a rimmed baking sheet and toast them for 6‑8 minutes, stirring halfway through. You’ll know they’re ready when they turn a deep golden brown and emit a nutty aroma that fills the kitchen—that sizzle when it hits the pan? Absolute perfection. Once toasted, let them cool, then roughly chop them to keep some texture.
While the nuts are cooling, take the full‑fat cream cheese out of the fridge and let it soften for about 20 minutes. In a large mixing bowl, combine the softened cream cheese with the shredded sharp white cheddar. Using a rubber spatula (see Kitchen Hack below), gently fold the cheeses together until they’re just merged—avoid over‑mixing, or you’ll lose that airy lightness.
Kitchen Hack: Scrape the sides of the bowl with a silicone spatula instead of a metal one to keep the mixture smooth and prevent any cheese from sticking.Now it’s time to season. Sprinkle the garlic powder, fine sea salt, and freshly ground black pepper over the cheese blend. Add the chopped parsley and chives, then fold everything together. As you mix, you’ll notice a faint green speckle appear—this is the visual cue that the herbs are evenly distributed, ensuring each bite gets that fresh burst.
Fold in the toasted pecans, pumpkin seeds, and dried cranberries. This is the moment where texture truly comes alive. The nuts should remain in small clusters, not a uniform dust, so you get that satisfying crunch in every bite. If you find the mixture too thick, add a teaspoon of milk or heavy cream to loosen it just enough for easy shaping.
Lightly dampen your hands with cold water (or a quick splash of olive oil) to prevent the cheese from sticking. Scoop out a generous portion—about the size of a golf ball—and roll it between your palms until it forms a smooth, uniform sphere. This step feels like a mini‑workout, but trust me, the tactile feedback is worth it.
Place the formed cheese ball onto a parchment‑lined baking sheet. Here’s the secret: give it a quick 5‑minute chill in the freezer before the final bake. This “flash chill” helps the outer crust set, so when you bake it, the exterior will turn lightly golden while the interior stays luxuriously creamy.
Watch Out: Do not skip the flash chill—without it, the cheese ball may spread and lose its shape during baking.Slide the sheet into the preheated oven and bake for 12‑15 minutes, just until the outer layer turns a light amber and you can see the herbs slightly crisping. The interior should still be soft; you’ll know it’s done when a gentle pressure on the top yields a slight give but doesn’t collapse.
Remove the cheese ball from the oven and let it rest for 5 minutes. This brief pause lets the heat redistribute, ensuring the center stays melt‑in‑your‑mouth while the crust stays firm enough to slice. While it rests, you can drizzle a tiny bit of melted butter over the top for an extra glossy finish—optional, but it adds a luxurious sheen.
Transfer the ball to a serving platter, garnish with a few extra toasted pecans, a sprinkling of pumpkin seeds, and a handful of fresh parsley leaves for that pop of color. Serve warm, alongside crisp crackers, sliced baguette, or fresh veggie sticks. Picture yourself pulling this out of the oven, the whole kitchen smelling incredible, and guests lining up for a bite—pure party gold.
That’s it — you did it. But hold on, I’ve got a few more tricks that'll take this to another level. Stay with me here — this is worth it.
Insider Tricks for Flawless Results
The Temperature Rule Nobody Follows
Never bake a cheese ball straight from the fridge. The shock of cold can cause the cheese to contract, leading to cracks on the surface. Let the ball sit at room temperature for 10 minutes before it hits the oven; this ensures even heat distribution and a smooth, crack‑free crust. A friend once tried skipping this step and ended up with a cheese ball that looked like a cracked planet—trust me, it’s not the vibe you want.
Why Your Nose Knows Best
The moment the cheese ball starts to brown, trust your sense of smell more than the timer. When you catch that nutty, buttery aroma, you know the outer layer is perfectly toasted. Over‑baking can dry out the interior, turning it from creamy to chalky. So, keep a watchful eye and a ready nose.
The 5‑Minute Rest That Changes Everything
After baking, let the cheese ball rest for exactly five minutes. This short pause allows the fats to re‑emulsify, giving you that melt‑in‑your‑mouth texture. Skipping this rest means the cheese can become a little gummy when sliced. I’ve seen it happen—people cut right away and end up with a sticky mess instead of clean, elegant slices.
Rolling the Perfect Sphere
Use a light dusting of flour on your hands while rolling. It prevents sticking without altering the flavor. The flour also creates a subtle dry coating that helps the outer crust crisp up during baking. If you’re gluten‑free, swap the flour for a pinch of almond meal—same effect, different flavor nuance.
The Secret of the Flash Chill
A 5‑minute blast in the freezer before baking is the unsung hero of this recipe. It firms the outer layer so it can hold its shape, yet it’s short enough that the interior stays soft. This hack turns a potentially soggy ball into a firm, slice‑ready masterpiece.
Creative Twists and Variations
This recipe is a playground. Here are some of my favorite ways to switch things up:
Spicy Jalapeño Kick
Fold in finely diced jalapeños and a pinch of smoked paprika. The heat adds a thrilling contrast to the creamy base, perfect for guests who love a little fire. Serve with cool cucumber slices to balance the spice.
Herbaceous Green Delight
Swap parsley and chives for fresh basil and mint. The aromatic profile becomes bright and summery, ideal for a spring garden party. Pair with toasted baguette slices brushed with olive oil.
Sweet & Savory Apple
Add finely diced dried apples and a drizzle of honey before forming the ball. The subtle sweetness mingles with the cheese, creating a dessert‑like appetizer that still feels savory. Great for Thanksgiving or autumn gatherings.
Smoky Bacon Crunch
Crumble cooked bacon into the mixture and replace pumpkin seeds with smoked almonds. The smoky, salty crunch elevates the flavor profile, making it a hit at barbecues or game‑day spreads.
Vegan Friendly Version
Use a plant‑based cream cheese and nutritional yeast in place of cheddar. Add smoked paprika and a splash of soy sauce for umami depth. This version still delivers that creamy‑crunchy experience without any dairy.
Storing and Bringing It Back to Life
Fridge Storage
Wrap the cheese ball tightly in plastic wrap or store it in an airtight container. It will keep fresh for up to 3 days. When you’re ready to serve, let it sit at room temperature for 15 minutes; this restores its creamy texture.
Freezer Friendly
For longer storage, freeze the unbaked cheese ball on a parchment sheet, then transfer it to a zip‑top bag. It will hold up for up to 2 months. Thaw overnight in the fridge, then give it a quick flash chill before baking as per the original method.
Best Reheating Method
Reheat leftovers in a preheated oven at 300°F (150°C) for 8‑10 minutes. Add a tiny splash of water (about a tablespoon) to the foil‑covered dish; the steam revives the interior’s moisture, making it taste freshly baked.