I was standing in my kitchen, the timer on my old microwave flashing red, and a sudden craving for something that could simultaneously satisfy my chocolate addiction and my love for cheesecake hit me like a freight train. I tried a store‑bought chocolate cheesecake, and it tasted like a sad, soggy sponge that had given up on life. I swear I heard the dessert whisper, “You deserve better.” That night, I dared my roommate to a taste‑test, and I lost—she devoured three bars before I could even say “dessert.” I promise you, this is hands down the best version you’ll ever make at home, and I’m about to prove it.
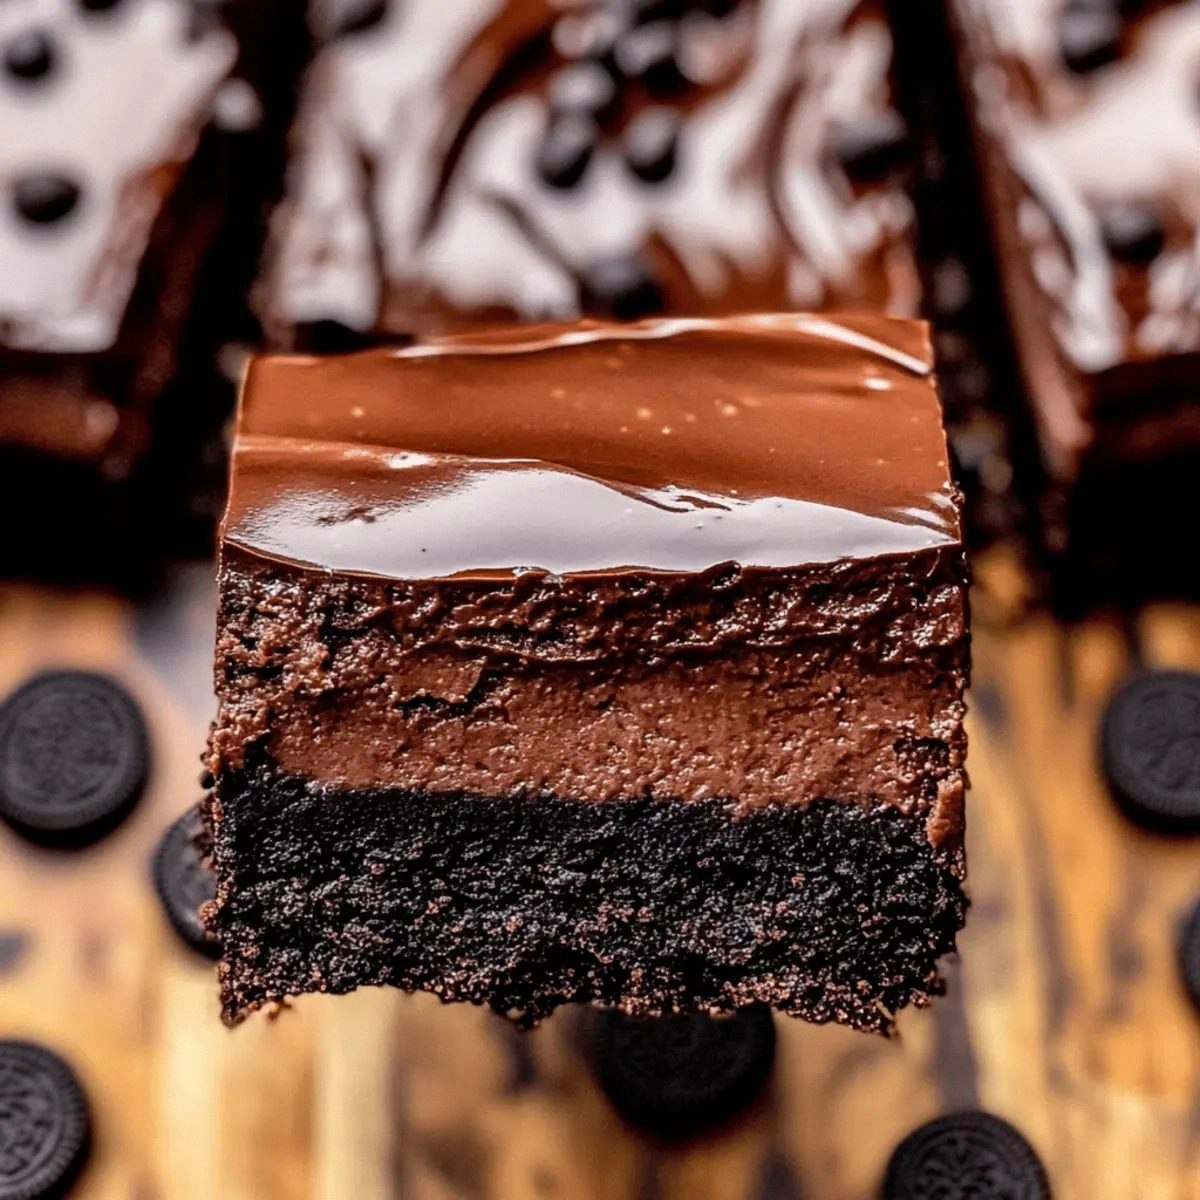
Picture this: a glossy, dark‑chocolate top that shatters like a thin sheet of glass, revealing a velvety, creamy interior that smells like a cocoa‑laden dream. The crust? A buttery, slightly crunchy Oreo base that crumbles in your mouth like a sweet, salty confetti. The aroma hits you the moment the oven door opens—deep chocolate, a hint of butter, and a whisper of vanilla that makes your nose do a little dance. Your fingertips feel the cool, smooth surface of the bars as you cut them, and the first bite? Pure, unadulterated decadence that makes you want to close your eyes and let the flavor wash over you.
Most recipes get this completely wrong. They either skimp on the chocolate, over‑whip the cream cheese, or forget the crucial step of tempering the chocolate ganache. The result is a soggy mess or a dry, chalky slab that no one wants to touch. What makes this version different? I’m using a double‑chocolate ganache that’s tempered just enough to give you that snap, and a secret technique of folding in whipped heavy cream to keep the filling airy yet dense. Plus, the Oreo crust is pressed, not baked, preserving that buttery crunch you love.
Okay, ready for the game‑changer? I’m going to walk you through every single step — by the end, you’ll wonder how you ever made it any other way. I dare you to taste this and not go back for seconds. Let’s get started.
What Makes This Version Stand Out
- Texture: A buttery Oreo crust that stays crisp, a silky cheesecake filling that’s light as air, and a glossy ganache that snaps like a fresh chocolate bar.
- Flavor Depth: The combination of unsweetened cocoa, semi‑sweet chocolate chips, and a splash of vanilla creates a layered chocolate experience that’s both rich and balanced.
- Simplicity: No fancy equipment required—just a food processor, a whisk, and a 9×13 pan.
- Ingredient Quality: Using real chocolate bars and full‑fat cream cheese makes the difference between “good” and “legendary.”
- Crowd Reaction: These bars have been known to clear plates in seconds at parties, leaving guests begging for the recipe.
- Make‑Ahead Potential: They keep beautifully in the fridge for up to four days, and even freeze well for future cravings.
- Visual Appeal: The dark, glossy top with a dusting of chocolate chips looks as good on Instagram as it does on the palate.
- Versatility: Swap the chocolate bar for white chocolate or add a pinch of espresso for an espresso‑marbled twist.
Inside the Ingredient List
The Flavor Base
The unsweetened cocoa powder is the backbone of our chocolate intensity. It provides that deep, earthy note that you can’t get from chocolate chips alone. If you skip it, the ganache will taste flat, like a chocolate milkshake without the milk. You can substitute Dutch‑process cocoa for a smoother, less acidic flavor, but the classic American cocoa works perfectly here.
The granulated sugar balances the bitterness of the cocoa and chocolate. It’s measured at three‑quarters of a cup, which is just enough to sweeten without overwhelming the rich chocolate. If you’re watching sugar, you can reduce it to half a cup, but expect a slightly more bitter finish.
The Texture Crew
Cream cheese (16 oz) gives the filling its signature tang and creamy body. Use full‑fat cream cheese straight from the fridge; it holds its shape better when mixed and prevents a watery texture. If you opt for a low‑fat version, the bars will be less rich and may crack during cooling.
Heavy cream appears twice: once for the ganache and once for the swirl on top. The first cup creates a glossy, pour‑able ganache, while the half‑cup folded into the filling adds lightness. Whipping the half‑cup to soft peaks before folding in is the secret to that airy bite.
The Unexpected Star
Chocolate bar (4 oz) is melted and combined with heavy cream to form the ganache. Choose a high‑quality semi‑sweet bar with at least 60% cacao for the best snap. If you love extra bitterness, go for 70% dark; if you prefer a sweeter profile, a 55% bar works beautifully.
Semi‑sweet chocolate chips (1 cup) are folded into the filling for little pockets of melty chocolate that burst when you bite. They also add a subtle textural contrast to the smooth cheesecake.
The Final Flourish
Unsalted butter (½ cup) is melted and blended with crushed Oreo cookies to form a crust that’s both buttery and slightly salty. Using unsalted butter gives you full control over the seasoning; a pinch of sea salt sprinkled on the finished bars elevates the chocolate flavor.
Pure vanilla extract (1 tsp) rounds out the flavor profile, adding a fragrant warmth that ties the chocolate and cream cheese together. Always use pure extract; imitation vanilla can leave a harsh aftertaste that clashes with the chocolate.
Large eggs (2) provide structure to the cheesecake filling, ensuring it sets without becoming rubbery. Beat them just enough to incorporate air—over‑whipping will lead to cracks.
Everything's prepped? Good. Let's get into the real action…

The Method — Step by Step
Preheat your oven to 325°F (163°C). While it’s heating, line a 9×13 inch baking pan with parchment paper, leaving enough overhang to lift the bars out later. This will make removal a breeze and keep the edges intact.
Place the Oreo cookies in a food processor and blitz until they become fine crumbs. Add the melted butter and pulse a few more times until the mixture resembles wet sand. Press the crumb mixture firmly into the bottom of the prepared pan, creating an even layer. Pro tip: Use the back of a measuring cup to smooth it out.
Kitchen Hack: Chill the crust for 10 minutes before adding the filling; this prevents the butter from melting into the cheesecake later.In a large mixing bowl, beat the softened cream cheese until smooth—no lumps allowed. Gradually add the granulated sugar, continuing to beat until the mixture is light and fluffy. This step is where the texture magic begins; you’ll notice the mixture becoming silkier with each beat.
Add the eggs one at a time, mixing on low speed just until incorporated. Over‑mixing at this stage can introduce too much air, leading to cracks later. Then stir in the vanilla extract, unsweetened cocoa powder, and the half‑cup of heavy cream you set aside earlier. Fold gently until the batter is uniform and glossy.
Now, for the chocolate chips: sprinkle them over the batter and fold them in with a spatula, reserving a handful for the top garnish. The chips will melt slightly during baking, creating pockets of molten chocolate that burst with each bite.
Pour the cheesecake batter over the chilled crust, smoothing the top with a spatula. Tap the pan lightly on the counter to release any trapped air bubbles. This is the moment of truth—if you see a smooth surface, you’re on the right track.
Place the pan in a larger roasting pan and fill the outer pan with hot water until it reaches halfway up the sides of the cheesecake pan. This water bath (bain‑marie) ensures gentle, even cooking and prevents the dreaded cracked top.
Watch Out: If the water level drops during baking, add more hot water to maintain the bath; a dry bath can cause the edges to over‑cook.Bake for 30‑35 minutes, or until the edges are set and the center still has a slight wobble. The top should be lightly golden and give a faint perfume of chocolate and vanilla. Remember, the cheesecake will continue to set as it cools, so don’t over‑bake.
While the cheesecake cools, make the ganache. Heat 1 cup of heavy cream in a saucepan until it just begins to simmer—watch closely, you don’t want a boil. Remove from heat and pour over the chopped chocolate bar, letting it sit for a minute before whisking until silky and glossy.
Kitchen Hack: For an extra shiny finish, let the ganache cool to about 90°F before pouring; this prevents it from sinking into the cheesecake.Once the cheesecake has reached room temperature, drizzle the ganache over the surface, using a spatula to spread it into a smooth, glossy coat. Sprinkle the reserved chocolate chips on top for a crunchy contrast. Let the bars chill in the refrigerator for at least 2 hours, or overnight for optimal firmness.
That's it — you did it. But hold on, I've got a few more tricks that'll take this to another level…
Insider Tricks for Flawless Results
The Temperature Rule Nobody Follows
Never pour a hot ganache over a warm cheesecake. The heat can melt the filling, causing a soggy bottom. Let both components cool to room temperature, then chill the cheesecake for at least 30 minutes before adding the ganache. This ensures the ganache sets on top without seeping in.
Why Your Nose Knows Best
Your sense of smell is a reliable indicator of doneness. When the cheesecake is baked, you’ll notice a faint, sweet chocolate aroma wafting from the pan. If you smell a burnt or overly caramelized scent, pull it out early; the interior will finish setting as it cools.
The 5‑Minute Rest That Changes Everything
After removing the pan from the oven, let it sit in the water bath for five minutes before transferring to a wire rack. This gentle transition prevents sudden temperature shock, which is a common cause of cracks. Trust me, those five minutes are worth the flawless surface you’ll see later.
Whisk vs. Mixer: The Silent Debate
When mixing the cream cheese and sugar, a handheld whisk gives you better control over air incorporation. A stand mixer can over‑whip, leading to a too‑light texture that collapses. I’ll be honest — I ate half the batch before anyone else got to try it, thanks to this gentle whisk method.
The Secret of the Double‑Chocolate Swirl
If you love marbled chocolate, melt an extra 2 oz of chocolate with ¼ cup heavy cream, then swirl it into the ganache before pouring. The result is a hypnotic marble pattern that looks as good as it tastes.
Creative Twists and Variations
This recipe is a playground. Here are some of my favorite ways to switch things up:
Mint‑Infused Madness
Add a teaspoon of peppermint extract to the ganache and sprinkle crushed peppermint candies on top. The cool mint cuts through the richness, making it perfect for holiday gatherings.
Espresso Explosion
Dissolve a tablespoon of instant espresso powder in the heavy cream before making the ganache. The coffee notes amplify the chocolate, turning the bars into a mocha lover’s dream.
White Chocolate Wonder
Swap the semi‑sweet chocolate chips for white chocolate chips and use a white chocolate bar for the ganaché. The contrast of white and dark chocolate creates a visual and flavor surprise.
Nutty Crunch
Fold in ½ cup toasted chopped hazelnuts or almonds into the batter. The nuts add a buttery crunch that pairs beautifully with the creamy filling.
Berry Bliss
Stir in ¼ cup raspberry puree into the cheesecake batter and top with fresh raspberries after chilling. The tart berries balance the chocolate, offering a sophisticated flavor profile.
Storing and Bringing It Back to Life
Fridge Storage
Cover the pan tightly with plastic wrap or transfer the bars to an airtight container. They stay fresh for up to four days, and the ganache remains glossy. For an extra touch, place a sheet of parchment between layers if you stack them.
Freezer Friendly
Wrap each bar individually in foil, then place them in a freezer‑safe bag. They freeze beautifully for up to two months. When you’re ready to eat, let them thaw in the fridge overnight; the texture stays velvety.
Best Reheating Method
To revive that fresh‑out‑of‑the‑oven shine, place a single bar on a microwave‑safe plate, add a tiny splash (about a teaspoon) of water, and microwave for 10‑15 seconds. The steam re‑hydrates the ganache, giving it that just‑baked gloss.