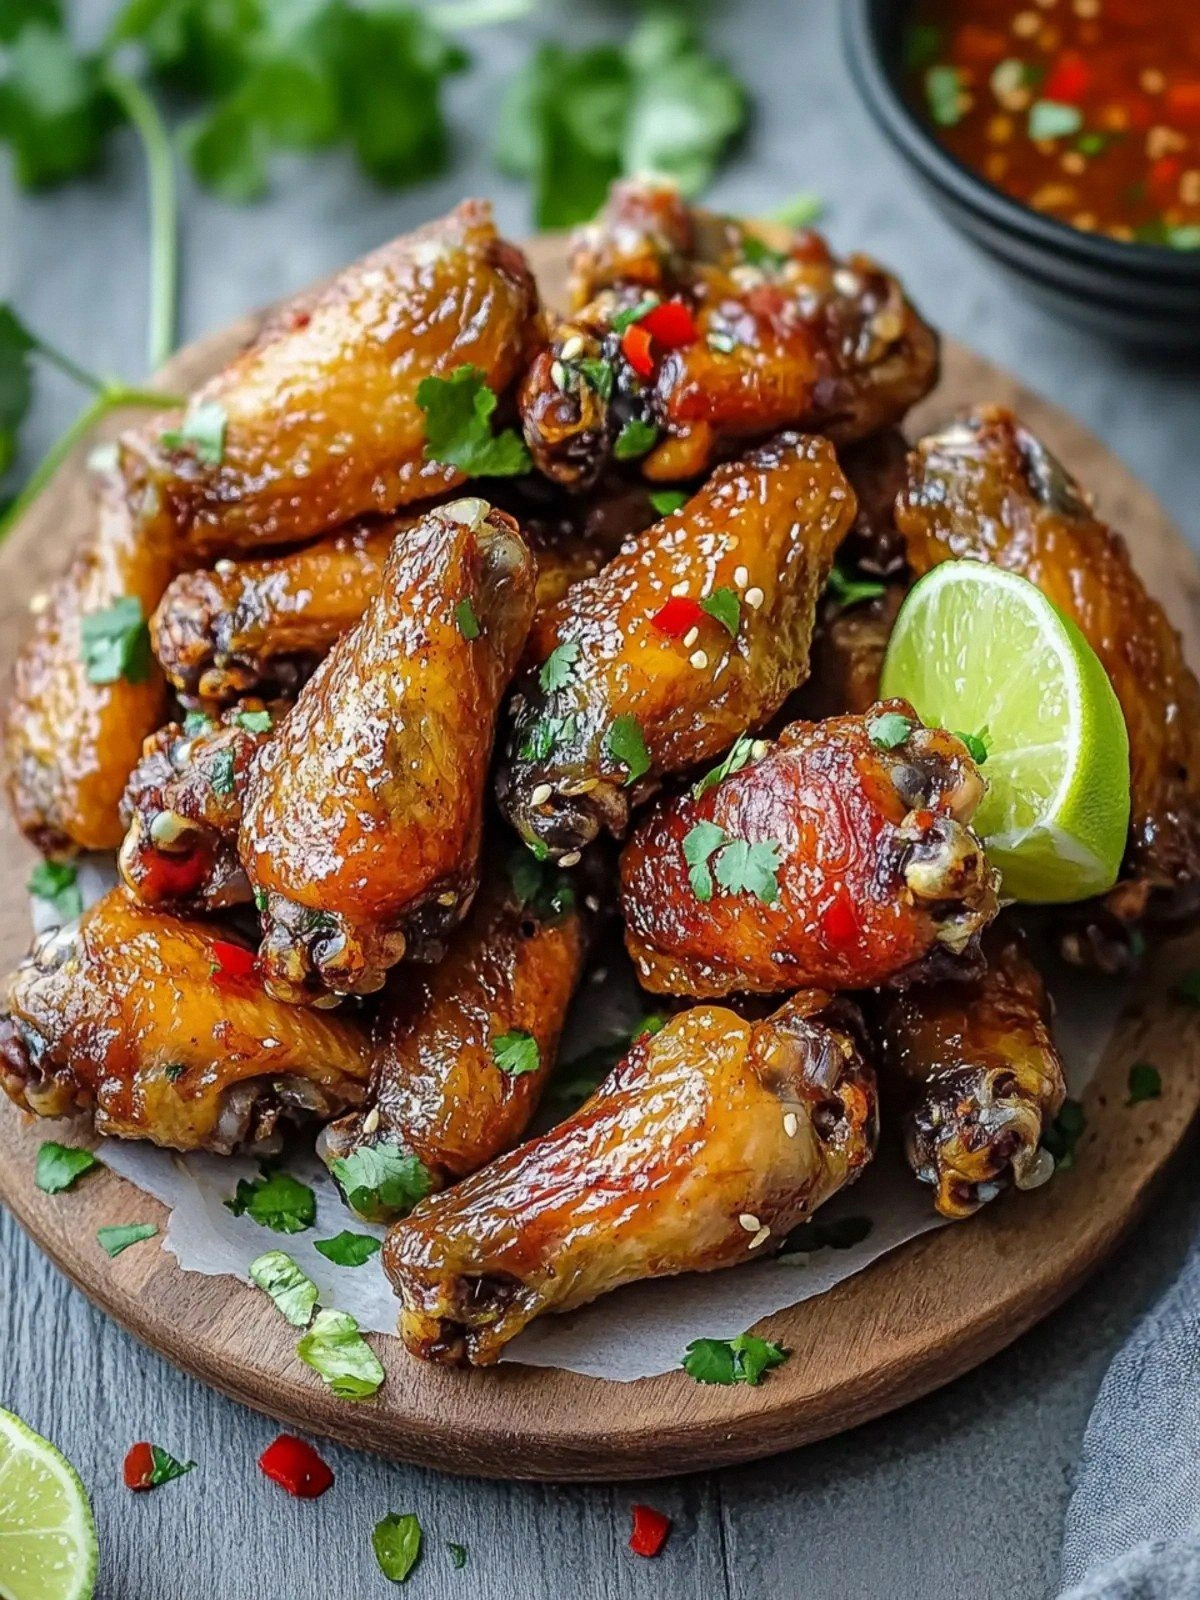
I was halfway through a disastrous dinner when the kitchen lights flickered and the smoke alarm screamed like a banshee. My friends had called for a last‑minute party, and I was staring at a pile of raw chicken wings that had been forgotten in the fridge for weeks. The only thing that could salvage the situation was a recipe that promised crispness, umami, and a splash of tropical tang. That’s when I discovered the ultimate Vietnamese Fish Sauce Chicken Wings recipe that turned a kitchen catastrophe into a crowd‑pleasing masterpiece.
Picture the moment when the wings hit the hot oil: a hiss that sounds like a thousand tiny fireworks, the aroma of butter and garlic swirling into a fragrant cloud that makes your mouth water before the first bite even arrives. The sizzling sound is the soundtrack to a transformation from raw to golden, each wing turning into a crunchy shell that cracks like a thin ice sheet under the slightest pressure. The scent of caramelized shallots and the faint, briny whisper of fish sauce mingle to create a head‑spinning aroma that instantly lifts the mood of any gathering.
What sets this version apart is not just the crispy exterior but the layered depth of flavor that comes from a simple, well‑balanced sauce. The fish sauce is the hero, its umami richness coating every bite like velvet. The buttery base melts into the wings, ensuring that the meat stays juicy while the coating stays crisp. The subtle sweetness from sugar and the bright citrus from lime wedges cut through the saltiness, creating a harmonious balance that satisfies every palate.
I dare you to taste this and not go back for seconds. If you’ve ever struggled with getting wings that are both crispy and juicy, you’re not alone. This recipe is hands down the best version you’ll ever make at home, and the technique that will change the way you think about wing preparation forever. Let me walk you through every single step — by the end, you’ll wonder how you ever made it any other way.
What Makes This Version Stand Out
- Umami: The fish sauce delivers a deep, savory flavor that elevates the wings beyond ordinary seasoning. It’s the secret ingredient that turns a simple dish into a flavor explosion.
- Crispness: The combination of flour, corn starch, and butter creates a coating that shatters like thin ice when you bite into it. The texture is a highlight that keeps guests coming back for more.
- Balance: Sweetness from sugar, acidity from lime, and heat from garlic create a well‑rounded profile that satisfies every craving. No single element overwhelms the others.
- Speed: Prep time is just 15 minutes, and the cooking process is straightforward, making it ideal for last‑minute gatherings or busy weeknights.
- Versatility: The sauce can be used as a glaze, a dipping sauce, or even a stir‑fry base. It adapts to your mood and the occasion.
- Make‑ahead Friendly: You can prepare the sauce and coating ahead of time, refrigerate, and finish cooking when you’re ready, saving you precious minutes during a dinner rush.
- Visual Appeal: The glossy, caramelized finish gives the dish an irresistible look that’s perfect for Instagram or a fancy family dinner.
- Ingredient Quality: Using fresh, high‑quality fish sauce and butter makes a noticeable difference in flavor and texture.
Alright, let’s break down exactly what goes into this masterpiece…
Inside the Ingredient List
The Flavor Base
Fish sauce is the cornerstone of this recipe, providing a salty, fermented depth that is unmistakably Vietnamese. Its umami profile is complex, with subtle hints of seaweed and fermented soy that add layers of taste to each bite. If you’re new to fish sauce, start with a smaller amount and adjust to taste; it can easily overpower if used excessively.
Garlic and shallot bring aromatic warmth. The garlic’s pungency is tempered by the shallot’s mild, sweet undertones, creating a balanced base that supports the richer flavors. If you prefer a milder taste, reduce the garlic to two cloves and double the shallot. This swap works well for those sensitive to raw garlic.
The Texture Crew
All-purpose flour and corn starch form the perfect coating that crisps up beautifully. The flour provides structure, while the corn starch adds a delicate, light crunch. If you’re looking for a gluten-free option, replace the flour with rice flour; the texture will remain crisp but with a slightly different bite.
Butter is the secret to a buttery, golden crust. It melts into the coating, creating a glossy finish that looks as good as it tastes. For a dairy-free version, use coconut oil, though the flavor will shift slightly toward a tropical note.
The Unexpected Star
Lime wedges are the final touch that adds a bright, citrusy zing. They cut through the richness of the butter and fish sauce, preventing the dish from feeling heavy. If you don’t have lime on hand, a splash of fresh lemon juice works as a suitable substitute.
The Final Flourish
The optional garnishes—such as chopped scallions, toasted sesame seeds, or a sprinkle of crushed chili flakes—add visual appeal and a burst of fresh flavor. They’re not essential to the core recipe, but they elevate the dish to a restaurant‑quality presentation. If you’re aiming for a more traditional feel, simply serve the wings with lime wedges and a small bowl of fish sauce for dipping.
Everything’s prepped? Good. Let’s get into the real action…
The Method — Step by Step
- Start by patting the chicken wings dry with paper towels. Removing surface moisture is crucial; it ensures the coating sticks and the wings crisp up rather than steam. A dry surface also prevents the oil from splattering excessively.
- In a large bowl, combine the flour, corn starch, salt, and pepper. Whisk them together until evenly mixed. This dry blend will form the crispy shell that encapsulates each wing.
- Dredge each wing in the flour mixture, shaking off excess. The coating should cling to the skin, creating a thin, even layer. For an extra crunch, double‑coat by dipping the coated wings back into the flour mix.
- Heat the vegetable oil in a deep skillet or Dutch oven to 350°F (175°C). Use a thermometer for accuracy; if you don’t have one, test the oil by dropping a small breadcrumb—if it sizzles immediately, you’re ready.
- Carefully lower the wings into the hot oil, working in batches to avoid overcrowding. Overcrowding lowers the oil temperature and results in soggy wings. Let them fry for about 8–10 minutes, turning them halfway through, until they reach an internal temperature of 165°F (74°C).
- While the wings are frying, melt the butter in a saucepan over medium heat. Add the minced garlic, shallot, and fish sauce, and sauté until the aromatics soften and the mixture starts to caramelize. The butter should turn a golden amber color, indicating the right level of toasting.
- Stir in the sugar and water, allowing the mixture to bubble and thicken slightly. The sugar will caramelize, giving the sauce a glossy sheen that will coat the wings beautifully. Watch for any signs of burning; if it starts to darken too quickly, lower the heat.
- Once the wings are cooked, transfer them to a paper‑lined tray to drain excess oil. Immediately toss the hot wings in the fish sauce glaze, ensuring each piece is coated evenly. The glaze will cling to the crispy shell, creating a sticky, caramelized finish.
- Serve hot, garnished with lime wedges and optional toppings like scallions or sesame seeds. The lime adds a fresh pop that cuts through the richness, while the scallions provide a subtle crunch and color contrast.
That’s it — you did it. But hold on, I’ve got a few more tricks that’ll take this to another level…
Insider Tricks for Flawless Results
The Temperature Rule Nobody Follows
Maintaining the oil temperature is essential for crispness. If the oil is too hot, the coating will burn before the wings are fully cooked; too cold, and the wings become greasy. Keep the temperature steady by using a thermometer and adjusting the flame as needed. This simple practice ensures a golden, non‑greasy finish every time.
Why Your Nose Knows Best
Before you add the fish sauce glaze, take a moment to inhale the aroma of the sautéed garlic and shallot. The smell will tell you if the mixture is ready; a sweet, caramelized scent means you’re on track. If the aroma is sharp or metallic, lower the heat to prevent burning.
The 5‑Minute Rest That Changes Everything
After frying, let the wings rest on a rack for five minutes. This brief rest allows the steam to escape, preventing the coating from becoming soggy. It also gives the glaze time to set, creating a glossy, caramelized finish that’s easier to handle.
Double‑Coat for Extra Crunch
If you’re aiming for the ultimate crunch, double‑coat the wings by dipping them back into the flour mixture after the first coat. The second layer will crisp up even more, creating a shell that’s light, airy, and utterly addictive.
The Right Oil Choice
While vegetable oil works well, using canola or peanut oil can enhance the flavor profile. Peanut oil, in particular, adds a subtle nuttiness that complements the fish sauce’s depth. For a healthier option, consider using sunflower oil, which has a high smoke point and neutral taste.
Creative Twists and Variations
This recipe is a playground. Here are some of my favorite ways to switch things up:
Spicy Sriracha Glaze
Add a tablespoon of Sriracha to the fish sauce glaze for a fiery kick that pairs wonderfully with the sweet caramelization. This variation is perfect for heat lovers and works well as a dipping sauce.
Herb‑Infused Citrus
Incorporate fresh basil or cilantro into the glaze, adding a herbaceous note that brightens the dish. The fresh herbs complement the lime wedges, creating a vibrant, aromatic experience.
Brown Sugar Crunch
Swap the granulated sugar for brown sugar to add a deeper molasses flavor and a slightly sticky glaze. The brown sugar caramelizes beautifully, giving the wings a richer, more complex sweetness.
Miso‑Enhanced Sauce
Stir in a spoonful of white miso into the glaze for an umami boost that layers on top of the fish sauce. The miso adds depth and a subtle nutty undertone that’s surprisingly complementary.
Coconut‑Cream Finish
Finish the wings with a splash of coconut milk in the glaze, creating a creamy, tropical finish. The coconut adds richness and a silky texture that pairs beautifully with the crisp coating.
Storing and Bringing It Back to Life
Fridge Storage
Store leftover wings in an airtight container in the refrigerator for up to 3 days. The coating may soften slightly, but reheating will restore crispness. Keep the glaze on the side so you can re‑apply before serving.
Freezer Friendly
Freeze wings in a single layer on a baking sheet before transferring them to a freezer bag. They stay fresh for up to 2 months. When ready to eat, bake at 400°F (200°C) for 10 minutes, then finish with a quick glaze.
Best Reheating Method
Reheat wings in a hot oven at 375°F (190°C) for 8–10 minutes, or use a skillet to crisp them up again. Add a tiny splash of water before reheating to create steam that re‑hydrates the interior, keeping the meat juicy while the crust stays crisp.