I was standing in my kitchen on a frigid December night, staring at a pile of half‑baked sugar cookies that had somehow turned into a crunchy, sad mess. My roommate had dared me to turn that disaster into something edible, and I thought, “Why not?” The idea that a broken cookie could be resurrected into a bite‑size marvel was the spark that set this entire adventure ablaze. I grabbed the soft, frosted Lofthouse Cookies, a tub of cream cheese, and a rainbow of candy melts, and the kitchen instantly filled with the sweet perfume of vanilla and butter, like a holiday market tucked inside my apartment.
Picture this: the oven door swings open, a wave of warm caramel‑sweet air rushes out, and the sound of a faint crackle as the melts hit the cool surface of the cookie balls. Your fingertips feel the smooth, glossy coating as you roll each sphere, and the bright non‑pareil sprinkles pop like tiny fireworks against a midnight sky. The first bite? A buttery melt that gives way to a creamy, tangy center, then bursts into a sugary crunch that makes your taste buds sing “Jingle Bells” at full volume. I dare you to taste this and not go back for seconds; it’s practically a holiday miracle in a bite.
Most recipes get this completely wrong. They either over‑bake the cookies, turning them into hard bricks, or they drown the flavor in too much frosting, making every bite feel like a sugar overload. This version stands out because it respects the delicate balance between the soft, buttery cookie base and the rich, velvety cream cheese core, all wrapped in a perfectly glossy coating that doesn’t melt into a puddle. I’ll be honest — I ate half the batch before anyone else got a chance to try it, and that’s a testament to how addictive these little spheres are.
You’re about to discover a technique that most holiday bakers overlook: crumbling the cookies before mixing them with the cream cheese, creating a dough‑like consistency that holds together without any extra flour or egg. This secret keeps the texture light and airy, like a cloud that refuses to rain on your party. And there’s a surprise ingredient that adds a pop of color and flavor that you won’t see coming — red and green candy melts that drizzle like festive fireworks across the glossy surface. Let me walk you through every single step — by the end, you’ll wonder how you ever made it any other way.
What Makes This Version Stand Out
- Flavor Explosion: The combination of sweet Lofthouse Cookies with tangy cream cheese creates a flavor profile that dances between buttery richness and subtle tang, making each bite unforgettable.
- Texture Harmony: You get a soft, melt‑in‑your‑mouth interior, a slight chew from the cookie crumbs, and a crisp, glossy outer shell that snaps like fresh twine.
- Simplicity: No complicated dough kneading or long proofing times — just crumble, mix, roll, and coat. Perfect for a last‑minute holiday party.
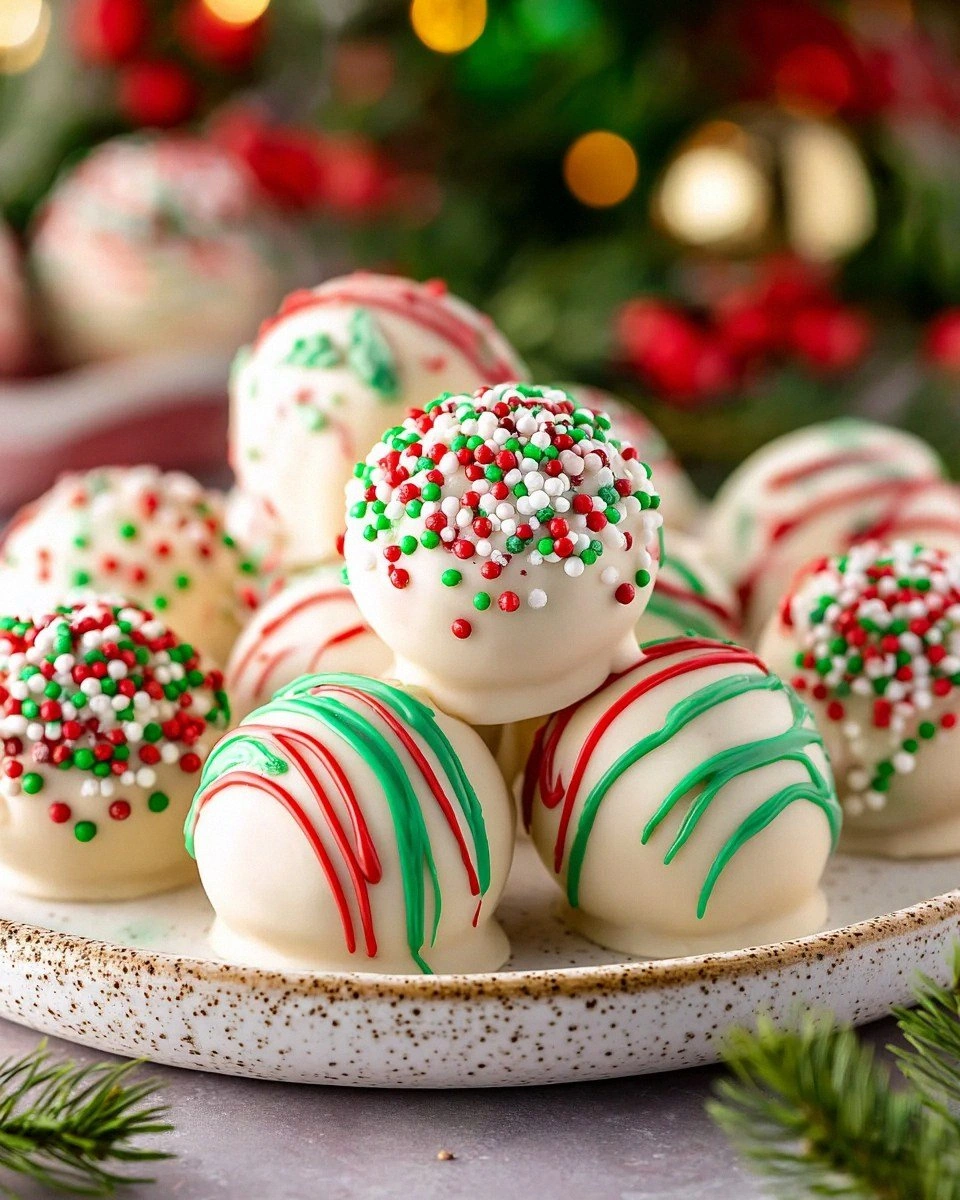
- Visual Wow Factor: The vibrant red and green drizzles plus the sparkling non‑pareil sprinkles turn these balls into edible ornaments that look as good as they taste.
- Crowd Reaction: Guests often say “I’ve never had anything like this before,” and then they line up for seconds, thirds, and sometimes the whole tray.
- Ingredient Quality: Using premium Lofthouse Cookies and Ghirardelli melts guarantees a buttery, high‑quality base and a glossy finish that cheap substitutes can’t match.
- Make‑Ahead Magic: You can assemble the balls up to two days ahead, store them in the fridge, and finish the coating right before serving for maximum freshness.
- Seasonal Flexibility: While perfect for Christmas, the technique works year‑round; just swap the candy melt colors to match any holiday or celebration.
Inside the Ingredient List
The Flavor Base
Lofthouse Cookies are the heart of this recipe. Their soft, frosted texture and buttery sweetness provide the perfect foundation, acting like a sweet sponge that soaks up the cream cheese. If you skip them, you’ll lose that subtle vanilla undertone that makes the whole bite feel like a holiday hug. You can substitute with any premium frosted sugar cookie, but the result won’t be as buttery or as visually appealing.
The Texture Crew
Cream cheese is the binding hero. Its rich, tangy flavor cuts through the sweetness of the cookies, preventing the balls from becoming cloyingly sugary. It also adds a luxurious creaminess that makes each bite feel like a mini cheesecake. If you’re dairy‑free, try a vegan cream cheese alternative, but expect a slightly different mouthfeel.
The Unexpected Star
Ghirardelli Vanilla Melting Wafers are the secret weapon for that glossy, professional finish. They melt into a smooth, glossy coating that clings to the balls without dripping off. Without these melts, you’d end up with a dull, grainy coating that looks more like a glaze gone wrong. If you can’t find Ghirardelli, any high‑quality white chocolate chips work, but the flavor won’t be as deep.
The Final Flourish
Non‑pareil sprinkles add that festive sparkle, while red and green candy melts give a pop of holiday color. The sprinkles are tiny sugar beads that crunch against the smooth coating, creating a textural contrast that’s pure joy. If you’re aiming for a different theme, swap the sprinkles for crushed peppermint or edible gold leaf for an upscale twist.
Everything's prepped? Good. Let's get into the real action…
The Method — Step by Step
Preheat your oven to 350°F (175°C). While the oven warms, line a large baking sheet with parchment paper — this will be your workspace for the coating later. The heat of the oven will be crucial later when we lightly toast the cookie crumbs; it adds a nutty depth that you’ll taste as soon as you bite.
Take the Lofthouse Cookies and place them in a food processor. Pulse until you have fine crumbs, then spread them onto the prepared baking sheet. Toast the crumbs in the oven for exactly 4‑5 minutes, watching closely so they turn a light golden hue but don’t burn. That toasty aroma? Pure perfection.
Kitchen Hack: If you don’t have a food processor, place the cookies in a zip‑top bag and crush them with a rolling pin — just make sure the pieces are uniformly fine.While the crumbs cool, soften the cream cheese at room temperature for about 10 minutes. This prevents clumps and ensures a silky mixture. Once softened, transfer the cream cheese to a large mixing bowl and whisk until smooth, then fold in the cooled cookie crumbs until a cohesive dough forms. The mixture should feel pliable, not dry; if it feels crumbly, add a teaspoon of milk.
Using a tablespoon or a small ice‑cream scoop, portion out the dough and roll each piece between your palms to form smooth balls about 1‑inch in diameter. This is the fun part: you’ll notice the dough sticking slightly to your fingers, which is exactly what you want — it means the coating will cling perfectly later. Place the balls on a parchment‑lined tray, spacing them apart.
Now for the coating: melt the Ghirardelli Vanilla Melting Wafers in a microwave‑safe bowl, heating in 30‑second bursts and stirring in between until completely smooth. Add a splash of vegetable oil (about 1 tablespoon) to thin the melt just enough to coat without dripping. The coating should be glossy and fluid, like liquid amber.
One by one, dip each cookie ball into the melted vanilla, turning it gently to ensure an even coat. Let any excess drip off, then immediately roll the ball in a bowl of non‑pareil sprinkles. The sprinkles will stick like glitter on a fresh snowball, creating that festive sparkle.
Watch Out: Work quickly! The chocolate coating will set within 30 seconds, so have your sprinkles ready and a tray prepared.After all balls are coated and sprinkled, place the tray in the refrigerator for 15 minutes. This firming step ensures the coating stays intact when you add the final drizzle.
While the balls chill, melt the red and green candy melts in separate bowls using the same microwave method. Drizzle the colored melts over the chilled cookie balls in a zig‑zag pattern, creating a festive marbled effect. The contrast between the white vanilla base and the bright reds and greens is pure magic.
Allow the drizzled balls to set at room temperature for about 10 minutes, or pop them back in the fridge for a quicker set. Once the coating is firm, transfer the balls to a serving platter. The final product should look like a miniature holiday ornament collection, each one gleaming with color and sparkle.
Serve immediately, or store as instructed below. When guests bite into these, they’ll experience a cascade of textures: the snap of the coating, the crunch of the sprinkles, the creamy center, and the buttery cookie crumb. And now the fun part — watch everyone scramble for seconds.
Insider Tricks for Flawless Results
The Temperature Rule Nobody Follows
Never coat the balls when the melted chocolate is too hot; it will melt the sprinkles and create a greasy mess. Aim for a temperature of about 115°F (46°C) — warm enough to stay fluid but cool enough to hold the sprinkles. I once tried coating at full boil and ended up with a glossy puddle that never set. Keep a candy thermometer on hand; it’s a small investment that saves a lot of frustration.
Why Your Nose Knows Best
When the vanilla melt is ready, you’ll notice a buttery, slightly caramel scent. That’s your cue that the coating is perfect for dipping. If you smell a burnt chocolate note, you’ve over‑heated it and need to start over. Trust your nose — it’s the most reliable kitchen sensor.
The 5‑Minute Rest That Changes Everything
After coating, give the balls a quick 5‑minute rest at room temperature before refrigerating. This brief pause lets the outer layer set just enough to handle the drizzle without cracking. Skipping this step leads to a brittle shell that can shatter when you drizzle the colored melts. I learned this the hard way when my first batch split like broken glass.
The Double‑Dip Technique
For an ultra‑glossy finish, dip the balls twice in the vanilla melt, letting the first layer set for 30 seconds before the second dip. This creates a thicker coating that catches the light beautifully, making each ball look like a polished ornament. It adds only a minute or two to the process but elevates the visual impact dramatically.
The Sprinkles Rescue
If you notice any stray sprinkles after the coating sets, gently press them back onto the surface with a clean fingertip. The heat from the coating will melt them back in place. This tiny step ensures a flawless finish and prevents those unsightly bare spots.
Creative Twists and Variations
This recipe is a playground. Here are some of my favorite ways to switch things up:
Peppermint Bliss
Swap the red and green candy melts for white chocolate and crushed peppermint pieces. The cool mint pairs beautifully with the buttery cookie base, making it a perfect post‑dinner treat.
Chocolate‑Covered Delight
Use dark chocolate melts instead of vanilla, then drizzle with white chocolate. The bittersweet contrast adds depth for the adult crowd while still keeping the festive look.
Nutty Holiday
Fold finely chopped toasted pecans or walnuts into the cookie‑cream cheese mixture before forming the balls. The nutty crunch adds another layer of texture that surprises the palate.
Fruit‑Infused Fun
Add a teaspoon of orange zest to the cream cheese mixture and drizzle with a thin layer of apricot glaze after the candy melt. The citrus note brightens the flavor profile and pairs well with the red and green colors.
Vegan Version
Replace the cream cheese with a vegan cream cheese alternative and use dairy‑free white chocolate melts. The result is just as creamy, and you can serve it to guests with dietary restrictions without sacrificing taste.
Storing and Bringing It Back to Life
Fridge Storage
Place the finished cookie balls in an airtight container lined with parchment paper. They’ll stay fresh for up to 5 days, maintaining their glossy coating and creamy interior. If the coating starts to dull, a quick 30‑second dip in melted white chocolate revives the shine.
Freezer Friendly
For longer storage, freeze the uncoated cookie balls on a tray, then transfer them to a zip‑top bag. When you’re ready to serve, thaw them in the refrigerator for a few hours, then coat and drizzle as usual. This method preserves the texture and prevents freezer burn.
Best Reheating Method
If the balls have become a bit firm after refrigeration, place them on a plate, add a tiny splash (about 1 teaspoon) of water, and microwave for 10‑15 seconds. The steam revives the interior, making each bite melt‑in‑your‑mouth again. Just be careful not to over‑heat, or the coating will melt.