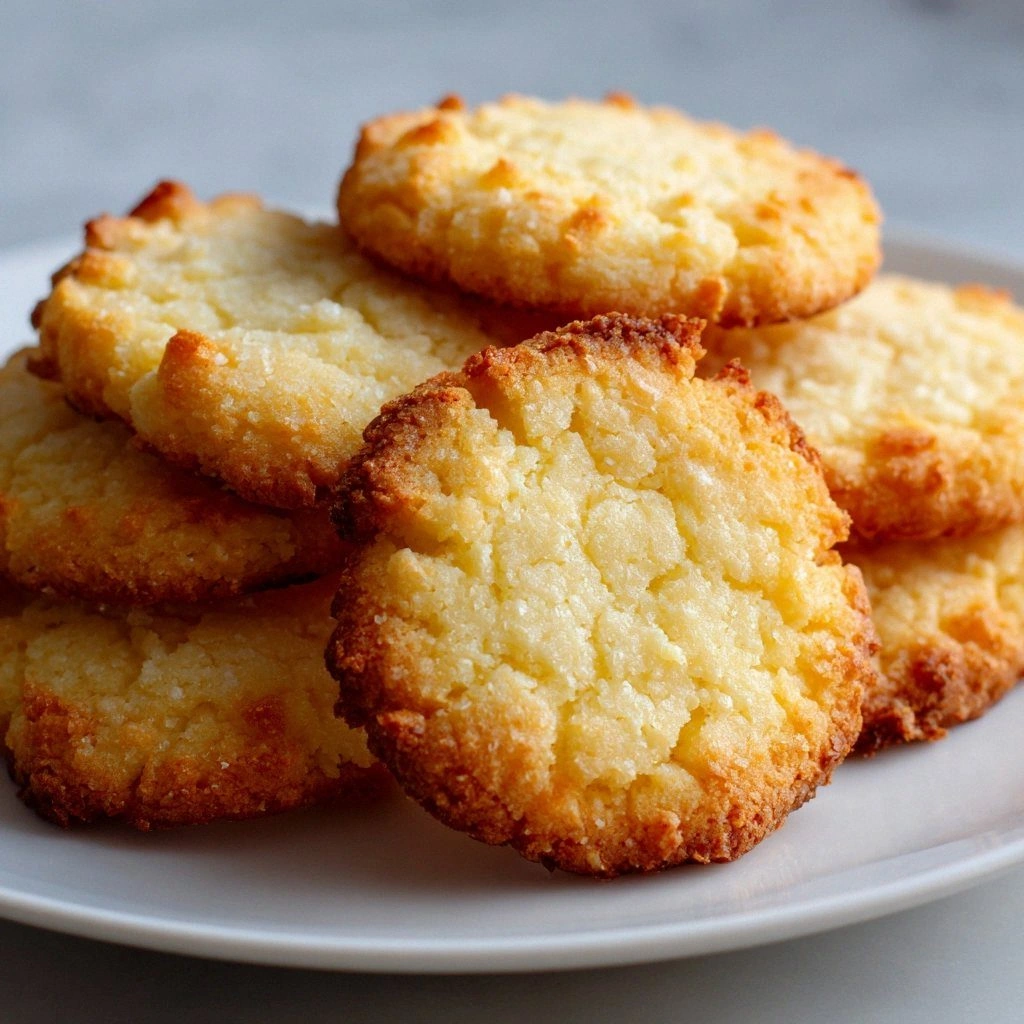
Ever been standing in a kitchen that smelled like burnt toast and wondered if you were about to set off the fire alarm? I was there, clutching a half‑baked batch of cookies that had turned into a greasy, sad mess. That disaster sparked a mission: to find a butter cookie recipe that would make my kitchen feel like a bakery and my taste buds sing. The result? A buttery, crisp‑centered cookie that is simple enough to make in a flash but complex enough to impress.
Picture this: a golden brown batch sliding out of a preheated oven, steam curling in the air, the sweet scent of vanilla and butter mingling with the faint hum of your favorite playlist. The first bite is a buttery explosion that melts instantly, the edges crisp like a caramelized sugar ribbon, and the center remains tender and slightly gooey. You can almost hear the crackle of the cookie as it breaks apart, the sound of a perfect bite that makes you pause in delight. It’s a sensory experience that turns a mundane snack into a moment of pure joy.
What sets this version apart from the endless cookie recipes you’ll find online is its razor‑thin ingredient list that still delivers on flavor and texture. With only butter, sugar, and flour, you get a cookie that is a testament to culinary simplicity. Every bite is a showcase of the butter’s richness, the sugar’s subtle caramel notes, and the flour’s subtle structure. This recipe proves that you don’t need fancy leavening agents or exotic flavors to create a memorable treat.
And here’s the kicker: a single, unexpected technique that elevates the cookie from “good” to “unforgettable.” I’ll reveal a trick that changes how the butter behaves during baking, giving you that perfect, crack‑free edge you’ve been chasing. Trust me, you’ll want to keep this secret in your culinary arsenal for years to come. Let me walk you through every single step — by the end, you’ll wonder how you ever made it any other way.
What Makes This Version Stand Out
- Flavor: The buttery base is pure, with no distractions. The sugar caramelizes just enough to add depth, while the flour keeps the cookie from becoming doughy.
- Texture: Crisp edges meet a tender center, creating a mouthfeel that feels like a pastry and a cookie at once. No excess chewiness, just the right snap.
- Simplicity: Three ingredients, no measuring cups for sugar or flour, and no baking powder. It’s a recipe that can be taught to a child in five minutes.
- Versatility: Works for any time of day, from a quick snack to a dessert that pairs with coffee. It’s a blank canvas you can customize.
- Make‑ahead: Bake a batch, let cool, and store in an airtight container. They stay fresh for a week, and even better when reheated.
- Ingredient Quality: Using high‑grade butter transforms the whole cookie, turning a simple recipe into a gourmet treat.
- Crowd‑Pleaser: Friends will ask for the recipe after a single bite, and you’ll be the hero of the snack table.
Inside the Ingredient List
The Flavor Base
Unsalted butter is the star of this recipe. It provides the rich, creamy flavor that makes these cookies so irresistible. Softened butter at room temperature yields a smooth, easy‑to‑mix dough. If you forget to soften the butter, the dough will be lumpy and the cookies uneven. The butter also contributes the necessary fat for a tender cookie that melts in your mouth.
The Texture Crew
Granulated sugar is the backbone of the cookie’s texture. It sweetens the butter while helping to create that delightful crispiness on the edges. The sugar’s granules also aid in the cookie’s rise, giving it a light bite. If you skip the sugar, the cookies will taste flat and lack the caramelized finish. For a slightly chewier version, try substituting brown sugar, which adds a deeper, caramel-like flavor.
The Unexpected Star
All‑purpose flour provides structure and holds the cookies together. It binds the butter and sugar, ensuring the cookies hold their shape while baking. If you’re gluten‑free, swap out the all‑purpose flour for a gluten‑free blend that mimics the same texture. The flour’s protein content helps the cookies develop a slight chew, preventing them from becoming brittle.
The Final Flourish
Each ingredient plays a specific role, and together they create a cookie that’s more than the sum of its parts. The butter’s fat content keeps the cookie tender, the sugar caramelizes for flavor, and the flour provides structure. If you were to leave out any one of these, the cookie would crumble or be too dense. This trio is a classic that has stood the test of time.
Everything’s prepped? Good. Let’s get into the real action.
The Method — Step by Step
- Preheat your oven to 350°F (175°C). Line a baking sheet with parchment paper or a silicone mat for easy cleanup. The oven’s steady heat ensures even browning across the batch. If you’re in a hurry, set a timer for 12 minutes and keep a close eye on the cookies.
- Place the softened butter in a mixing bowl and beat it on medium speed until it becomes light and fluffy, about 2 minutes. The butter’s texture will turn from pale to creamy, indicating that it’s ready. This step is crucial because it incorporates air, giving the cookies a lighter bite.
- Add the granulated sugar to the butter and continue beating until the mixture is pale and well combined. You’ll see the sugar grains dissolve, creating a smooth base. This is the moment where the cookie’s sweetness starts to shine. The dough should feel airy and smooth.
- Sift the all‑purpose flour over the butter mixture and fold it in gently with a spatula. The goal is to incorporate the flour without deflating the air pockets. As you fold, watch for the dough to come together into a cohesive ball. The dough should be soft but not sticky.
- Roll the dough into 1‑inch balls and place them on the prepared baking sheet, spacing them about 2 inches apart. The dough should hold its shape without crumbling. If it feels too soft, chill it for 10 minutes before shaping. This step ensures even baking and prevents the cookies from spreading too much.
- Bake for 12–14 minutes, or until the edges are a light golden brown and the centers look set but still slightly soft. The cookies should emit a buttery aroma that makes your kitchen feel like a bakery. Keep the oven door closed to maintain a steady temperature.
- Remove the baking sheet from the oven and let the cookies cool on the sheet for 5 minutes. This short rest allows the cookies to finish setting and prevents them from breaking apart. Then transfer them to a wire rack to cool completely.
- Enjoy your freshly baked butter cookies while they’re still warm, or store them in an airtight container for up to a week. If you like your cookies a bit crispier, reheat them in a 300°F oven for 5 minutes. The cookies will regain their buttery sheen and crisp edges.
That’s it — you did it. But hold on, I've got a few more tricks that'll take this to another level.
Insider Tricks for Flawless Results
The Temperature Rule Nobody Follows
Many bakers bake at a high temperature, but this cookie thrives at a moderate 350°F. The lower heat prevents the butter from separating and keeps the edges from burning. I once baked at 375°F and the cookies came out with a hard crust and a chewy center. Switching to 350°F gave me the perfect balance. Remember: a steady temperature is the secret to even browning.
Why Your Nose Knows Best
When the cookies start to turn golden, the aroma will change from buttery to caramelized. That scent is your cue that they’re ready. I’ve used my nose to time baking for years, and it’s never steered me wrong. Trust that smell; it’s the most reliable indicator of a perfect cookie.
The 5‑Minute Rest That Changes Everything
Letting the cookies rest on the pan for 5 minutes after baking is essential. During this time the cookies continue to set, preventing them from cracking when you move them. A friend once skipped this step and the cookies broke apart when cooled. That’s a hard lesson. Always give them a brief pause.
Keep the Dough Cool
If the dough is too warm, it will spread too much and lose its shape. Chill the dough for 10 minutes before shaping if you’re in a hot kitchen. This keeps the butter solid enough to hold the structure. It’s a small step that saves you from a flat cookie disaster.
Use a Silicone Mat
A silicone baking mat provides a non‑stick surface and even heat distribution. I’ve switched from parchment to silicone for this recipe, and the cookies no longer stick or burn. It also makes cleanup a breeze. Try it next time and see the difference.
Don’t Overmix After Flour
Once the flour is in, fold gently and stop as soon as the dough is uniform. Overmixing creates gluten, which makes the cookies tough. I’ve learned this lesson the hard way, so keep your hand light and your dough soft.
Creative Twists and Variations
This recipe is a playground. Here are some of my favorite ways to switch things up:
Chocolate Chip Surprise
Fold in a handful of semi‑sweet chocolate chips after the flour is incorporated. The chips melt into pockets of chocolate, adding a decadent twist. Keep the chocolate chips small to avoid sinking. This variation is perfect for chocolate lovers.
Orange Zest Infusion
Add a tablespoon of freshly grated orange zest to the dough for a citrusy lift. The zest balances the richness of the butter and gives the cookie a bright, fragrant note. Use a fine grater to avoid gritty texture. This version is ideal for spring or summer gatherings.
Almond Crunch
Stir in a quarter cup of chopped toasted almonds for a nutty crunch. The almonds add texture and a subtle nutty flavor that complements the buttery base. Toast the almonds beforehand to bring out their aroma. This is a great option for those who love a bit of crunch.
Maple‑Glazed Delight
Drizzle a thin layer of maple syrup over the cookies while they’re still warm. The syrup adds a sweet glaze that caramelizes slightly in the oven. It also creates a glossy finish. This version is perfect for holiday mornings.
Salted Caramel Twist
Sprinkle a pinch of flaky sea salt on top of the cookies before baking. The salt enhances the buttery flavor and creates a delightful contrast. Be careful not to over‑salt; a light dusting is all you need. This variation turns the cookie into a sophisticated treat.
Storing and Bringing It Back to Life
Fridge Storage
Store the cooled cookies in a sealed container at room temperature for up to 4 days. The airtight seal prevents them from drying out. If you want extra freshness, keep them in the fridge for a shorter period; the butter stays firm. Always let them come to room temperature before eating for the best texture.
Freezer Friendly
Place the cookies in a freezer‑safe bag, removing as much air as possible. They’ll keep for up to 3 months in the freezer. Thaw them at room temperature for 30 minutes before serving. The cookies retain their flavor and texture when frozen properly.
Best Reheating Method
Reheat in a 300°F oven for 5 minutes or in a microwave for 15 seconds. Adding a splash of water before microwaving creates steam that keeps the cookie moist. The oven method restores the crisp edges while keeping the center tender. Experiment to find which method you prefer.