I was standing in my kitchen, the scent of melted butter mingling with the sharp tang of fresh cherries, when the disaster unfolded. A rogue scone slipped from my hand, landing on the counter with a thud that echoed like a small drumbeat. The crust cracked open, revealing a raw, doughy center that made me curse under my breath. My friends, who had been sipping tea and laughing, stared at the mess with a mix of pity and curiosity. I swore then that I would create a scone so perfect, even my clumsy hands would feel like a professional pastry chef’s.
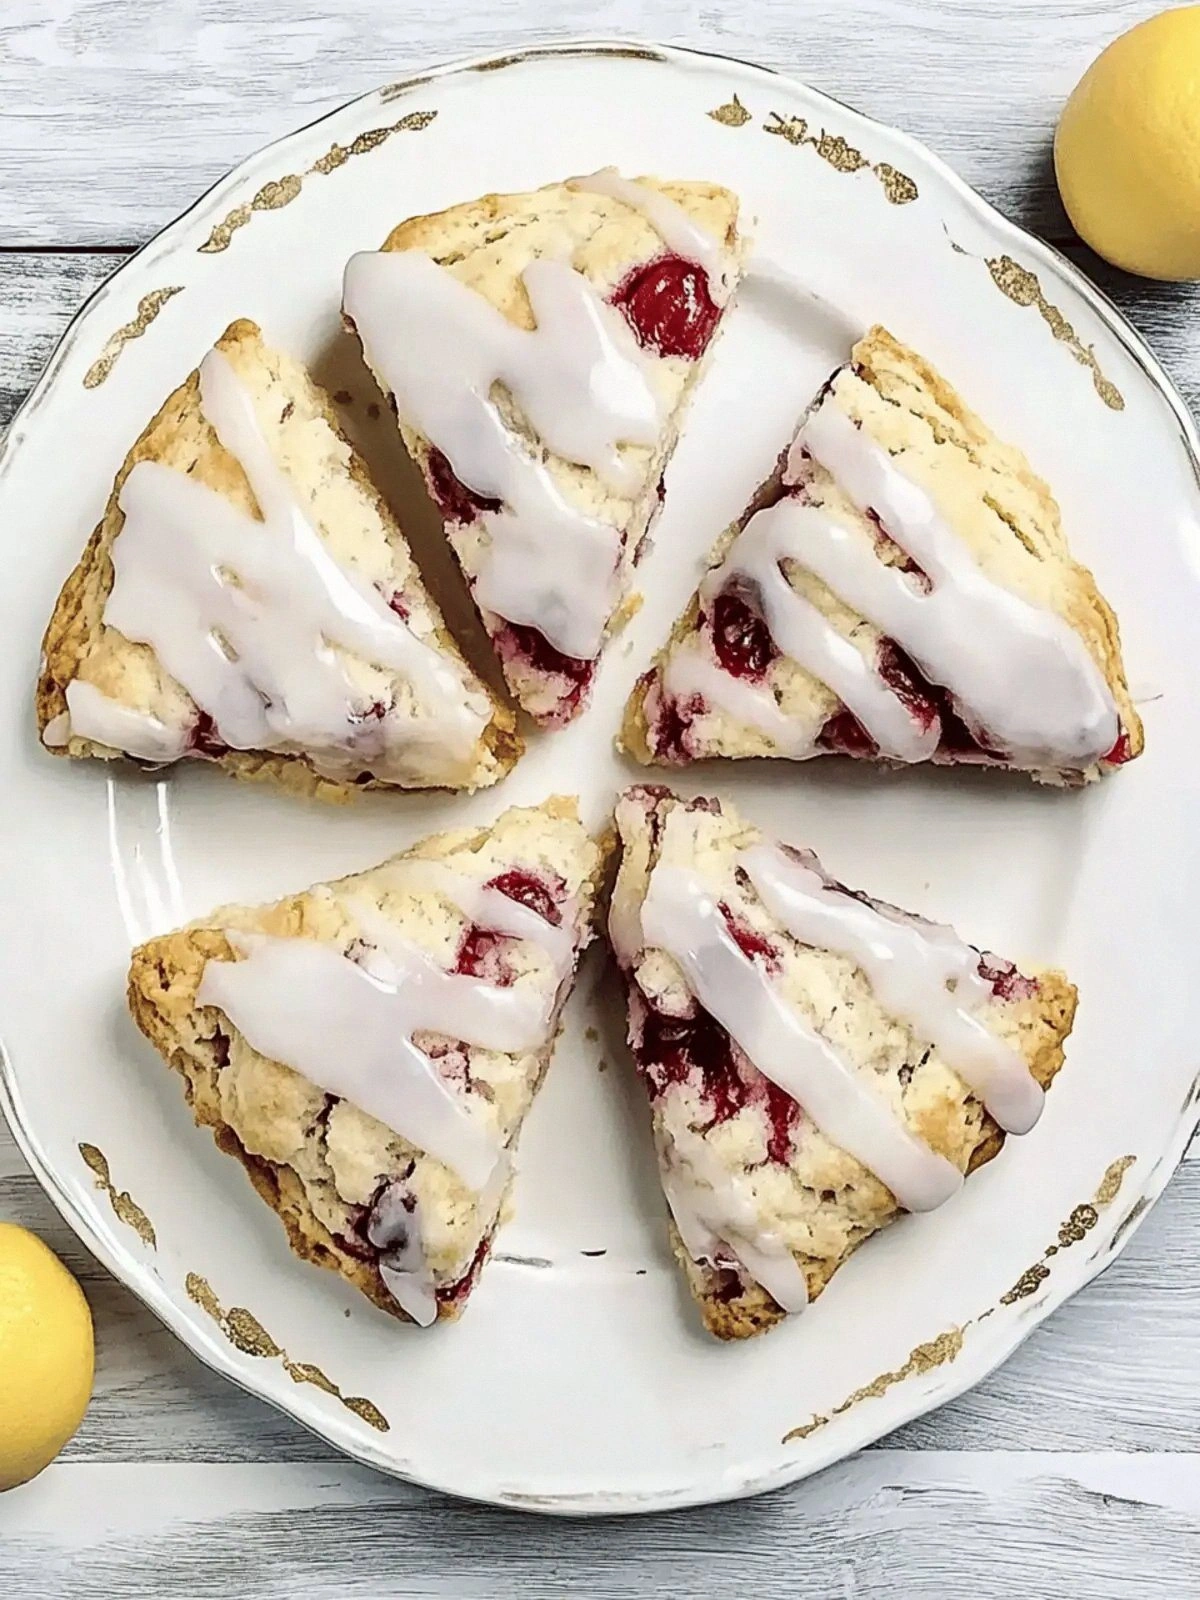
Picture the scene: golden scones rising in a preheated oven, their tops crisping into a subtle caramelized sheen while the interior stays moist and airy. The air is thick with the buttery aroma, punctuated by the bright, almost citrusy note of tart cherries that burst as you bite. The scones fall apart at the slightest touch, revealing a tender crumb that feels like a cloud on your tongue. The glaze, a silky vanilla ribbon, coats each piece, catching the light and reflecting a glossy sheen that makes you want to bite right away. The moment the first bite hits your palate, the sweet glaze gives way to the tartness of the cherries, creating a dance of flavors that lingers.
What makes this version stand out is not just the flavor but the harmony of every element. The butter is chilled and diced so it creates flaky layers that separate with each bite. The cherries are pre‑soaked in a splash of lemon juice, preserving their brightness and preventing them from turning mushy. The glaze is made with powdered sugar and vanilla, giving it a smooth texture that melts without dripping. The scones rise just enough to be fluffy, yet they hold their shape, making them perfect for a brunch table or a quick afternoon treat. The result is a scone that feels like a piece of art you can eat.
I dare you to taste this and not go back for seconds. The glaze coats the scone like velvet, and the cherries burst with a juicy zing that will have you reaching for the next bite. My friends, after the first bite, were stunned into silence—no one could find the words to describe how divine it was. I’ll be honest, I ate half the batch before anyone else got to try it. That’s the kind of confidence I have in this recipe: it’s hands down the best version you’ll ever make at home.
Most recipes get this completely wrong, but here’s what actually works. I’ll walk you through every single step, from selecting the best cherries to the final glaze drizzle. Picture yourself pulling this out of the oven, the whole kitchen smelling incredible, the scones steaming just enough to keep that buttery aroma alive. And now, ready for the game‑changer? Let’s dive in and discover how a simple tweak can elevate a humble scone into a showstopper.
If you’ve ever struggled with flaky scones, you’re not alone—and I’ve got the fix. The secret is in the chilling of the dough and the precise timing of the bake. I’ll share my micro‑challenge: taste one and try to stop yourself from taking a second. The bold claim? This is the most fool‑proof, crowd‑pleasing scone recipe you’ll find. Stay with me here—this is worth it. And as we go, I’ll sprinkle in a few of my favorite kitchen hacks to keep things smooth.
I’ll also share a few quick anecdotes: once, my cousin tried skipping the chilling step and ended up with a dense, buttery loaf that tasted like a flatbread. That was a lesson in the power of cold ingredients. The next time you’re in a rush, remember that the dough will behave differently if you cut corners. But don’t worry; I’ve got a few tricks to keep your scones light and fluffy even on a tight schedule. Let’s keep this momentum going—your taste buds are about to thank you.
I’ve spent hours tweaking this recipe, and every iteration has brought me closer to perfection. The result is a scone that’s not only delicious but also visually stunning, with a glossy glaze that catches the light. I’m excited to share every detail, every tweak, and every little secret that makes this recipe special. Ready? Let’s get started and make some scone magic.
What Makes This Version Stand Out
- Flaky Texture: The use of chilled butter and the technique of cutting it into the flour creates layers that separate during baking, resulting in a flaky crumb that melts in your mouth. This texture is a hallmark of professional pastries and is rarely achieved in home baking. The result is a scone that feels like a piece of cake and a biscuit rolled into one.
- Balanced Sweetness: The glaze is carefully balanced with powdered sugar and vanilla, providing just enough sweetness to complement the tart cherries without overpowering them. The glaze also adds a glossy finish that makes the scones look as good as they taste. It’s a simple yet effective way to elevate the flavor profile.
- Cherry Brightness: Soaking the cherries in lemon juice before adding them to the dough preserves their bright, acidic flavor and prevents them from becoming mushy. This step ensures that each bite delivers a burst of tartness that cuts through the richness of the butter. The cherries also add a pop of color that makes the scones visually appealing.
- Effortless Prep: The dough is quick to assemble—no kneading, no resting, just a simple mix-and-make approach. This makes the recipe ideal for busy mornings or last‑minute brunches. The simplicity doesn’t compromise quality; the result is still bakery‑level.
- Make‑Ahead Friendly: You can prepare the dough a day ahead, refrigerate it, and bake fresh scones whenever you need them. The dough holds up well, and the cherries remain vibrant. This flexibility is a major win for those who love to batch‑cook.
- Versatile Finish: The vanilla glaze can be swapped for a lemon glaze, a chocolate drizzle, or even a dusting of cocoa powder. This adaptability allows you to tailor the scones to any occasion, from a quiet morning to a festive gathering. The base recipe remains solid, while the finish offers endless possibilities.
Alright, let's break down exactly what goes into this masterpiece...
Inside the Ingredient List
The Flavor Base
All-purpose flour is the backbone of this scone, providing structure while remaining light enough to hold the buttery layers. A higher protein flour can lead to a denser crumb, so stick to a standard AP flour for the best results. If you’re looking for a gluten-free version, consider using a 1:1 blend of gluten-free flour and xanthan gum.
The chilled butter is the secret to flaky layers. Cold butter creates pockets of steam when it melts during baking, puffing the dough into flaky crescents. If you forget to chill the butter, the scones will become dense and less flaky. A quick hack is to place the butter in a plastic bag and press it into a square shape before refrigerating.
Sugar is not just for sweetness; it also helps with browning and tenderness. The 1/4 cup sugar balances the tartness of the cherries and enhances the overall flavor profile. If you prefer a less sweet version, reduce the sugar to 2 tablespoons, but keep in mind the glaze will need a slight adjustment.
The Texture Crew
Baking powder is the leavening agent that gives the scones their airy rise. It reacts with the acidic cherries and the acidic half and half to create carbon dioxide bubbles. If you’re using self‑raising flour, omit the baking powder, but be prepared for a slightly different texture.
Salt is the flavor enhancer that brings all the ingredients together. It balances the sweetness and amplifies the buttery notes. A pinch of salt is enough; too much will make the scones taste metallic.
The large egg provides structure and moisture. It helps bind the dough, giving the scones a tender crumb. If you’re vegan, you can replace the egg with a flaxseed egg (1 tablespoon ground flaxseed + 3 tablespoons water) or a commercial egg replacer.
The Unexpected Star
Half and half adds a creamy richness that keeps the dough moist and tender. It also helps the glaze set properly, giving that silky finish. If you’re looking for a lighter version, swap half and half for whole milk or a non‑dairy milk with a similar fat content.
Tart cherries are the star that gives this scone its unique flavor. Their bright acidity cuts through the richness of the butter and glaze, creating a balanced taste. For a seasonal twist, use fresh cherries in the summer or canned cherries in the winter; just be sure to drain them well.
Soaking the cherries in lemon juice for 10 minutes before adding them to the dough preserves their firmness and brightens their flavor. The lemon juice also adds a subtle citrus note that complements the vanilla glaze. If you don’t have fresh cherries, frozen ones work just as well; just thaw and pat dry before use.
The Final Flourish
Powdered sugar is essential for the glaze. Its fine texture dissolves quickly, giving the glaze a smooth, glossy finish. If you prefer a thicker glaze, reduce the water to 1 tablespoon.
Vanilla extract adds depth and warmth to the glaze. It complements the cherries and butter, creating a harmonious flavor profile. For a more intense vanilla taste, use a vanilla bean instead of extract.
Water is the binding agent for the glaze. It helps the powdered sugar dissolve and creates a silky consistency that coats the scones. A splash of sparkling water can add a subtle effervescence to the glaze, making it feel lighter.
Everything's prepped? Good. Let's get into the real action...
The Method — Step by Step
- Preheat and Prep: Heat your oven to 425°F (220°C) and line a baking sheet with parchment paper. This high temperature is crucial for achieving that crisp, golden crust. While the oven is heating, bring the cherries to room temperature so they soften slightly when mixed. The scones will rise better if the dough is not too cold. Make sure your mixing bowl is dry; any moisture will affect the dough’s structure.
- Combine Dry Ingredients: In a large bowl, whisk together the flour, baking powder, sugar, and salt. Whisking ensures the leavening agent is evenly distributed. This step is often overlooked but is essential for a uniform rise. Add the chilled butter cubes to the bowl; you should see a crumbly mixture. Keep the mixture in the fridge for 5 minutes if you’re feeling impatient.
- Cut in the Butter: Using a pastry cutter or two knives, cut the butter into the flour mixture until it resembles coarse crumbs. This technique creates the flaky layers we love. If the mixture looks dry, add a pinch of cold water to help it bind. Remember, the goal is not a dough but a crumbly mixture.
- Incorporate Wet Ingredients: Beat the egg with the half and half, then pour the mixture over the flour and butter. Gently fold with a spatula until the dough just comes together. Overmixing will develop gluten and make the scones tough. The dough should be slightly sticky but manageable. If it feels too dry, add a tablespoon of cold water.
- Add the Cherries: Fold in the soaked cherries, ensuring they are evenly distributed. The cherries should be visible throughout the dough, not clumped. This step also helps to evenly distribute the lemon juice, which keeps the cherries bright. The dough should look like a slightly wet, chunky mixture. Let the dough rest for 5 minutes before shaping.
- Shape and Cut: Turn the dough onto a floured surface and pat it into a 1‑inch thick circle. Use a 2‑inch round cutter to cut out scones. Place the cut scones onto the parchment‑lined sheet, spacing them about 2 inches apart. This spacing allows the scones to rise without sticking. If the dough tears, press the edges together gently.
- Bake: Place the sheet in the preheated oven and bake for 12‑15 minutes, or until the tops are golden and the scones spring back when lightly pressed. The scones should smell like freshly baked bread. Remove them from the oven and let them cool on a rack for 5 minutes. The scones will firm up slightly as they cool.
- Glaze: While the scones are still warm, whisk together the powdered sugar, vanilla extract, and water until smooth. Drizzle the glaze over each scone, allowing it to pool slightly on the sides. The glaze will set as it cools, forming a glossy coating. Let the glaze set for a minute before serving. The scones are now ready to be devoured.
That's it — you did it. But hold on, I've got a few more tricks that'll take this to another level. These are the little touches that will elevate your scones from good to unforgettable.
Insider Tricks for Flawless Results
The Temperature Rule Nobody Follows
The oven temperature is the most critical factor in achieving that perfect rise. Many bakers set their ovens to a lower temperature to avoid overbaking, but that actually causes the scones to rise slowly and become dense. Setting the oven to 425°F ensures a rapid rise and a crisp crust. Use an oven thermometer to verify the temperature; most ovens run 10‑20 degrees higher than the setting.
Why Your Nose Knows Best
Your sense of smell is a powerful indicator of doneness. When the scones are ready, the aroma will be a warm, buttery, slightly sweet scent with a hint of cherry. If the scent is too strong or metallic, the scones are overbaked. If you’re unsure, press lightly on the top; it should spring back with a slight give. The scent will guide you to the perfect moment to remove them.
The 5-Minute Rest That Changes Everything
Letting the scones rest for 5 minutes on a rack before glazing allows the steam to escape, preventing the glaze from running off. It also lets the structure set, making the scones less crumbly. A friend once tried glazing immediately after baking and ended up with a glaze that ran down the sides, ruining the appearance. The 5‑minute rest is a small step that makes a huge difference.
Use Fresh Cherry Juice for Extra Brightness
If you have fresh cherries, squeeze a bit of their juice and add it to the glaze. This adds a natural tartness that complements the vanilla. It also gives the glaze a subtle color shift, making it more visually appealing. Use no more than a tablespoon; you don’t want to overpower the vanilla.
Freeze for Later
If you bake a batch early, you can store the cooled scones in an airtight container for up to 3 days. When you’re ready to eat, reheat them in a 350°F oven for 5 minutes. The scones will regain their warmth and flavor. I’ve kept a stash of these scones in my fridge, and they’re always a hit at brunch.
Add a Dash of Salt to the Glaze
A pinch of sea salt in the glaze brings out the sweetness and balances the tartness of the cherries. It’s a subtle touch that many overlook, but it makes the glaze more complex. Sprinkle the salt just before pouring the glaze to keep the flavor balanced. The salt also enhances the buttery notes, creating a harmonious finish.
These tricks are the secret sauce that turns a simple scone recipe into a memorable experience. Use them, and you’ll have a crowd-pleaser that keeps people coming back for more.
Creative Twists and Variations
This recipe is a playground. Here are some of my favorite ways to switch things up:
Chocolate Cherry Scones
Add 1/4 cup of dark chocolate chips to the dough for a rich, chocolatey twist. The chocolate melts slightly during baking, creating pockets of gooey delight. Serve with a dusting of cocoa powder for an extra chocolatey finish. This version is perfect for chocolate lovers who want a burst of flavor.
Lemon Poppy‑Seed Scones
Swap the vanilla glaze for a lemon glaze made with powdered sugar, lemon zest, and a splash of lemon juice. Add a tablespoon of poppy seeds to the dough for a nutty crunch. The bright lemon pairs wonderfully with the buttery base. This variation is ideal for a bright, citrusy brunch.
Almond Joy Scones
Add 1/3 cup of chopped almonds and 1/4 cup of shredded coconut to the dough. Use a coconut‑flavored glaze for a tropical twist. The nuts add a satisfying crunch, while the coconut provides a sweet, chewy texture. This version feels like a dessert on a stick.
Savory Herb Scones
Omit the cherries and glaze. Instead, fold in 2 tablespoons of chopped fresh rosemary and 1 teaspoon of grated parmesan. Bake as usual, and serve warm with a dollop of garlic butter. The herbs give a savory depth that pairs well with cheese or charcuterie. This is a great option for a savory snack or appetizer.
Peanut Butter Swirl Scones
After shaping the dough, drizzle a thin line of peanut butter across the top of each scone. Fold the edges over to create a swirl effect. The peanut butter adds a nutty richness that contrasts with the sweet glaze. This version is fun for kids and adults alike.
Maple‑Glazed Scones
Replace the vanilla glaze with a maple glaze made from powdered sugar and pure maple syrup. The maple adds a deep, caramel flavor that pairs beautifully with the buttery base. Dust with a pinch of sea salt for depth. This variation feels like a fall treat even in the middle of the year.
Storing and Bringing It Back to Life
Fridge Storage
Store cooled scones in an airtight container at room temperature for up to 2 days. If you prefer them warm, wrap them in foil and place them in a preheated oven at 200°F for 5 minutes before serving. The foil keeps them from drying out, while the low heat reactivates the butter flavor. Keep the container away from strong odors; the scones absorb scents quickly.
Freezer Friendly
Place cooled scones in a freezer‑safe zip‑top bag, pressing out as much air as possible. They’ll stay fresh for up to 3 months. When ready to eat, thaw at room temperature for 1 hour, then warm in a 350°F oven for 5 minutes. The scones will taste almost brand‑new. I keep a batch in the freezer for those busy mornings when I need a quick breakfast.
Best Reheating Method
Reheat in a 350°F oven for 5 minutes, then remove and let rest for a minute. If the glaze has dried, brush a splash of water or milk over the top before reheating to revive the glossy finish. The scones will regain their moisture and flavor. Avoid microwaving; it can make the butter soggy and the crust chewy.