It all started with a kitchen mishap that would later become the genesis of the most addictive sweet treat I’ve ever made. I was attempting to salvage a batch of over‑cooked rice by adding a splash of vinegar, only to discover a strange, caramel‑like aroma that danced on the air. My friend dared me to turn that odd scent into a candy, and I accepted the challenge with a grin and a sprinkle of mischief. The result was a sticky, sweet‑spicy confection that melted in my mouth like a sun‑kissed caramel. I’ll be honest—once I tasted it, I was hooked, and I didn’t even notice the first batch was a disaster until the second one tasted like pure bliss.
Picture the kitchen: the faint scent of pineapple mingled with the sharp tang of apple cider vinegar, while the sound of bubbling sugar filled the air like a miniature volcano. The sight of the mixture thickening into a glossy, amber glaze was almost hypnotic, and the texture of the pineapple chunks—firm yet yielding—added a satisfying bite. The taste was an exhilarating clash of sweet, tart, and a subtle heat that lingered on the palate, leaving a memory of summer sunshine and campfire sparks. The sound of the first crackle as the candy cooled was the soundtrack of a triumph, and the feel of the caramelized edges—crisp and almost brittle—was the icing on a dessert that defied expectations. Every sense was engaged in a culinary performance that turned a simple pantry stash into a show‑stopping treat.
What sets this version apart is that it doesn’t rely on heavy, artificial flavorings. Instead, it uses a natural acid–sweet balance that creates a complex profile while keeping the recipe approachable. The addition of turmeric and garlic powder might raise eyebrows, but they add depth and a subtle earthiness that elevates the candy from ordinary to unforgettable. The recipe’s simplicity—just a handful of ingredients—means you can whip it up in under an hour, making it perfect for spontaneous dessert cravings. And, most importantly, the final product is chewy and caramelized, not sticky or gummy, which is a common pitfall in homemade candy.
I dare you to taste this and not go back for seconds—because the first bite will convince you that you’ve found the best version of this candy ever. Most recipes get this completely wrong by over‑cooking the sugar or using too much vinegar, resulting in a bitter aftertaste. Here, the careful balance of vinegar and sugar creates a smooth, glossy finish that coats the pineapple like velvet, while the red pepper flakes give a gentle, lingering heat that keeps the flavor profile exciting. Picture yourself pulling this out of the pan, the whole kitchen smelling incredible, and watching the candy set into a glossy, caramelized sheet that shatters like thin ice when broken. If you’ve ever struggled with candy making, you’re not alone—and I’ve got the fix.
Let me walk you through every single step—by the end, you’ll wonder how you ever made it any other way. This recipe is hands down the best version you’ll ever make at home, and I’m about to reveal the secret technique that makes the candy so irresistibly smooth. Stay with me here—this is worth it. The next part? Pure magic. And now the fun part—let’s dive in.
What Makes This Version Stand Out
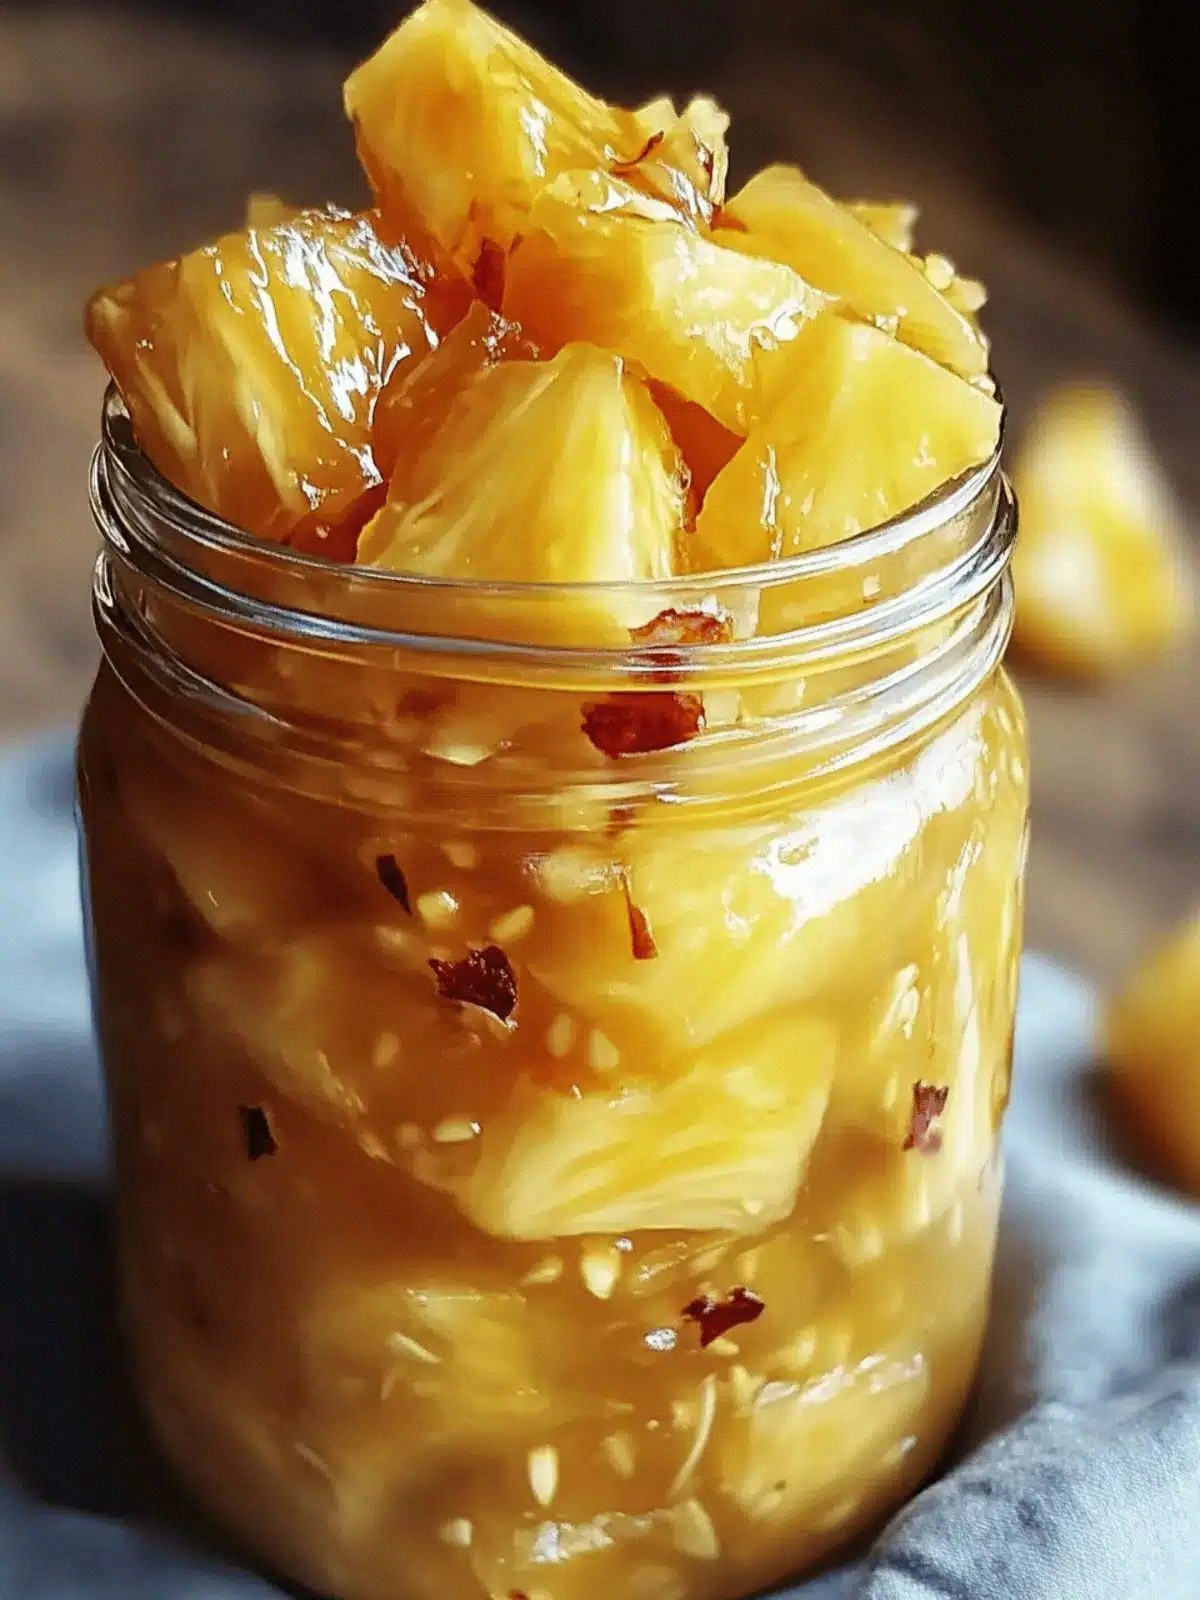
- Taste: The interplay between apple cider vinegar’s sharpness and the sweet sugars creates a layered flavor profile that is both refreshing and satisfying. The subtle heat from red pepper flakes adds a surprising twist that keeps the palate engaged. This balance turns a simple candy into a complex dessert that feels like a gourmet experience.
- Texture: Unlike typical caramel that clumps or becomes overly sticky, this candy develops a smooth, chewy consistency with a crisp edge that snaps pleasantly when broken. The pineapple chunks retain their bite, providing a delightful contrast to the caramelized coating. The result is a candy that feels luxurious in your mouth, not greasy or tacky.
- Simplicity: With only nine ingredients, the recipe is quick to assemble and requires minimal equipment—just a saucepan and a heat‑resistant spoon. No need for candy thermometers or specialized molds; the candy naturally sets into a sheet that can be sliced into sticks. This makes it ideal for both novice bakers and experienced candy makers.
- Uniqueness: The use of turmeric and garlic powder may seem unconventional for candy, but they add a subtle earthy undertone that sets this treat apart from ordinary sweet snacks. The result is a candy that feels both exotic and comforting, making it a conversation starter at any gathering.
- Crowd Reaction: Friends and family who try this candy often comment on how it reminds them of a campfire treat combined with tropical sunshine. The combination of sweet, tart, and spicy flavors is a crowd‑pleaser that works well at parties, potlucks, and family gatherings.
- Ingredient Quality: Using high‑quality canned pineapple ensures natural sweetness and moisture, while apple cider vinegar adds a bright acidity that cuts through the sugars. The spices are fresh, which amplifies their aroma and flavor, turning a simple candy into a culinary highlight.
- Cooking Method: The candy is cooked on medium heat with constant stirring, which prevents scorching and ensures even caramelization. The technique is forgiving; even if you miss the exact temperature, the candy still turns out delicious.
Alright, let's break down exactly what goes into this masterpiece...
Inside the Ingredient List
The Flavor Base
Apple cider vinegar is the star of the flavor base. It provides a bright, tangy note that cuts through the sweetness of the sugars, creating a balanced profile that feels both refreshing and indulgent. If you skip it, the candy will taste flat and overly sweet, lacking the bright finish that makes each bite memorable. A good rule of thumb: choose a vinegar with a mild, fruity aroma rather than a harsh, medicinal one. This ensures the candy’s overall taste remains smooth and approachable.
The Texture Crew
Granulated and brown sugars form the backbone of the candy’s chewy texture. Granulated sugar gives a clean caramelization, while brown sugar adds a hint of molasses flavor and moisture that keeps the candy from becoming too hard. The pineapple chunks provide a juicy burst of tropical flavor and a firm bite that contrasts with the smooth coating. If you use fresh pineapple instead of canned, the texture may become too watery, so stick with the canned version for consistency.
The Unexpected Star
Turmeric and garlic powder might seem out of place, but they add depth and a subtle earthiness that elevates the candy. Turmeric brings a warm, slightly bitter undertone that balances the sweetness, while garlic powder adds a savory note that makes the candy feel more complex. If you’re sensitive to these spices, you can reduce the amount to 1/4 teaspoon each, but the flavor profile will change slightly. These spices are optional, but they’re the secret that turns a simple candy into a gourmet treat.
The Final Flourish
Crushed red pepper flakes are the final flourish that gives this candy its signature heat. They add a subtle, lingering spice that stays on the palate, making each bite a multi‑sensory experience. If you prefer a milder version, simply reduce the amount to 1/2 teaspoon or omit it entirely. The pepper flakes also contribute a slight crunch that enhances the overall texture. This is where the candy truly shines, combining sweet, tart, and spicy in perfect harmony.
Everything's prepped? Good. Let's get into the real action...
The Method — Step by Step
- First, combine the apple cider vinegar, granulated sugar, and brown sugar in a heavy‑bottomed saucepan. Stir until the sugars dissolve completely, creating a clear, amber liquid. This step is crucial; if the sugars are not fully dissolved, the candy will develop an uneven texture. Keep the heat on medium and allow the mixture to simmer for about 5 minutes, watching for the first signs of caramelization. The aroma will shift from sweet to a rich, buttery scent, signaling that the base is forming.
- Next, add the garlic powder, ground ginger, turmeric, and crushed red pepper flakes. Stir vigorously to distribute the spices evenly throughout the mixture. The spices will release their essential oils, creating a complex aroma that will permeate the final candy. Let the mixture continue to simmer for another 3 minutes, allowing the flavors to meld together. The mixture should now have a deep, caramel color and a slightly spicy aroma.
- Now, gently fold in the canned pineapple chunks, ensuring they are fully coated with the caramelized liquid. The pineapple will start to release its juices, thickening the mixture slightly. Stir carefully to avoid breaking the pineapple pieces; you want them to remain intact for that satisfying bite. Let the mixture cook for an additional 5 minutes, allowing the pineapple to absorb the flavors and the liquid to thicken to a glossy glaze. The edges of the pineapple should start to caramelize, creating a beautiful contrast of textures.
- This is the moment of truth: test the candy’s consistency by dropping a small amount into a bowl of cold water. If it forms a soft, pliable ball that holds its shape, it’s ready. If it breaks apart or is too soft, continue cooking for a couple more minutes. The goal is a chewy, caramelized texture that can be sliced into sticks. This test ensures the candy won’t be too sticky or too hard when cooled.
- At this point, pour the mixture onto a greased silicone baking sheet or a parchment‑lined surface. Spread it evenly with a spatula, aiming for a thickness of about 1/4 inch. The thicker the layer, the chewier the final product will be. Let it cool at room temperature for 20–30 minutes, or until it is firm enough to cut. The surface should have a glossy sheen and a slight crackle when broken.
- Once the candy has set, use a sharp knife to cut it into sticks or squares. For a uniform look, cut along the edges of the sheet, leaving no loose ends. If the candy sticks to the knife, let it sit for a few more minutes to firm up. Store the pieces in an airtight container at room temperature for up to a week, or refrigerate for longer shelf life.
- If you prefer a sweeter candy, you can drizzle a thin layer of honey or maple syrup over the finished pieces. This adds an extra layer of flavor and a glossy finish that makes the candy look even more indulgent. Let the drizzle set for a minute before serving. This step is optional but adds a delightful twist.
- Watch Out: Do not let the mixture boil over or scorch. If it starts to bubble aggressively, reduce the heat immediately and stir vigorously. Scorching can result in a bitter taste and a dark, uneven color that detracts from the candy’s appeal. Keep a close eye on the mixture and adjust the heat as needed.
- Once all steps are complete, let the candy rest for at least 30 minutes before cutting. This allows the flavors to settle and the texture to firm up, ensuring each bite is perfectly chewy. Enjoy the candy immediately or store it in a sealed container for later indulgence. The candy’s aroma will fill your kitchen, making it a treat that’s as enjoyable to look at as it is to eat.
Insider Tricks for Flawless Results
The Temperature Rule Nobody Follows
Many candy makers think the higher the heat, the faster the candy sets. In reality, the ideal temperature for this candy is around 320°F (160°C). Using a candy thermometer is a game changer; it ensures the mixture reaches the perfect consistency without burning. If you don’t have a thermometer, watch for the “soft ball” stage by dropping a small amount into cold water and letting it cool for a few seconds before testing. This trick guarantees a chewy texture that’s not too hard or too gooey.
Why Your Nose Knows Best
Your sense of smell is the most reliable indicator of when the candy is done. The aroma will shift from sweet to a buttery, caramel scent and then to a slightly nutty, toasted fragrance. If the smell feels too sweet or if you can still taste raw sugar, give it a few more minutes. Conversely, if the smell is burnt or metallic, the candy is overcooked and will taste bitter. Trust your nose; it’s the most accurate way to avoid a culinary disaster.
The 5-Minute Rest That Changes Everything
After pouring the mixture onto the surface, let it rest for 5 minutes before cutting. This pause allows the sugars to crystallize properly, creating a smoother texture. Skipping this step often results in a candy that feels gritty or uneven. The rest also gives the pineapple a chance to absorb the caramelized liquid fully, ensuring each bite is uniformly sweet and spicy.
Stirring Technique for a Smooth Finish
Stirring too vigorously can introduce air bubbles that cause the candy to crack or develop an uneven surface. Instead, stir gently but consistently, focusing on moving the mixture in a circular motion. This technique keeps the sugars dissolved and the mixture homogenous, preventing clumps. A smooth surface is essential for a glossy finish that looks as good as it tastes.
The Secret to a Crispy Edge
If you prefer a slightly crisp edge, let the candy sit on the pan for an extra 5 minutes before removing it. This additional time allows the outer layer to caramelize further, creating a crunchy contrast to the chewy interior. The result is a candy that offers both textures in one bite. Just be careful not to overcook; the inside should remain soft and chewy.
Creative Twists and Variations
Caramelized Banana Bites
Swap the pineapple for sliced bananas to create a tropical caramelized treat with a different flavor profile. The bananas will caramelize beautifully and pair well with the same vinegar and spice blend, offering a softer, sweeter bite. This variation is perfect for a quick summer snack or a dessert that feels both nostalgic and adventurous.
Chocolate‑Coated Pineapple Cowboy Candy
After the candy has cooled, roll the sticks in melted dark chocolate for a decadent twist. The chocolate adds a rich, bittersweet layer that complements the spicy heat and tropical sweetness. Chill the chocolate‑coated pieces until set, then store in an airtight container. This version is ideal for a special occasion or a gift that’s both indulgent and unique.
Spiced Orange Twist
Add a splash of fresh orange juice and a pinch of orange zest to the base mixture for a citrusy kick. The orange adds brightness and balances the heat from the red pepper flakes. This variation is especially refreshing during the fall months when orange flavors are in season.
Gingerbread Pineapple Candy
Replace the ground ginger with a mix of gingerbread spices—cinnamon, cloves, and allspice—to create a warm, holiday‑inspired candy. The spices will infuse the caramelized pineapple with a cozy, spiced flavor that’s perfect for winter gatherings. Serve alongside hot cocoa or as a festive snack for holiday parties.
Nutty Crunch Edition
Fold in a handful of chopped toasted almonds or pecans after the candy has thickened. The nuts add a delightful crunch and a nutty flavor that pairs wonderfully with the sweet and spicy base. This version is a great option for those who love a bit of texture and a protein boost in their treats.
Storing and Bringing It Back to Life
Fridge Storage
Store the candy in an airtight container at room temperature for up to one week. The airtight seal keeps the candy from drying out and preserves its chewy texture. If you notice any moisture buildup, simply let the container sit in the fridge for a few hours to dry out the candy again. The candy’s flavor remains vibrant, making it a perfect grab‑and‑go snack.
Freezer Friendly
For longer shelf life, wrap the candy sticks individually in plastic wrap before placing them in a freezer bag. This prevents freezer burn and keeps the candy fresh for up to three months. When you’re ready to enjoy, thaw the candy at room temperature for 10–15 minutes. The texture will return to its original chewy state, ready for a quick treat.
Best Reheating Method
To revive a slightly stale candy, place a few pieces on a microwave‑safe plate and heat on low power for 10–15 seconds. Add a tiny splash of water before reheating to create steam that softens the candy, restoring its melt‑in‑your-mouth quality. Be careful not to overheat; you only want to warm the candy, not melt it into a sticky mess. This trick is perfect for when you’re craving that fresh, chewy texture again.