Picture this: It's Sunday afternoon, I'm standing in my kitchen in my rattiest sweatpants, staring at a mountain of leftover mashed potatoes from last night's dinner party. You know the scene — that awkward Tupperware situation where you've got enough spuds to feed a small village, but zero desire to eat another scoop of plain mashed potatoes. Been there? Oh, I've been there more times than I care to admit.
But here's where the magic happens. Instead of resigning myself to another week of sad, reheated potatoes, I had what can only be described as a lightning bolt moment. What if I could transform these humble leftovers into something that would make grown adults weep with joy? Something crispy on the outside, cloud-soft on the inside, loaded with all the good stuff that makes comfort food worth living for? I grabbed my mixing bowl like it was Excalibur and started experimenting, and let me tell you — the first batch never even made it to the plate. I stood there at my counter, popping these golden nuggets of joy like potato chips, completely unable to stop myself.
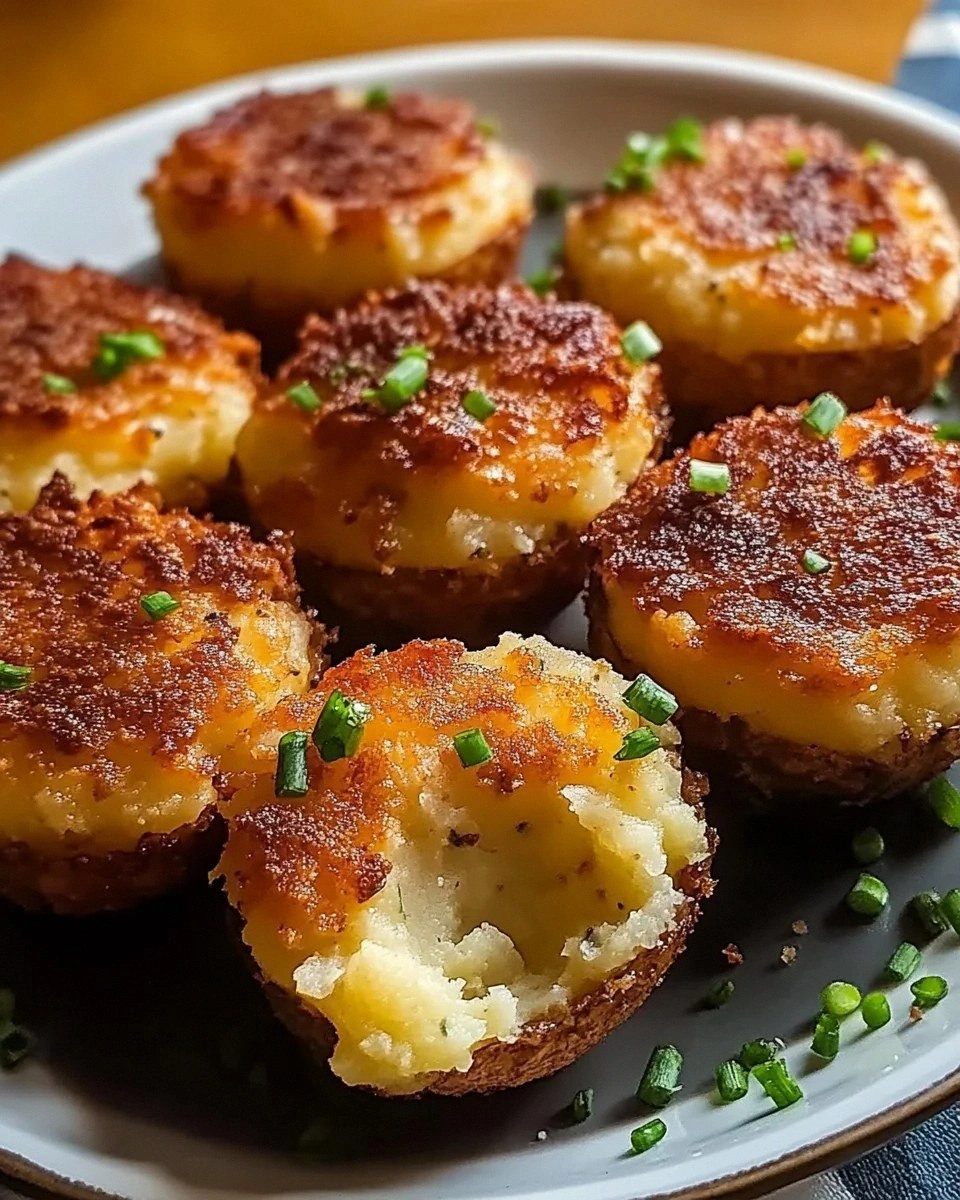
That day changed everything. These loaded mashed potato bites aren't just another appetizer recipe cluttering up the internet — they're a revelation. They take everything you love about loaded baked potatoes, all the crispy-edged joy of tater tots, and wrap it up in bite-sized packages that vanish faster than you can say "pass the sour cream." The crispy Parmesan crust shatters like thin ice under your teeth, revealing a molten center that's basically a hug for your taste buds.
I've since made these for game day parties where they disappeared before kickoff, holiday gatherings where they upstaged the main course, and late-night snack attacks that would make a food truck jealous. The best part? They start with leftovers, but they're so good you'll find yourself making mashed potatoes just as an excuse to whip up a batch. Okay, ready for the game-changer? Let me walk you through every single step — by the end, you'll wonder how you ever made it any other way.
What Makes This Version Stand Out
Crisptastic: We're talking about edges so crispy they practically shatter, thanks to a double-coating technique that creates a protective Parmesan armor around each bite. Most recipes skip this step and end up with sad, soggy potato blobs that nobody wants to touch after five minutes out of the oven.
Cheese Overload: Sharp cheddar, melty mozzarella, AND nutty Parmesan work together in perfect harmony. It's like a cheese board got drunk at a potato party and decided to stay forever. I dare you to taste this and not go back for seconds.
Loaded for Real: Bacon pieces so generous you'll think you're eating a loaded baked potato, green onions for that fresh bite, and sour cream mixed right into the potato base. No sad, barely-there toppings here — every bite delivers the full experience.
Make-Ahead Magic: These babies freeze like champions. Make a double batch, freeze half, and you've got instant comfort food ready for those "I can't even" days when cooking feels impossible. Future you will thank present you profusely.
Leftover Legend: This recipe was literally born from desperation and leftover mashed potatoes, which means it's not just accommodating leftovers — it celebrates them. That sad bowl of spuds in your fridge? It's about to become legendary.
Crowd Psychology: Something magical happens when you serve these at parties. People who were politely chatting suddenly transform into potato-seeking missiles. I've seen introverts fight extroverts for the last one. Don't say I didn't warn you.
Texture Heaven: The contrast between the crunchy exterior and the cloud-soft interior creates what food scientists call "dynamic contrast" — basically, your brain gets so excited by the texture play that it releases extra happiness chemicals.
Inside the Ingredient List
The Flavor Base
The foundation of any great potato bite starts with properly seasoned mashed potatoes. If you're working with plain, unseasoned leftovers, you'll need to wake them up with some serious flavor. I'm talking about folding in roasted garlic, a generous knob of butter, and enough salt that the potatoes taste vibrant, not flat. The potatoes should be creamy but not wet — think of them as the canvas for our loaded masterpiece. If your potatoes are too loose, add a tablespoon of flour at a time until they hold their shape when scooped.
Sour cream brings the tang that makes these bites addictive rather than just heavy. Full-fat is non-negotiable here — the low-fat stuff separates and makes your bites weepy. The sour cream should be cold when you mix it in, creating little pockets of cool tang against the warm potato base. Don't overmix here — you want ribbons of white streaking through, not a uniform beige blob.
The Texture Crew
Sharp cheddar provides that unmistakable loaded potato flavor, but here's what most recipes miss — you need two types of cheese for optimal texture. Pre-shredded from the bag for easy melting throughout the potato base, plus hand-shredded aged cheddar folded in at the end for those glorious cheese pulls when you bite in. The aged stuff doesn't fully melt, giving you little treasure pockets of concentrated cheese flavor.
Mozzarella might seem like overkill, but trust me — it's the secret to that Instagram-worthy cheese stretch. Use fresh mozzarella, not the rubbery block kind. Pat it dry with paper towels and tear it into small pieces. When these bites hit the oven, the mozzarella creates those long, dramatic cheese pulls that make everyone reach for their phone before their fork.
The Unexpected Star
Parmesan cheese usually plays a supporting role, but here it's the star of the show. We're using it three ways: mixed into the potato base for umami depth, in the coating for that addictive crispy crust, and sprinkled on top for extra crunch. The quality matters here — skip the green can and get the real stuff. Your taste buds will immediately know the difference.
Green onions provide the fresh bite that keeps these from feeling like a brick in your stomach. The secret is using both the white and green parts, but at different stages. The white parts get mixed into the potato base where their sharpness mellows, while the green tops are sprinkled on top for brightness and color. Slice them on the bias — it looks fancier and gives you more surface area for that onion flavor.
The Final Flourish
Thick-cut bacon isn't just an ingredient here — it's practically a religion. Cook it until it's just shy of crispy, because it'll continue cooking in the oven. The fat renders out, creating smoky bacon bits that distribute perfectly throughout each bite. Save that bacon fat — brush a little on top before baking for extra flavor insurance.
Smoked paprika is my secret weapon, adding depth without overwhelming the other flavors. It's like regular paprika went to finishing school and came back sophisticated. Just a whisper transforms the whole batch, giving these bites a subtle smokiness that makes people ask, "What is that amazing flavor?"
The Method — Step by Step
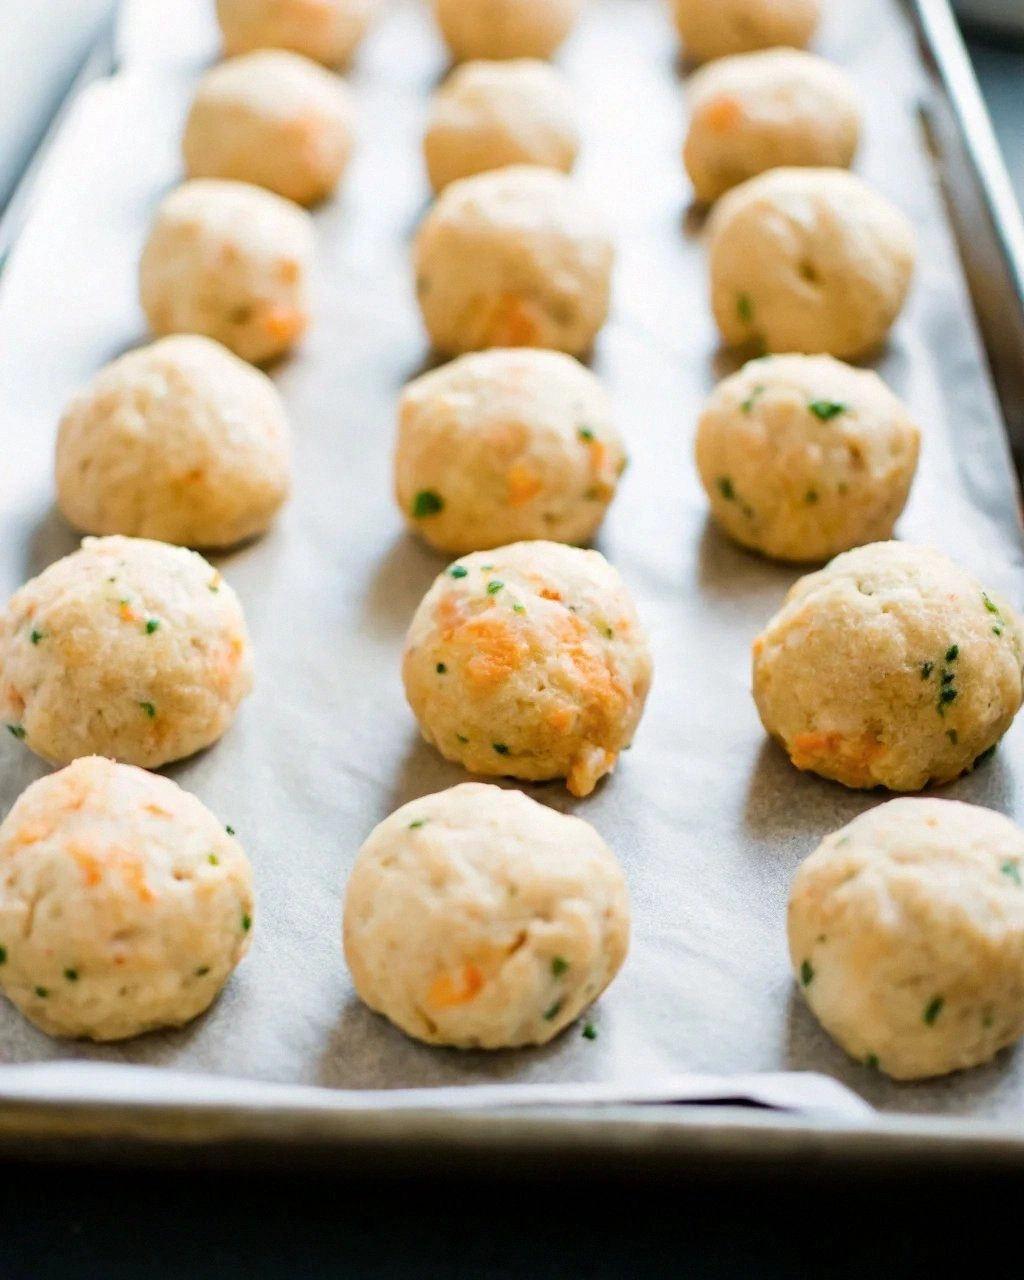
- Start with cold mashed potatoes straight from the fridge — we're talking fridge-temperature here, people. If you've got warm potatoes, spread them on a baking sheet and pop them in the freezer for 20 minutes. Cold potatoes are easier to handle and less sticky, which means your bites will look like adorable little nuggets instead of sad blobs. Grab a large mixing bowl and dump in your potatoes, breaking them up with a fork so they're not one solid mass. The texture should be like play-dough that you can squeeze but not so wet that it oozes between your fingers.
- Now for the fun part — we're building flavor layers like a symphony conductor. Add your sour cream, shredded cheddar, and half your chopped green onions to the potatoes. Use a fork to gently fold everything together — I said fold, not mash like you're trying to kill it. The goal is marbled distribution, not uniform gray mush. Think of it like you're making cookies and you want to see chocolate chip distribution, not chocolate bread. The mixture should be cohesive but still have some personality.
- Time to channel your inner sculptor — using a small cookie scoop or two spoons, form golf ball-sized portions. Roll them gently between your palms (lightly dusted with flour if they're sticky) until they're smooth little spheres. Place them on a parchment-lined baking sheet and refrigerate for 30 minutes. This chilling step is crucial — it firms them up so they don't fall apart during the coating process. Skip this step and you'll have potato soup in your breadcrumb bowl.
- While your potato balls chill, let's create the coating station that'll make these bites legendary. Set up three shallow dishes: flour seasoned with salt, pepper, and smoked paprika in the first; beaten eggs mixed with a splash of water in the second; and a mixture of panko breadcrumbs, grated Parmesan, and a whisper of garlic powder in the third. The panko gives you that restaurant-quality crunch that regular breadcrumbs can only dream of achieving. Arrange them in assembly-line fashion — trust me, you'll feel very professional and organized.
- This next part? Pure magic. Take a chilled potato ball and roll it in the flour, coating it completely but tapping off the excess. Dip it in the egg wash, letting the excess drip off — think of it like you're giving it a quick spa treatment, not drowning it. Finally, roll it in the panko-Parmesan mixture, pressing gently so the coating adheres. The goal is a thick, even coating that'll create that shatteringly crisp shell. Set each coated bite on a clean parchment-lined baking sheet as you work.
- Now here's where most recipes get it wrong — they stop at one coating. Not us. For the ultimate crispy crust, we're double-coating these beauties. After your first round of coating, pop the tray back in the fridge for 10 minutes to set the coating. Then repeat the egg wash and breadcrumb process. Yes, it's an extra step. Yes, it's worth it. The double coating creates a protective barrier that keeps the potato creamy inside while achieving maximum crunch outside.
- Heat your oven to 425°F (220°C) — and yes, I want it fully preheated, not just "close enough." Position a rack in the upper third of the oven for optimal browning. While it heats, melt a tablespoon of that reserved bacon fat (or butter if you already ate all the bacon) and lightly brush the tops of your coated bites. This little bit of fat helps the coating achieve that gorgeous golden color and adds another layer of flavor. The smell when these hit the oven? Absolute perfection.
- Bake for 20-25 minutes, rotating the pan halfway through for even browning. You're looking for deep golden color and crispy edges that pull away slightly from the baking sheet. That sizzle when they hit the hot pan? That's the sound of magic happening. Resist the urge to flip them — they need uninterrupted time to develop their crust. When they're done, they should feel firm to the touch and sound hollow when you tap them gently.
- While they're baking, let's make the loaded topping that'll take these over the edge. Crisp up some extra bacon until it's perfectly crunchy, crumble it into bite-sized pieces, and mix it with the remaining green onions. When the bites come out of the oven, immediately shower them with this bacon-onion mixture so it adheres to the hot surface. The residual heat warms everything through without making the bacon soggy. Serve them hot with a side of sour cream mixed with a squeeze of lemon and a crack of black pepper — trust me on this one.
That's it — you did it. But hold on, I've got a few more tricks that'll take this to another level...
Insider Tricks for Flawless Results
The Temperature Rule Nobody Follows
Here's the thing that separates amateur potato bites from restaurant-quality ones — temperature management. Your potatoes need to be cold when you start mixing, but your oven needs to be screaming hot when they go in. I keep a thermometer in my oven because most ovens lie about their temperature by 25-50 degrees. If your oven runs cool, these will emerge pale and sad instead of golden and glorious. A friend tried skipping this step once — let's just say it didn't end well, and she ended up with what looked like beige hockey pucks.
Why Your Nose Knows Best
Don't set a timer and walk away — use your sense of smell as much as your eyes. When these bites are perfectly done, your kitchen will fill with the aroma of toasted cheese and crispy bacon that makes it impossible to concentrate on anything else. If you smell that and your bites aren't golden yet, check them immediately — they're probably done. This is also how you know when to rotate the pan for even browning. That first whiff of nutty Parmesan and toasty breadcrumbs is your cue to get ready for action.
The 5-Minute Rest That Changes Everything
I know you're going to want to shove these in your face the second they come out of the oven — resist! Let them rest for exactly 5 minutes. This brief pause allows the coating to set and the cheese inside to reach that perfect molten consistency. Cut one open too early and you'll get a cheese lava flow that burns your tongue and ruins the experience. Wait too long and the cheese firms up, losing that magical pull. Five minutes is the sweet spot where everything comes together in perfect harmony.
The Cheese Pull Secret
Want those Instagram-worthy cheese pulls? The secret is in the mozzarella placement. Instead of mixing it throughout, reserve some larger chunks and press them into the center of each bite before coating. When they bake, these mozzarella pockets create dramatic cheese pulls that'll have your guests reaching for their phones. Just warn them to let them cool for a minute — molten cheese burns are real, and nobody wants to explain to the ER doctor how they injured themselves on potato bites.
Creative Twists and Variations
This recipe is a playground. Here are some of my favorite ways to switch things up:
Buffalo Blue Cheese Bombs
Replace half the cheddar with crumbled blue cheese and add a tablespoon of buffalo sauce to the potato mixture. The spicy-tangy combo with the funky blue cheese creates a flavor explosion that wing lovers will worship. Serve with ranch dressing mixed with a splash of hot sauce for dipping. These disappear faster than free drinks at an open bar.
Breakfast of Champions
Mix in crumbled breakfast sausage and shredded pepper jack cheese, then serve with maple syrup for dipping. The sweet-savory combination hits every pleasure center in your brain. Add a sprinkle of everything bagel seasoning to the coating for extra breakfast vibes. I made these for brunch once and people literally asked if they could take some home — high praise indeed.
Mediterranean Magic
Swap the cheddar for feta, add chopped sun-dried tomatoes and fresh oregano to the potato mixture. Use olive oil instead of bacon fat for brushing, and serve with tzatziki for dipping. The briny feta and sweet-tart tomatoes transport you straight to a Greek island, minus the expensive plane ticket.
Truffle Shuffle
Add a drizzle of truffle oil to the potato mixture and use truffle salt in the coating. Replace the bacon with crispy prosciutto and serve with aioli for ultimate decadence. These are fancy enough for cocktail parties but easy enough for Netflix binges. Fair warning: once you go truffle, regular potato bites might feel a bit basic.
Spicy Korean Fusion
Mix gochujang into the potato base, use kimchi instead of green onions, and add a touch of sesame oil. Coat with panko mixed with sesame seeds for extra crunch. Serve with a dipping sauce made from mayonnaise, gochujang, and rice vinegar. The umami bomb creates an addiction that's both pleasurable and slightly concerning.
Thanksgiving Remix
Use leftover Thanksgiving mashed potatoes (already flavored with garlic and herbs), mix in chopped turkey and stuffing spices. Serve with cranberry sauce mixed with sour cream for dipping. It's like having Thanksgiving dinner in one perfect bite, minus the awkward family conversations about your dating life.
Storing and Bringing It Back to Life
Fridge Storage
If you somehow manage to have leftovers (I've heard rumors this happens), let the bites cool completely before storing them in an airtight container. They'll keep for up to 4 days in the refrigerator, though the coating will lose some of its crunch. Layer them between sheets of paper towel to absorb excess moisture, and don't stack them too high or they'll crush each other. Pro tip: store the bacon-onion topping separately so it stays crisp.
Freezer Friendly
These freeze like absolute champions — make a double batch and freeze half for those days when you need comfort food but can't muster the energy to cook. Flash freeze them on a baking sheet first, then transfer to freezer bags with the air squeezed out. They'll keep for up to 3 months, though honestly, they've never lasted more than a week in my house. Label the bag or you'll play frozen potato roulette in a few months.
Best Reheating Method
The microwave is your enemy here — it turns the coating to rubber faster than you can say "leftovers." Instead, reheat them in a 400°F oven for 8-10 minutes, or until they're heated through and the coating is crispy again. Add a tiny splash of water to the baking sheet — it creates steam that warms the centers without drying them out. If you're in a hurry, the air fryer works wonders at 375°F for 5-6 minutes. The microwave is only acceptable if you're desperate and willing to sacrifice texture for speed.