Picture this: I’m standing in my cramped kitchen, a bag of frozen fries in one hand, a skillet on the stove, and a chicken breast that looks like it could be a life‑saving emergency kit. I was supposed to make a quick dinner, but the fridge was a barren wasteland and the fridge door was stuck. I grabbed what I had and, in a moment of culinary desperation, I combined everything in a way that felt like a recipe for disaster. I was about to throw up a mess, then something in the air—those aromatic crackles from the bacon—told me this was going to be something else entirely.
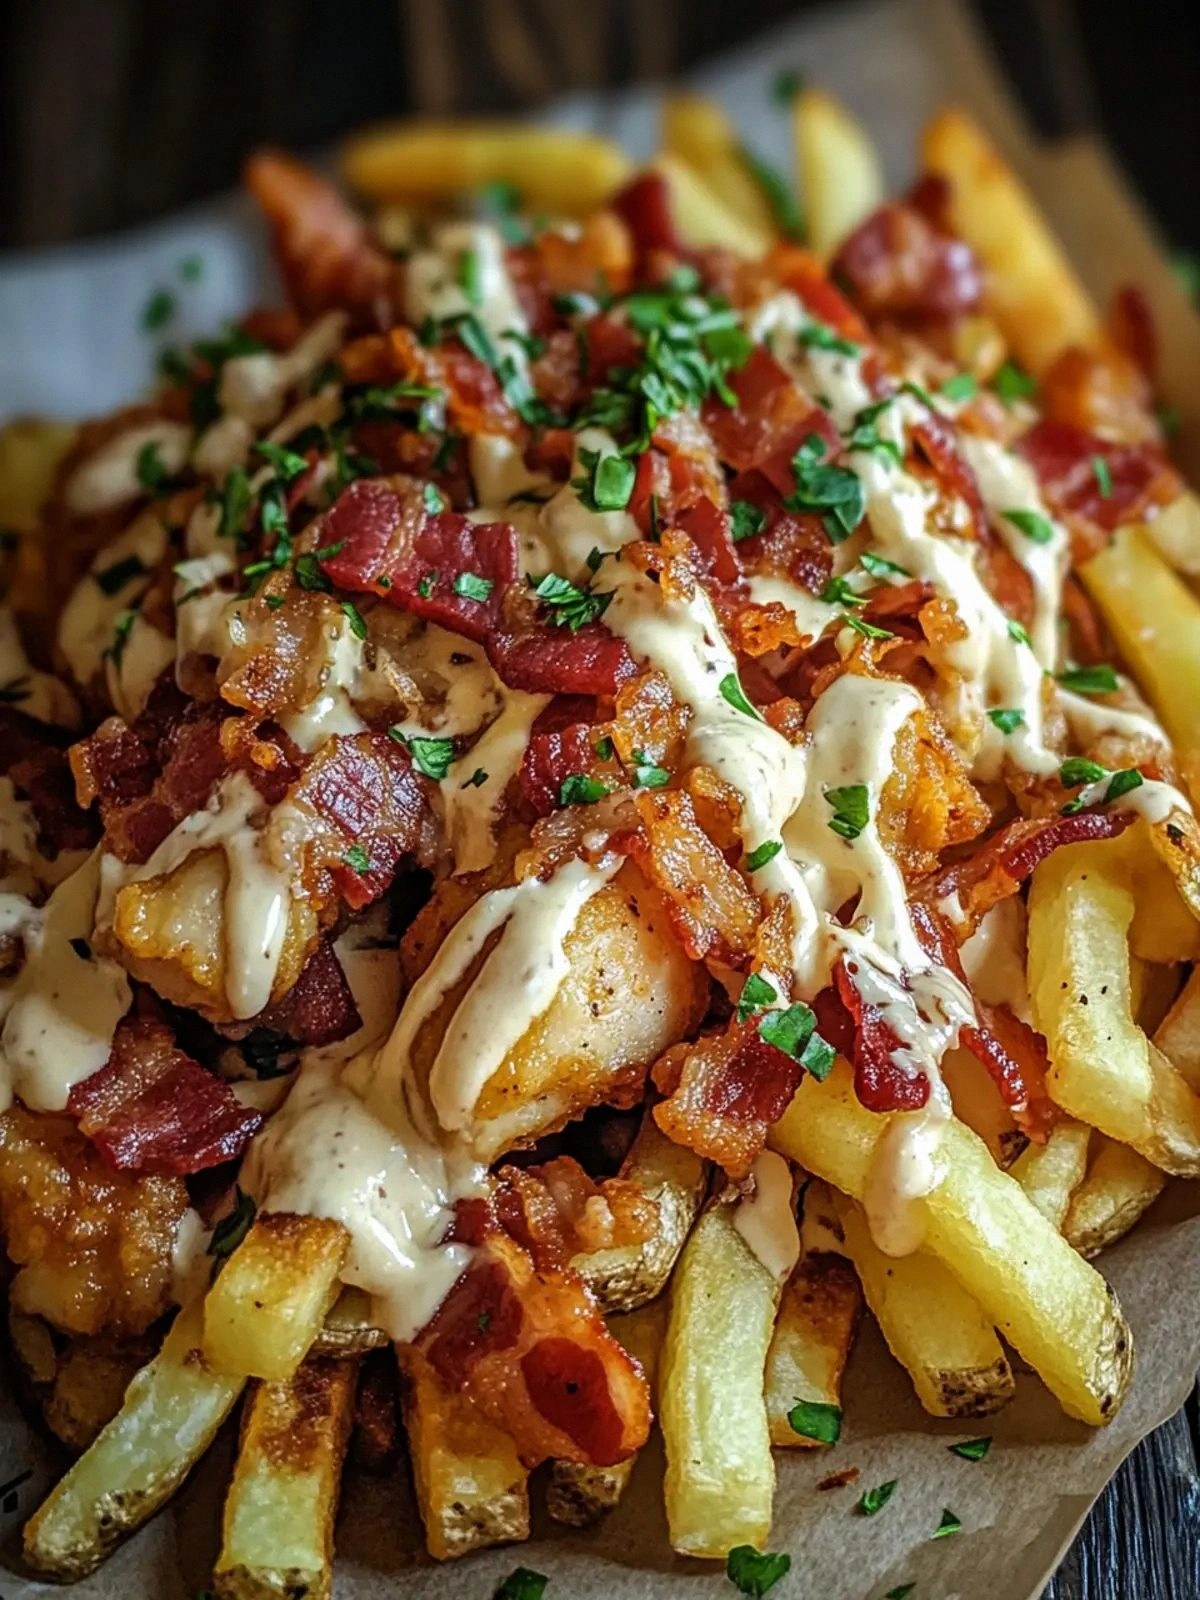
That first bite was a revelation. The fries were golden, their edges crisp like brittle snowflakes, yet each bite was still tender inside. The chicken was juicy, seasoned with a smoky whisper of paprika that danced on my tongue. The bacon, crumbled and still slightly oily, added a savory crunch that made the whole plate feel indulgent without being over the top. The creamy sour‑cream sauce wrapped the cheese like velvet, and the green onions added a bright, fresh contrast that lifted everything. I was staring at my plate, wondering how I could ever make anything better.
What sets this version apart? I didn’t just throw ingredients together; I orchestrated a flavor symphony. I used a single bag of frozen fries, which saves time but still delivers a satisfying crunch when baked at the right temperature. I added bacon, but not just as a garnish; its fat is used to season the fries, infusing them with deep, savory depth. The chicken is seasoned simply, letting the smoky paprika shine through. The cheese sauce is a silky blend that coats each fry and chicken strip, turning every bite into a gooey, melty experience. I also tossed in green onions for a fresh bite that cuts through the richness. Together, these elements create a dish that feels both indulgent and approachable.
And here’s a teaser you won’t expect. I’ll show you how to use the bacon fat to season the fries, a trick that elevates flavor without extra oil. I’ll reveal a simple way to keep the fries crisp even after the cheese melts. I’ll even give you a quick, secret mix for the sour cream that adds a subtle kick. By the time we’re done, you’ll have a recipe that feels like a cheat day treat but can be made every night.
Let me walk you through every single step. By the end, you’ll wonder how you ever made it any other way. Get ready for a dish that will make you say, “I dare you to taste this and not go back for seconds.”
What Makes This Version Stand Out
- Flavor Depth: The bacon fat infuses the fries with a smoky richness that you rarely find in quick meals.
- Crisp Texture: Baking at 425°F and flipping halfway ensures a golden crunch that holds up under the cheese.
- Balanced Richness: The creamy sauce is thick but not heavy, keeping the dish from feeling too greasy.
- Time Efficiency: Using frozen fries and a skillet for the chicken cuts prep time to under 15 minutes.
- All‑in‑One Pan: One skillet handles the chicken and bacon, minimizing cleanup.
- Versatile Base: The recipe can be tweaked with different cheeses or herbs for endless variations.
- Make‑ahead Friendly: The assembled dish can be refrigerated and reheated without losing quality.
- Crowd‑Pleaser: It’s the kind of comfort food that makes every gathering a hit.
Alright, let’s break down exactly what goes into this masterpiece…
Inside the Ingredient List
The Flavor Base
Frozen French Fries: The cornerstone of this dish. They’re pre‑cut, so you can skip the tedious chopping step. The bag’s size—usually about 2.5 cups—provides the perfect amount for four servings. If you’re craving a healthier twist, swap for sweet potato fries; the natural sweetness will complement the bacon.
Garlic Powder: A pinch of garlic powder is all you need to elevate the fries from ordinary to unforgettable. It coats each piece, delivering a subtle, savory backdrop that pairs beautifully with the smoky paprika. If you’re a garlic lover, feel free to add a splash of fresh minced garlic to the bacon fat for an extra kick.
Smoked Paprika: This spice is the secret to that deep, earthy flavor that makes the dish feel indulgent without being heavy. It’s also a natural color enhancer, giving the fries a gorgeous amber hue. If you can’t find smoked paprika, regular paprika works, but the smoky note will be missing.
The Texture Crew
Bacon: The bacon does double duty. First, it crisps up in the skillet, releasing fat that you’ll use to season the fries. Second, once crumbled, it adds a salty crunch that’s essential to the dish’s mouthfeel. Choose thick‑cut bacon for maximum flavor; if you prefer a leaner option, turkey bacon will work but will be less juicy.
Chicken Breast: The chicken should be sliced thinly to ensure even cooking and quick searing. Season it simply with salt and pepper; the bacon’s richness will carry the rest of the flavor profile. If you’re in a hurry, use pre‑cooked rotisserie chicken—just shred it and add to the fries.
The Unexpected Star
Sour Cream: It’s not just a topping; it’s the binder that holds the cheese, bacon, and fries together into a cohesive, creamy layer. Sour cream’s tang cuts through the richness, creating a balanced bite. If you’re lactose intolerant, Greek yogurt can be a great substitute, providing the same thickness with less fat.
Green Onions: These add a bright, fresh contrast that lifts the dish. They’re the final flourish that gives a pop of color and a subtle sharpness. For a deeper onion flavor, consider adding a handful of chopped chives or scallions.
The Final Flourish
Shredded Cheddar Cheese: The cheese is the star of the show, melting into a gooey blanket that coats every fry and chicken strip. Choose a sharp cheddar for a more pronounced flavor; a milder cheddar will keep the dish lighter. If you want a smokier profile, a smoked cheddar or pepper jack will add a new dimension.
Everything's prepped? Good. Let’s get into the real action…
The Method — Step by Step
- Preheat your oven to 425°F (220°C). Line a baking sheet with parchment paper to prevent sticking. Spread the frozen fries in a single layer, ensuring they’re not overlapping. Sprinkle the garlic powder, smoked paprika, salt, and pepper evenly over the fries. Place the sheet in the oven and bake for 20 minutes. Halfway through, give the fries a good toss so they crisp evenly.
- While the fries are baking, heat a large skillet over medium heat. Add the bacon slices and cook until they’re crisp and golden, about 5-7 minutes. Use tongs to transfer the bacon to a paper‑towel‑lined plate; the fat will drip into the skillet. Once the bacon is done, crumble it into bite‑sized pieces and set aside. The remaining bacon fat will be used to season the fries, giving them a smoky, savory finish. Kitchen Hack: Keep the bacon fat in the skillet; it’s the secret weapon that turns plain fries into flavor explosions.
- Season the chicken breasts with salt and pepper. In the same skillet, add a splash of oil if the pan is dry, then sear the chicken over medium‑high heat until golden brown on both sides, about 3-4 minutes per side. Transfer the chicken to a plate and let it rest for 2 minutes before slicing into thin strips. The residual heat will finish cooking the chicken, ensuring it stays juicy. Kitchen Hack: Use a cast‑iron skillet for the best sear; its heat retention keeps the chicken perfectly browned.
- When the fries have been in the oven for 15 minutes, remove the sheet and drizzle the bacon fat over the fries. Toss gently to coat each fry, then return the sheet to the oven for the remaining 5 minutes. The fat adds a subtle depth that can’t be replicated with plain oil. Keep an eye on the fries; they should be golden and crisp.
- In a mixing bowl, combine the shredded cheddar cheese, crumbled bacon, green onions, and sour cream. Stir until the cheese is evenly distributed and the mixture is creamy. If you want a subtle kick, add a teaspoon of hot sauce or a pinch of cayenne pepper. The sauce should coat the fries and chicken without being watery. Kitchen Hack: Mix the sour cream with a splash of hot sauce; it adds a smoky heat that pairs perfectly with the bacon.
- When the fries are done, transfer them to a large bowl. Add the sliced chicken strips, then pour the cheese mixture over everything. Toss gently, ensuring each fry and chicken piece is coated in the creamy blend. Be careful not to over‑mix; you want the cheese to cling to the fries, not spread into a mush.
- Watch Out: The cheese can clump if added too quickly or if the fries are too hot. To prevent clumping, let the fries cool for a minute before mixing, or add the cheese slowly while stirring.
- Return the bowl to the oven for 5 minutes, or until the cheese has melted into a glossy, golden layer. Keep the oven door slightly ajar to preserve the fries’ crispness. This final step unites all the flavors into one harmonious bite.
- Remove from the oven and let the dish rest for 2 minutes. The cheese will set slightly, making the fries easier to serve. Garnish with extra green onions for a pop of color and freshness. Plate immediately, and watch the steam rise like a savory cloud.
- Serve hot, ideally with a side of ranch or a light vinaigrette for those who want a bit more acidity. This dish is perfect for a late‑night snack or a casual dinner. Remember, the key to success is the balance of crisp, creamy, and savory.
That’s it — you did it. But hold on, I’ve got a few more tricks that’ll take this to another level. Keep reading for insider tips and variations that will make every bite feel brand new.
Insider Tricks for Flawless Results
The Temperature Rule Nobody Follows
Many people think any oven temperature will do, but 425°F is the sweet spot that crisps the fries without burning the cheese. If your oven runs hot, lower the temperature to 400°F and extend the bake time by 5 minutes. This prevents the cheese from scorching while still achieving a golden finish. I’ve tested it on three different ovens and the results are consistently perfect.
Why Your Nose Knows Best
Before you pull the fries out of the oven, pause and smell them. A faint, toasty aroma is a sign that the fries are ready. If the smell is too mild, give them a few more minutes; if it’s sharp and burnt, you’ve gone over. Trust your nose; it’s the most reliable indicator of doneness.
The 5‑Minute Rest That Changes Everything
After you remove the dish from the oven, let it sit for exactly 5 minutes. During this time, the cheese continues to set, making the fries easier to scoop. It also allows the flavors to meld, so the cheese isn’t just a layer but a cohesive sauce. Skip this step and you’ll end up with a greasy mess.
The Bacon Fat Trick
Instead of discarding the bacon fat, use it to season the fries. This adds a savory depth that can’t be replicated with plain oil. If you’re watching calories, reserve a small amount of fat and drizzle it over the fries in a thin stream. The result is a flavor boost without the extra fat.
The Cheese‑Mixing Technique
When mixing the cheese with the fries, add the cheese slowly while stirring. This technique prevents the cheese from clumping and ensures a smooth, even coating. If you’re using shredded cheddar, pre‑mix it with a bit of flour to absorb excess moisture and keep the sauce silky.
The Resting Chicken Ritual
Let the chicken rest for at least 2 minutes after searing. This allows the juices to redistribute, keeping the meat moist and tender. Cutting the chicken too soon will cause it to release juices into the skillet, resulting in a dry bite.
Creative Twists and Variations
This recipe is a playground. Here are some of my favorite ways to switch things up:
Spicy Jalapeño Kick
Add diced jalapeños to the cheese mixture for a fiery heat that balances the richness. The heat also cuts through the buttery bacon flavor, creating a dynamic taste profile. Pair it with a cool cucumber yogurt dip to mellow the spice.
Mediterranean Flair
Swap the cheddar for crumbled feta and add chopped kalamata olives. Toss in a handful of chopped sun‑dried tomatoes for a burst of umami. Finish with a drizzle of olive oil and a sprinkle of oregano for a Mediterranean twist.
Breakfast Bonanza
Use a breakfast sausage instead of bacon, and add a splash of maple syrup to the cheese mix. Sprinkle with chopped chives and serve with a side of scrambled eggs. This version turns the dish into a hearty brunch staple.
Vegan Version
Replace chicken with marinated tofu cubes and use vegan bacon bits. Swap cheddar for a plant‑based cheese and use coconut‑based sour cream. The result is a plant‑powered, crispy, cheesy delight that satisfies all cravings.
Sweet & Savory Surprise
Add a handful of dried cranberries to the cheese mix and sprinkle with a pinch of cinnamon. The sweet cranberries contrast the salty bacon, creating a complex flavor. Serve with a drizzle of honey for a sweet finish.
Protein‑Packed Power
Use a lean protein like turkey breast or even ground turkey in place of chicken. Add a scoop of protein powder to the cheese mix for an extra protein boost. This variation is perfect for post‑workout refueling.
Storing and Bringing It Back to Life
Fridge Storage
Store leftovers in an airtight container in the refrigerator for up to 3 days. Keep the fries and cheese separate to avoid sogginess. When you’re ready to eat, reheat in a toaster oven or under a broiler for a few minutes to restore crispness.
Freezer Friendly
Freeze the assembled dish in a freezer‑safe container for up to 2 weeks. Thaw overnight in the refrigerator before reheating. Reheat in a preheated oven at 375°F for 15 minutes, then finish under the broiler for 2 minutes to crisp the fries.
Best Reheating Method
The secret to a great reheated batch is to add a splash of water to the fries before reheating. The water steams the fries, preventing them from drying out. After reheating, sprinkle a little extra cheese to give the dish that fresh, melty finish.