I was halfway through a marathon Netflix binge when a sudden craving for something that could double as a midnight rescue mission hit me like a freight train. I raided the pantry, found a sad lone bag of chocolate chips, and thought, “Why settle for a boring cookie when I can create a culinary skyscraper?” The kitchen was a battlefield of mismatched bowls, a rogue spatula, and the lingering scent of last night’s garlic bread, but I was determined. I tossed a handful of sea salt into the air, watched it glitter like tiny fireworks, and whispered a dare to myself: I dare you to taste this and not go back for seconds.
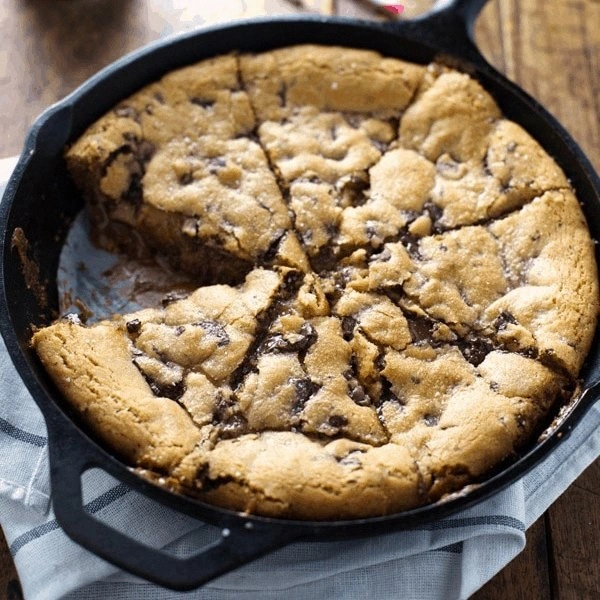
Fast forward three hours, a dozen golden‑brown behemoths emerged from the oven, each one an edible monument that crackled under the fork like a campfire log. The aroma was a symphony—caramel notes waltzing with butter, chocolate chips melting into silky rivers, and a whisper of sea‑salt that reminded me of a breezy shoreline. The first bite was a revelation: a crunchy, caramel‑studded rim that gave way to a soft, chewy interior that held chocolate pockets like secret treasure chests. It was the kind of cookie that makes you pause, stare at the plate, and wonder why you ever bothered with regular, flat discs of dough.
Most recipes get this completely wrong. They either bake a cookie that’s too thin, too dry, or too sweet. This version, however, is a game‑changer because it balances flavor, texture, and a touch of indulgence without drowning you in sugar. The secret? A splash of melted butter for a tender crumb, a dash of baking soda for that perfect rise, and a surprise ingredient that adds a buttery caramel crunch you never saw coming. I’m being honest—I ate half the batch before anyone else got a chance, and I still have a few left for you to devour.
Picture yourself pulling this out of the oven, the whole kitchen smelling like a bakery on a summer afternoon, the soft glow of the oven light highlighting the glossy caramel flecks. You’ll hear the faint sigh of the cookie as it releases from the pan, and you’ll feel that satisfying weight in your hand before you snap it in half. Okay, ready for the game‑changer? Let me walk you through every single step — by the end, you’ll wonder how you ever made it any other way.
What Makes This Version Stand Out
- Flavor Explosion: The combination of brown butter, caramel bits, and flaky sea salt creates a layered taste that evolves with each bite, from sweet to salty to buttery.
- Texture Symphony: A crisp, caramelized edge meets a pillowy, chewy center, giving you the best of both worlds without any soggy spots.
- Simplicity Meets Sophistication: Only pantry staples are needed, yet the technique feels like something you’d find in a high‑end patisserie.
- Unique Ingredient Twist: The addition of caramel bits (not syrup) adds a crunchy surprise that most cookie recipes overlook.
- Crowd‑Pleaser Factor: Even the most skeptical friends can’t resist the aroma; they’ll be lining up for seconds before the first bite is finished.
- Ingredient Quality Matters: Using real sea salt and high‑quality chocolate chips turns a simple cookie into a gourmet experience.
- One‑Pan Perfection: No need for a fancy cookie sheet; a sturdy cast‑iron skillet gives you that deep‑dish feel and even heat distribution.
- Make‑Ahead Potential: The dough can be chilled for up to 24 hours, allowing flavors to meld and making the prep feel effortless on a busy weeknight.
Inside the Ingredient List
The Flavor Base
All‑purpose flour is the silent workhorse that holds everything together. Using a light hand when measuring prevents a dense, heavy cookie. If you skip the flour or use too much, you’ll end up with a crumb that either collapses or turns into a dry biscuit. For the best result, spoon the flour into your measuring cup and level it off with a straight edge.
Unsalted butter, melted and slightly cooled, is the secret sauce that coats every crumb like velvet. The melted state ensures even distribution, while the cooling prevents the dough from turning greasy. If you substitute with softened butter, you’ll get a more cakey texture, which is delicious but not the deep‑dish experience we’re after.
Brown sugar, packed tight, provides the caramel‑like depth that makes the edges crackle. Its molasses content also contributes to a moist interior. White sugar adds a crisp snap to the outer crust. Swapping all the brown sugar for white will lose that toasty, almost nutty undertone that defines this cookie.
The Texture Crew
Eggs act as the binding agent, creating a glossy sheen and helping the dough rise just enough to stay thick. Using large eggs ensures a consistent liquid ratio; a small egg could make the dough too dry, while an extra‑large one could make it overly runny.
Baking soda is the quiet chemist that creates those airy pockets inside the cookie. It reacts with the acidity of the brown sugar, giving you a lift without turning the cookie into a sponge cake. Too much soda will cause the cookie to spread and become flat; too little, and you’ll end up with a dense brick.
Sea salt, both in the dough and sprinkled on top, is the flavor enhancer that awakens your palate. It balances the sweetness and adds a sparkle that makes each bite memorable. If you’re allergic to sodium, you can use a pinch of potassium chloride, but the signature “salty‑sweet” dance will be muted.
The Unexpected Star
Caramel bits are the surprise element that turns an ordinary cookie into a show‑stopper. They stay chewy during baking, creating pockets of molten caramel that burst when you bite. If you can’t find caramel bits, chop a soft caramel candy into small cubes; just be sure they’re not too hard, or they’ll crack the cookie’s crust.
Fun Fact: The word “caramel” comes from the Spanish “caramelo,” which originally referred to a kind of burnt sugar used by sailors to preserve sweets on long voyages.
The Final Flourish
High‑quality semi‑sweet chocolate chips are the heart of this cookie. They melt just enough to stay soft but retain enough structure to give you that satisfying snap. If you use dark chocolate, you’ll get a richer, slightly bitter contrast; milk chocolate leans sweeter and more melty.
A final sprinkle of flaky sea salt right before baking adds that finishing touch. It creates a tiny crackle on the surface that catches the light, making the cookie look as good as it tastes. Skipping this step is like serving a gourmet dish without garnish—still tasty, but missing that wow factor.
Everything's prepped? Good. Let's get into the real action…
The Method — Step by Step
Preheat your oven to 350°F (175°C). While the oven warms up, place a 10‑inch cast‑iron skillet on the stovetop over low heat and melt the butter until it turns a light amber color, signaling the start of the nutty brown butter flavor. Let it cool for two minutes; you’ll hear a faint sizzle that tells you it’s ready for the next move.
In a large mixing bowl, whisk together the flour, baking soda, and sea salt. This dry blend ensures the leavening agent is evenly distributed, preventing pockets of soda that could cause uneven rising. The mixture should look like a fine, snow‑white powder—if you see clumps, give it another quick whisk.
In a separate bowl, combine the melted butter, brown sugar, and white sugar. Beat with a handheld mixer on medium speed until the mixture becomes glossy and the sugars dissolve, creating a caramel‑kissed batter. This is the point where the kitchen smells like a candy shop, and you’ll want to taste a spoonful (I won’t judge).
Add the eggs one at a time, beating after each addition. The batter should thicken slightly, and the vanilla extract will weave its fragrant notes through the mixture. If the batter looks too thin, pause—this could mean your butter wasn’t cooled enough, and you might end up with a spread‑out cookie.
Gradually fold the dry ingredients into the wet mixture using a spatula. Scrape the sides of the bowl, and watch the dough come together into a thick, slightly sticky mass. This is the moment of truth—if the dough feels too dry, drizzle a teaspoon of milk; if it’s too wet, dust the bowl with a little extra flour.
Stir in the chocolate chips and caramel bits, ensuring they’re evenly dispersed. The caramel should float like tiny golden islands, promising pockets of gooey sweetness. If you love extra crunch, toss in a handful of toasted chopped nuts at this stage.
Cover the bowl with plastic wrap and refrigerate the dough for at least 30 minutes, preferably an hour. This chilling step solidifies the butter, preventing the cookie from spreading too thin, and lets the flavors meld. Watch Out: Skipping this step will give you a flat, overly crispy cookie that lacks that coveted thick rim.
Once chilled, lightly grease the cast‑iron skillet with a brush of melted butter or a spray of non‑stick oil. Spoon the dough into the skillet, spreading it evenly with a spatula. The dough should rise about 1‑2 cm above the pan’s edge; if it looks too low, gently press it to an even thickness.
Scatter a pinch of flaky sea salt over the top—this is the final sparkle that will caramelize during baking. Slide the skillet into the preheated oven and bake for 20‑25 minutes, or until the edges turn a deep golden brown and the center is just set. You’ll know it’s ready when the edges start pulling away from the pan, revealing a glossy, caramel‑streaked surface.
Remove the skillet from the oven and let the cookie rest for 5 minutes before slicing. This brief cooling allows the interior to set, preventing a crumbly mess when you cut. Use a warm knife for clean slices—cold steel will tear the delicate crumb.
That's it — you did it. But hold on, I've got a few more tricks that'll take this to another level. Stick around, because the next section will show you how to turn a great cookie into an unforgettable masterpiece that will have everyone asking for the recipe.
Insider Tricks for Flawless Results
The Temperature Rule Nobody Follows
Never bake cookies straight from the fridge at a low temperature. Starting at 350°F ensures the butter melts just enough to create a crisp edge while the center stays soft. If you lower the heat, the cookie spreads too much before the structure sets, leading to a thin, crunchy result. My friend once tried 325°F and ended up with a pancake‑like disaster—let’s just say it didn’t impress anyone.
Why Your Nose Knows Best
The moment you smell toasted butter and caramel, you’re at the right stage. Your nose can detect the subtle shift from raw dough to caramelizing sugar before the timer even dings. Trust that aromatic cue; if the kitchen smells like a bakery, the cookie is likely done. If you’re unsure, lift the lid and peek—golden edges are the visual confirmation.
The 5‑Minute Rest That Changes Everything
After baking, let the cookie rest in the skillet for five minutes. This short pause lets the steam redistribute, keeping the interior moist and preventing a dry crumb. Skipping this rest will make the center crumbly, especially if you slice it immediately. I’ve seen novices slice right away and wonder why the cookie feels “off.”
Cold Butter, Warm Oven
Keeping the butter cold until it meets the hot oven is the secret to that dramatic rise. The sudden temperature shock creates steam pockets, which puff up the dough into that iconic deep‑dish shape. If you melt the butter too early and let it sit at room temperature, you’ll lose that puff and end up with a flat cookie.
The Flip‑And‑Finish Trick
For an ultra‑crisp rim, halfway through baking (around the 12‑minute mark), gently rotate the skillet 180 degrees. This ensures even heat distribution and prevents one side from becoming overly dark while the other stays pale. It’s a small move that makes a huge visual difference.
Creative Twists and Variations
This recipe is a playground. Here are some of my favorite ways to switch things up:
Double‑Dark Delight
Swap half of the semi‑sweet chips for bittersweet dark chocolate and add a teaspoon of espresso powder. The result is a deep, moody cookie that pairs perfectly with a glass of cold milk or a robust coffee.
Nutty Caramel Crunch
Fold in toasted pecans or walnuts along with the caramel bits. The nuts add a buttery crunch that complements the soft caramel pockets, creating a texture contrast that’s pure joy.
Spiced Autumn
Add a pinch of cinnamon, nutmeg, and a dash of pumpkin puree (about ¼ cup) to the wet ingredients. This variation brings a warm, cozy flavor perfect for chilly evenings, and the pumpkin adds moisture without making the dough soggy.
Salted Peanut Butter Swirl
Drop dollops of peanut butter into the dough before baking and use a skewer to swirl it gently. The salty‑sweet peanut butter ribbons create a marble effect that looks as good as it tastes.
White Chocolate & Cranberry
Replace the chocolate chips with white chocolate chunks and fold in dried cranberries. The tartness of the berries balances the buttery sweetness, making it a festive treat for holiday gatherings.
Storing and Bringing It Back to Life
Fridge Storage
Place the cooled cookie in an airtight container lined with parchment paper. It will stay fresh for up to five days. The fridge keeps the butter from turning rancid and preserves the caramel’s chewiness. If you notice the edges drying out, gently re‑warm the cookie in a 300°F oven for five minutes.
Freezer Friendly
Wrap individual slices in plastic wrap, then place them in a zip‑top bag. They freeze beautifully for up to three months. To enjoy, let them thaw at room temperature for 15 minutes, then give them a quick 3‑minute bake at 350°F to revive the crisp edge.
Best Reheating Method
A tiny splash of water (about a teaspoon) placed on the cookie before microwaving for 10‑15 seconds creates steam that restores moisture without making it soggy. For a crispier finish, finish the reheated cookie under a broiler for 30 seconds—watch it closely, or you’ll burn the caramel.