I was halfway through a dinner party, juggling a sizzling skillet, a bubbling pot of pasta, and a last‑minute request for a quick appetizer that would wow a crowd. The kitchen was a chaotic orchestra of clanging pans and frantic timer clicks, and I had a sudden craving for something bright, tangy, and utterly impossible to find in the grocery aisle. That moment of culinary crisis led me to rummage through the pantry and discover a forgotten jar of beetroot and a stash of hard‑boiled eggs. I dared myself to turn these humble staples into something that would make my guests gasp, and what emerged was a rainbow of pickled eggs that practically sang from the glass jar. This is not just a recipe; it’s a rescue mission for a flustered host, a testament to what a splash of color and a dash of curiosity can do in a kitchen.
Picture the scene: the air tingles with the sharp perfume of white wine vinegar mingling with the earthy sweetness of beets, a faint metallic hint of sea salt, and the subtle citrus kiss of fresh lemon. My eyes lock onto the glossy, ruby‑red beet slices that stack neatly beside the pale, creamy eggs, each one a tiny canvas awaiting its vibrant coat. The sound of the brine gently bubbling as it pours over the layers is almost a lullaby, while the texture of the beets—crisp yet tender—creates a satisfying contrast against the silky yolks. When you take that first bite, the explosion of flavors is like a fireworks show: the acidity cuts through the richness, the turmeric adds a warm, almost earthy undertone, and the yogurt and mayo melt into a velvety finish that coats the palate like velvet.
What sets this version apart is the intentional layering of textures and the deliberate choice of ingredients that elevate a classic pickled egg into a showstopper. The beets don’t just add color; they bring a natural sweetness that balances the sharpness of the vinegar. The yogurt and mayonnaise infusion gives the eggs a creamy, almost custard‑like consistency that’s unexpected in a pickled dish. And the peppery bite from celery seeds and the subtle heat from turmeric make every bite a complex adventure rather than a simple brine. I dare you to taste this and not go back for seconds—once you’ve had a handful, you’ll be craving the whole jar. This is hands down the best version you’ll ever make at home.
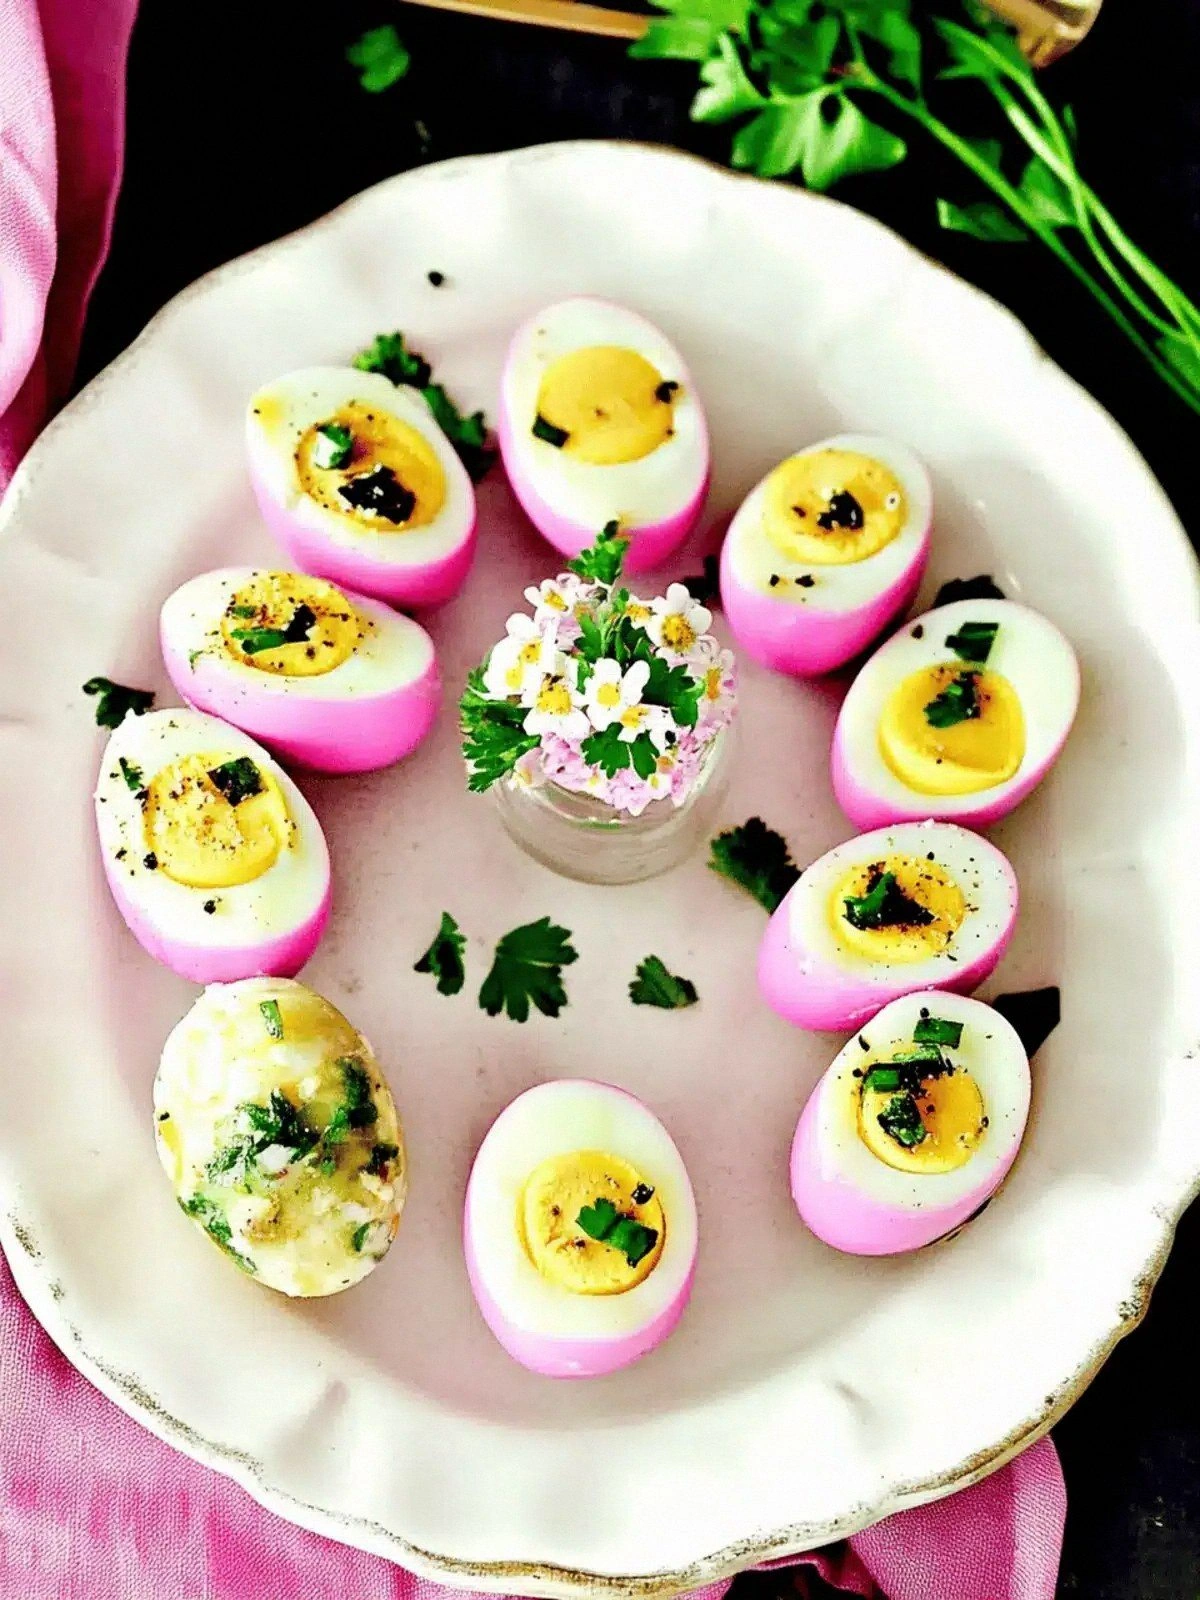
If you’ve ever struggled with making pickled eggs that are both visually stunning and flavorfully balanced, you’re not alone—and I’ve got the fix. I’ll be honest—I ate half the batch before anyone else got to try it—so I’ve tweaked this recipe to keep everyone satisfied. Most recipes get this completely wrong; they either forget the beets, over‑pick the eggs, or miss the creamy finish. Picture yourself pulling this out of the fridge, the whole kitchen smelling incredible, and watching as the glossy, rainbow‑colored eggs gleam like jewels in a glass jar. Let me walk you through every single step—by the end, you’ll wonder how you ever made it any other way.
What Makes This Version Stand Out
- Taste: The combination of sweet beet, sharp vinegar, and subtle turmeric creates a flavor profile that dances on the tongue. It’s bright enough for a summer gathering yet rich enough for a cozy dinner.
- Texture: The beets remain crisp while the yolks transform into a silky, creamy coating thanks to yogurt and mayonnaise. The result is a delightful contrast that keeps each bite interesting.
- Simplicity: Only a handful of pantry staples are required. No need for exotic spices or complicated steps—just layer, brine, chill, and serve.
- Uniqueness: The beetroot layer not only adds color but also infuses the eggs with a natural sweetness that sets this recipe apart from ordinary pickles.
- Crowd Reaction: Guests often ask for the recipe after the first bite, and the vibrant presentation makes it Instagram‑ready.
- Ingredient Quality: Using fresh, organic beets and high‑quality yogurt elevates the dish’s overall taste and nutritional profile.
- Cooking Method: The dual‑step process—first brining, then adding a creamy layer—ensures depth of flavor and a memorable finish.
- Make‑Ahead Potential: Once brined, the eggs can sit in the fridge for up to a week, making them perfect for pre‑parties or busy evenings.
Alright, let's break down exactly what goes into this masterpiece...
Inside the Ingredient List
The Flavor Base
The white wine vinegar is the backbone of this pickled creation, providing a sharp, clean acidity that cuts through the richness of the eggs and the sweetness of the beets. Using a high‑quality vinegar with a subtle fruity note enhances the overall profile; a cheaper vinegar can taste harsh. If you prefer a milder bite, substitute half of the vinegar with apple cider vinegar for a sweeter finish. Avoid using bottled vinegar that’s been pasteurized too heavily, as it can lose its bright character.
The Sweet Counterbalance
Brown sugar is more than just a sweetener—it adds depth with its molasses undertones and helps caramelize the edges of the brine as it simmers. If you’re watching your sugar intake, a 50/50 blend of honey and brown sugar works well, but keep in mind that honey can introduce a floral note. The sugar also helps the brine thicken slightly, giving the eggs a glossy sheen. Skipping sugar entirely will result in a flatter, less complex flavor.
The Unexpected Star
Beets are the visual and flavor highlight. Their earthy sweetness balances the sharpness of the vinegar, and their natural pigments give the eggs a stunning, rainbow hue. Fresh beets yield a brighter color than canned, but if you’re in a pinch, canned beet slices can be used—they’ll still provide that sweet bite. When slicing beets, aim for thin rounds (about 3 mm) so they soften just enough to let the brine seep through without becoming mushy.
The Final Flourish
Plain whole milk yogurt and mayonnaise create a creamy coating that coats the yolks like a velvety glaze. The yogurt adds tang and a slight probiotic kick, while the mayonnaise brings richness and body. If you’re vegan or dairy‑free, a blend of coconut yogurt and vegan mayo works surprisingly well. The addition of turmeric not only gives a subtle warmth but also a golden hue that complements the beet’s deep reds.
Everything's prepped? Good. Let's get into the real action...
The Method — Step by Step
- Step 1: Boil and Peel. Bring a pot of water to a rolling boil, drop in the eggs, and let them simmer for 10 minutes. Afterward, plunge them into ice water for 5 minutes to stop the cooking process. Peel the shells carefully; the skins should slip off like a curtain. This ensures the yolks remain firm and ready for the brine.
- Step 2: Prepare the Brine. In a saucepan, combine the white wine vinegar, brown sugar, sea salt, celery seeds, yellow mustard seeds, dry mustard, crushed garlic, turmeric, and fresh lemon juice. Warm the mixture over medium heat, stirring until the sugar dissolves completely. The aroma of warm spices will fill your kitchen, signaling that the base is ready.
- Step 3: Layer the Beets. Place the thinly sliced beets at the bottom of a clean mason jar or a large glass container. Their bright color will act as the canvas for the eggs. This step is crucial for achieving the vibrant look that makes the dish Instagram‑worthy.
- Step 4: Add Eggs, Onion, and Parsley. Gently nestle the peeled eggs into the beet layers, followed by thinly sliced red onion and a handful of chopped parsley. The onion adds a subtle sharpness, while parsley provides a fresh, herbal lift. Keep the layers neat to ensure even pickling.
- Step 5: Pour the Brine. Carefully pour the hot brine over the layered ingredients, making sure the eggs are fully submerged. The liquid should reach just above the top layer. Let the jar sit at room temperature for 24 hours to allow the flavors to meld.
- Step 6: Refrigerate. After the initial 24‑hour soak, seal the jar tightly and place it in the refrigerator. Let it rest for at least 48 hours—this is when the beets release their pigments and the eggs absorb the brine’s flavor.
- Step 7: Creamy Finish. In a small bowl, whisk together the plain whole milk yogurt, mayonnaise, and a pinch of salt. Gently spoon or pipe this mixture over each egg, ensuring the yolks are coated. This creamy layer turns the eggs into a luxurious, custard‑like treat.
- Step 8: Chill Again. Return the jar to the fridge and let the eggs set for at least 4 hours, or overnight if you’re feeling extra patient. The flavors will deepen, and the creamy coating will firm up.
- Step 9: Garnish. Before serving, sprinkle chopped chives or scallions over the top for a pop of green and a subtle onion bite. A drizzle of extra lemon juice adds a bright finish.
- Step 10: Serve. Slice the jar open, let the colorful eggs spill onto a platter, and serve with crusty bread or crackers. The visual spectacle will have everyone asking for the recipe before they even taste it.
That's it — you did it. But hold on, I've got a few more tricks that'll take this to another level. The next section will give you insider knowledge that turns an already amazing dish into a showstopper every time.
Insider Tricks for Flawless Results
The Temperature Rule Nobody Follows
When boiling the eggs, the water temperature should be just below a rolling boil—about 190°F (88°C). A full boil can cause the shells to crack or the yolks to become rubbery. Use a thermometer if you’re precise; otherwise, a gentle simmer works fine. This subtle control ensures a silky yolk that holds its shape during pickling.
Why Your Nose Knows Best
The aroma of the brine is a reliable indicator of readiness. If it smells sharp and sweet, it’s ready to pour. A faint, sour scent means the vinegar hasn’t fully blended with the sugar and spices. Trust your nose—an off‑smell can translate to off‑taste.
The 5‑Minute Rest That Changes Everything
After peeling, let the eggs rest in ice water for 5 minutes. This brief pause allows the shells to contract, making them easier to peel without tearing the whites. Skipping this step often results in a messy, uneven peel.
The Secret to a Glossy Finish
Before sealing the jar, give the brine a quick swirl to ensure no pockets of air remain. Air pockets can create uneven pickling and affect the color. A smooth, glossy surface also looks more appetizing when you serve the eggs.
The Right Container for Longevity
Use a Mason jar with a tight seal or a glass jar with a silicone lid. Plastic containers can absorb flavors and discolor over time. A glass jar also allows you to see the beautiful layers, adding to the visual appeal.
Creative Twists and Variations
This recipe is a playground. Here are some of my favorite ways to switch things up:
Spicy Sriracha Surprise
Swap the plain yogurt for a mixture of yogurt and a tablespoon of sriracha. The heat pairs well with the beet's sweetness, creating a bold, spicy kick that’s perfect for adventurous palates.
Herb‑Infused Citrus Burst
Add a handful of fresh dill or tarragon to the brine and garnish with lemon zest. The herbal notes elevate the dish, making it a refreshing addition to a summer brunch.
Smoky Chipotle Twist
Introduce a chipotle pepper in adobo sauce to the brine for a smoky depth. The pepper’s heat contrasts nicely with the creamy coating, giving the eggs a complex, layered flavor.
Vegan Version
Replace the eggs with marinated tofu cubes and use coconut yogurt with vegan mayo. This version maintains the vibrant colors and creamy texture while keeping it plant‑based.
Miso‑Marinated Marvel
Incorporate a tablespoon of white miso into the brine for umami richness. The miso adds depth and pairs wonderfully with the beet’s natural sweetness.
Berry‑Infused Beets
Add a handful of fresh blueberries or raspberries to the jar after layering the eggs. The berries release their juices, creating a subtle fruitiness that complements the earthy beet flavor.
Storing and Bringing It Back to Life
Fridge Storage
Store the pickled eggs in a sealed glass jar in the refrigerator for up to 2 weeks. The vibrant colors will remain vivid, and the brine will continue to infuse the eggs with flavor. Keep the jar upright to prevent any leakage.
Freezer Friendly
For longer storage, transfer the eggs and brine into a freezer‑safe container, leaving a small headspace for expansion. Freeze for up to 3 months. When ready to eat, thaw in the fridge overnight. The texture may change slightly, but the flavor remains intact.
Best Reheating Method
If you prefer a warm version, gently warm the jar in a water bath at 120°F (49°C) for 10 minutes. Avoid microwaving, as it can cause the brine to separate. A quick steam bath preserves the creamy coating and keeps the eggs juicy.
Add a tiny splash of water before reheating — it steams back to perfection and keeps the brine from drying out.