Picture this: I’m standing in a kitchen that smells like burnt toast, a lingering memory of a cheesecake disaster that left me with a half‑filled, lopsided cake that could have been a modern art sculpture. I was staring at the jagged edges, the uneven rise, the dry crumb that didn’t hold. That night, I vowed to never let that happen again. I dug into my pantry, pulled out every chocolate cookie I owned, and decided it was time for a redemption recipe.
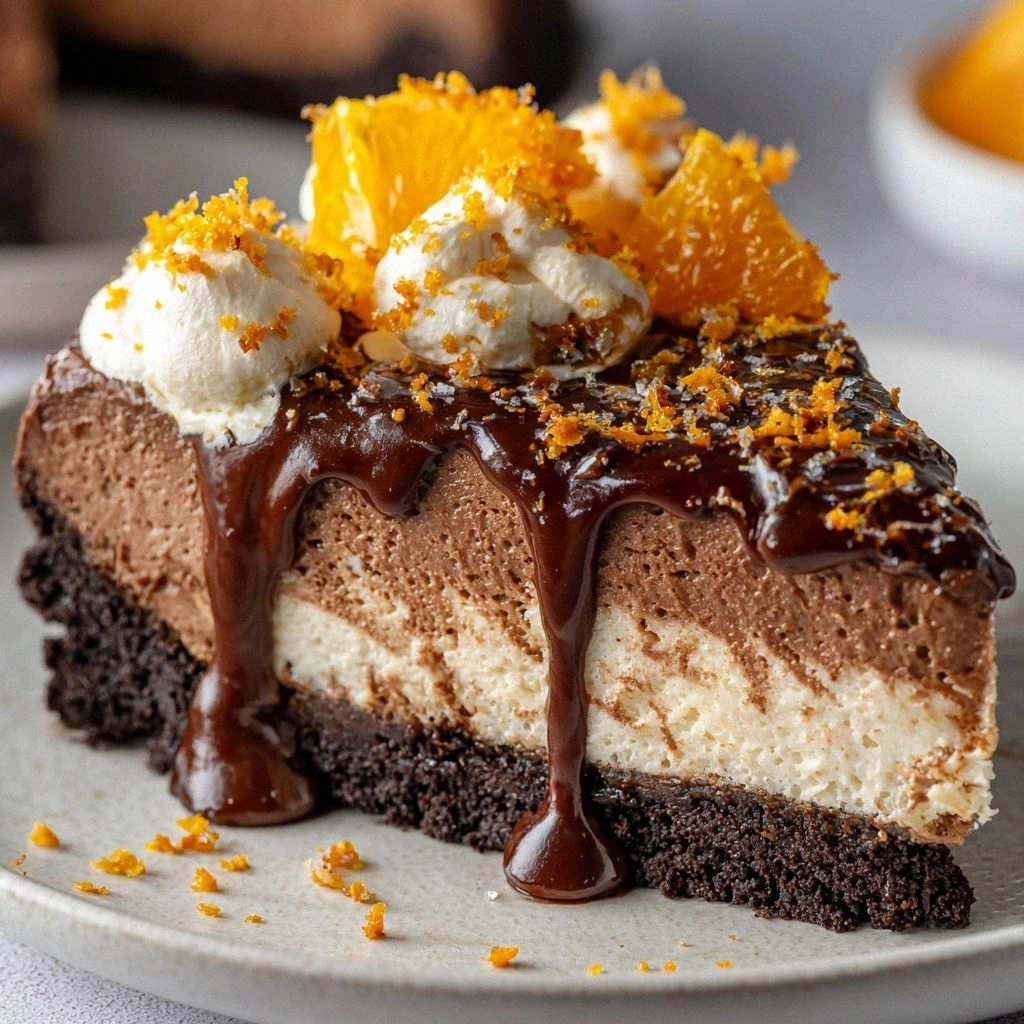
When it finally came together, the kitchen transformed: The oven hummed like a contented cat, the air filled with the sweet, tangy aroma of orange zest dancing with chocolate. My eyes widened as the filling set, a glossy, ivory sea of cream cheese that seemed to glow from within. The sound of the first bite was a satisfying crack, like a thin ice sheet breaking into a crystal waterfall. My taste buds felt a sudden rush of silky sweetness, followed by a bright citrus punch that cut through the richness. I could feel the buttery crust giving a subtle crunch under my teeth, a satisfying contrast to the smooth interior.
What makes this version stand out is not just the combination of chocolate and orange; it’s the precision and the small, almost invisible tweaks that elevate the whole experience: I used a chocolate cookie base that is more crumbly than typical graham crackers, giving the cheesecake a subtle chocolate undertone from the start. I folded in semi‑sweet chocolate chips that melt into the filling, creating pockets of molten chocolate that burst in your mouth. I added fresh orange juice and zest, not just for flavor but for moisture that keeps the cheesecake silky. The result is a cheesecake that feels like a dessert and a dessert that feels like a dessert. I dare you to taste this and not go back for seconds.
And here’s the kicker: The final texture is so airy that it feels almost like a souffle, yet it holds its shape like a classic cheesecake. The crust is buttery and crisp, not soggy or crumbly. This is hands down the best version you’ll ever make at home. I’ll be honest — I ate half the batch before anyone else got a chance. If you’re ready to replace your old cheesecake routine with something that feels like a revelation, let me walk you through every single step. By the end, you’ll wonder how you ever made it any other way.
What Makes This Version Stand Out
- Flavor: The dual‑layer of chocolate and citrus creates a dynamic flavor profile that is both comforting and refreshing. The chocolate cookie crust adds depth, while the orange zest delivers a bright, zesty finish.
- Texture: The use of sour cream in the filling locks in moisture, preventing the cheesecake from drying out and giving it a luxuriously creamy mouthfeel.
- Ease: No complicated steps, no advanced techniques, just straightforward mixing and baking that anyone can master.
- Visual Appeal: The glossy filling and glossy chocolate chips give the cheesecake a professional, show‑stopper look.
- Versatility: The recipe can be easily tweaked for dietary preferences—use dairy‑free cream cheese or a sugar substitute without compromising the flavor.
- Make‑ahead Potential: Once baked, the cheesecake can be stored in the fridge for up to five days or frozen for a month, making it a perfect make‑ahead dessert.
- Ingredient Quality: Using full‑fat cream cheese and fresh orange juice ensures a richer taste than store‑bought substitutes.
Alright, let's break down exactly what goes into this masterpiece...
Inside the Ingredient List
The Flavor Base
Chocolate cookie crumbs: They form the base of your cheesecake, providing a rich, chocolatey flavor that anchors the entire dessert. If you skip them, the cheesecake will taste flat and lack depth. Swap with crushed chocolate graham crackers for a crunchier texture, or use dark chocolate cookies for a deeper cocoa profile. When choosing cookies, look for those that are slightly sweet but not overpowering, so they don’t clash with the orange.
The Texture Crew
Unsalted butter: This helps bind the crust together and adds a lovely richness. Make sure it’s melted for easy mixing; if it’s too hot, it can melt the crumbs into a paste. If you’re vegan, use a dairy‑free butter alternative. Butter also adds a subtle caramel flavor that enhances the chocolate.
Cream cheese: The star of the show! Softened cream cheese gives the cheesecake its creamy texture. Look for full‑fat for the best results. If you use a low‑fat version, the filling might be watery and fail to set properly. A good tip: let it sit at room temperature for 30 minutes before mixing.
Sour cream: This adds a delightful tang and creaminess to the filling. You can substitute with Greek yogurt if you prefer, but it may introduce a slightly thicker consistency. Sour cream also helps stabilize the mixture, preventing cracks.
The Unexpected Star
Orange zest: This is where the magic happens! The zest adds a burst of citrus flavor that complements the chocolate beautifully. Use a microplane for fine zest; too coarse can be bitter. If you’re allergic to citrus, you can replace it with a splash of orange extract, but the zest’s aroma is irreplaceable.
Fresh orange juice: It brings a refreshing brightness to the cheesecake. Freshly squeezed is best, but bottled works in a pinch. If you use bottled, choose a natural, no‑added‑sugar variety. The juice also keeps the filling moist and prevents it from drying out.
The Final Flourish
Granulated sugar: This sweetens the filling, balancing the tanginess of the cream cheese and the brightness of the orange. Use white sugar for a clean sweetness; brown sugar can add a caramel note. If you want a lower‑glycemic option, try a sugar substitute that doesn’t crystallize.
Eggs: They provide structure and stability to the cheesecake. Use large eggs for consistency. If you’re vegan, try a flaxseed egg or aquafaba as a binder.
Vanilla extract: A splash of vanilla enhances the overall flavor, making it even more delicious. A pinch of vanilla can also help mellow the sharpness of the orange.
Semi‑sweet chocolate chips: These are folded into the filling for delightful chocolatey bites. You can use dark chocolate chips for a richer flavor. If you’re gluten‑free, make sure your chips are certified gluten‑free.
Everything's prepped? Good. Let's get into the real action...
The Method — Step by Step
- Preheat your oven to 325°F (165°C). Line a 9‑inch springform pan with parchment paper, ensuring the paper extends about 1 inch beyond the rim. This will make removal a breeze. The parchment also prevents the crust from sticking, giving you a clean release.
- In a medium bowl, combine the chocolate cookie crumbs with the melted butter. Stir until the mixture resembles wet sand. Pour the crumb mixture into the prepared pan and press firmly with the back of a spoon or your palm. Tap the pan gently on the counter to settle the crust. Let the crust set while you prepare the filling.
- In a large mixing bowl, beat the softened cream cheese on medium speed until smooth and creamy, about 2 minutes. Add the granulated sugar and continue to beat until the mixture is light and fluffy. The sugar should dissolve completely; any grainy texture indicates under‑beating.
- Add the eggs one at a time, beating on low speed after each addition. Scrape the sides of the bowl frequently to ensure even incorporation. The mixture should be silky and free of lumps.
- Stir in the sour cream, vanilla extract, orange zest, and fresh orange juice until the filling is homogeneous. The mixture should look almost translucent, a sign that the ingredients have blended well.
- Fold in the semi‑sweet chocolate chips gently with a spatula, distributing them evenly throughout the batter. This ensures each bite has a chocolate burst.
- Pour the filling over the crust, smoothing the top with a spatula. Tap the pan a few times to release any air pockets. The filling should be level with the crust edge.
- Place the pan on the middle rack of the preheated oven. Bake for 30 minutes, or until the edges are set but the center still has a slight wobble. This wobble indicates that the cheesecake will continue to set as it cools, preventing cracks.
- Turn off the oven and leave the cheesecake inside with the door slightly ajar for 1 hour. This slow cooling step reduces the risk of cracking and creates a silky finish.
- Remove the cheesecake from the oven and let it cool completely at room temperature. Once cool, refrigerate for at least 4 hours, preferably overnight, to set fully.
That’s it — you did it. But hold on, I've got a few more tricks that'll take this to another level...
Insider Tricks for Flawless Results
The Temperature Rule Nobody Follows
Why it matters: Baking at a lower temperature for a longer time ensures even cooking and a silky texture. Most recipes push the temperature to 350°F, but that can cause the outer layer to overcook while the center remains undercooked. By baking at 325°F, you give the cheesecake time to set without drying out.
Why Your Nose Knows Best
Use aroma as a cue: When the cheesecake starts to smell slightly toasty and chocolatey, it’s a sign that the edges are setting. If the aroma is still overwhelmingly sweet or raw, give it a few more minutes. Your nose can detect subtle changes that the timer can’t.
The 5-Minute Rest That Changes Everything
Why it matters: Leaving the cheesecake in the oven with the door ajar for 1 hour helps the internal temperature drop gradually, preventing sudden contraction that causes cracks. Think of it as a gentle cooldown for the batter, giving it time to settle.
The Secret to a Fluffy Crust
Why it matters: A crust that’s too dense will make the cheesecake feel heavy. By using a mixture of crumbs and melted butter and pressing it firmly, you create a thin, buttery layer that complements the filling’s lightness.
The Quick Chill Trick
Why it matters: After baking, place the cheesecake on a wire rack in the fridge for 10 minutes before covering it. This helps the surface cool faster, reducing condensation that can make the top soggy.
Creative Twists and Variations
This recipe is a playground. Here are some of my favorite ways to switch things up:
Lemon‑Orange Fusion
Swap: Replace half of the orange zest with lemon zest and add a tablespoon of lemon juice. The result is a bright, citrusy cheesecake that feels like a springtime treat.
Caramel Swirl
Swap: Drizzle a caramel sauce over the filling before baking. The caramel adds a buttery sweetness that pairs wonderfully with the chocolate.
Nutty Crunch
Swap: Fold in toasted hazelnuts or chopped walnuts into the filling for a nutty crunch. These add texture and a complementary flavor profile.
Espresso Boost
Swap: Add a teaspoon of instant espresso powder to the batter. The espresso deepens the chocolate flavor and gives a subtle coffee kick.
Mango‑Orange Surprise
Swap: Replace half of the orange juice with mango puree. The tropical sweetness balances the chocolate and adds a vibrant color.
Dark Chocolate Variant
Swap: Use dark chocolate chips and reduce the sugar by ¼ cup. The richer chocolate will pair beautifully with the citrus, creating a sophisticated dessert.
Storing and Bringing It Back to Life
Fridge Storage
How long: Keep the cheesecake in the refrigerator for up to five days. Store it in an airtight container or wrap it tightly in plastic wrap to prevent it from absorbing fridge odors.
Freezer Friendly
How to freeze: Wrap the cheesecake tightly in plastic wrap and then in aluminum foil. Label with the date and freeze for up to one month. Thaw overnight in the fridge before serving.
Best Reheating Method
How to reheat: Warm the cheesecake in the oven at 300°F (150°C) for 10 minutes, or until it’s warm throughout. Add a splash of water before reheating; the steam will keep the cheesecake moist and silky.