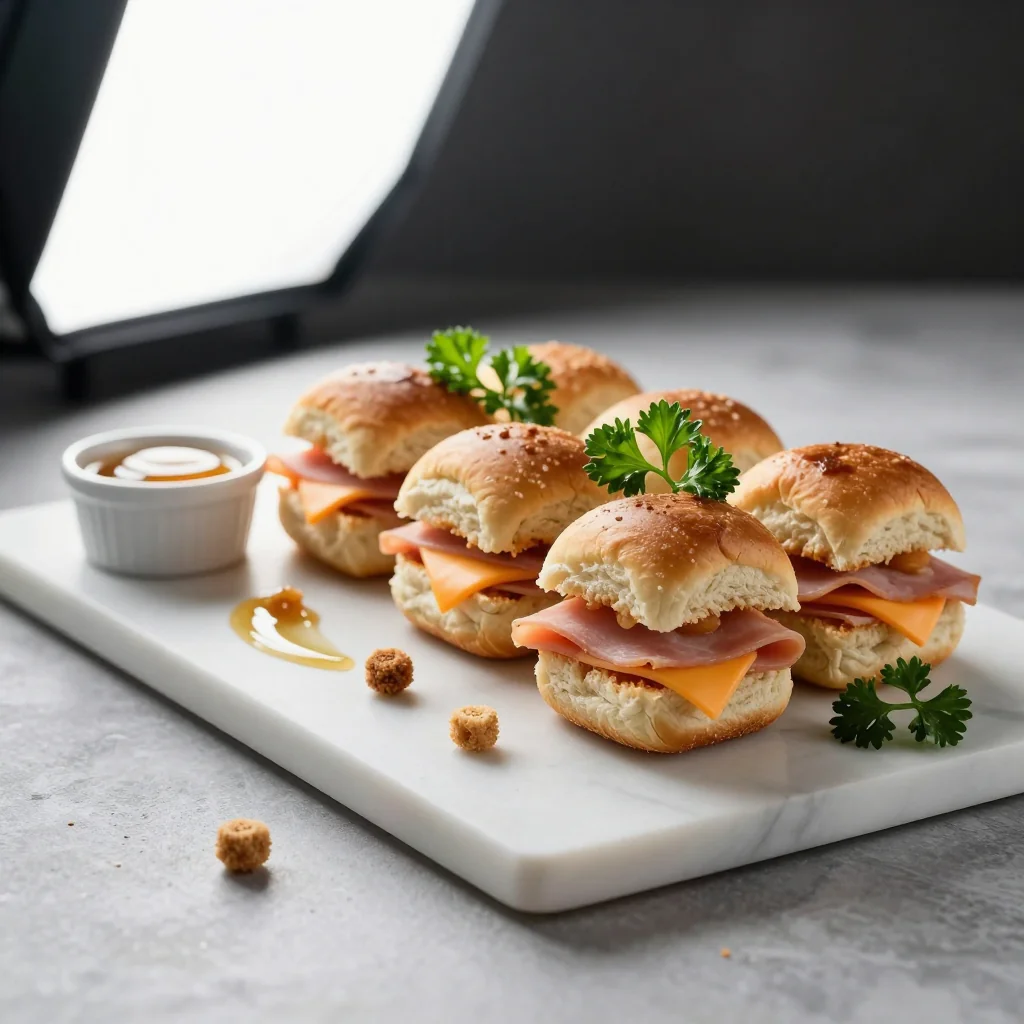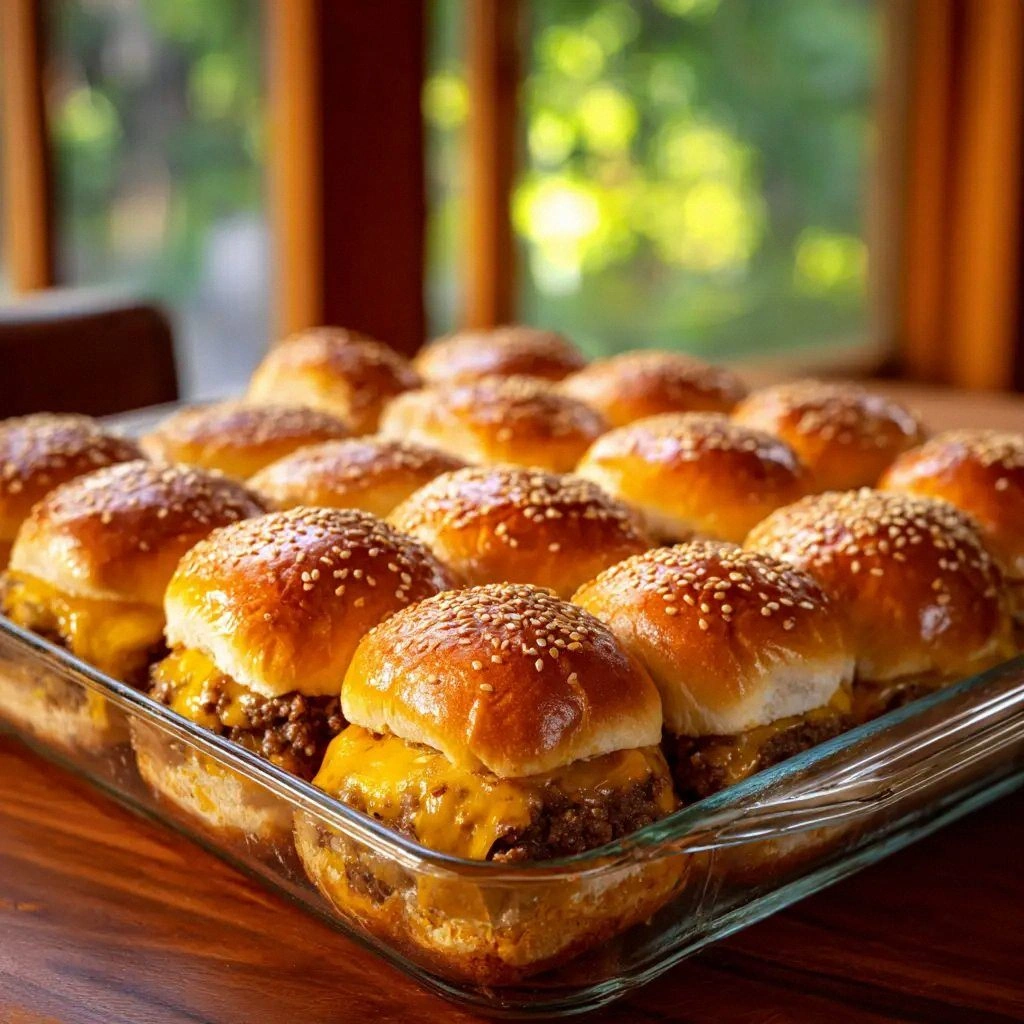
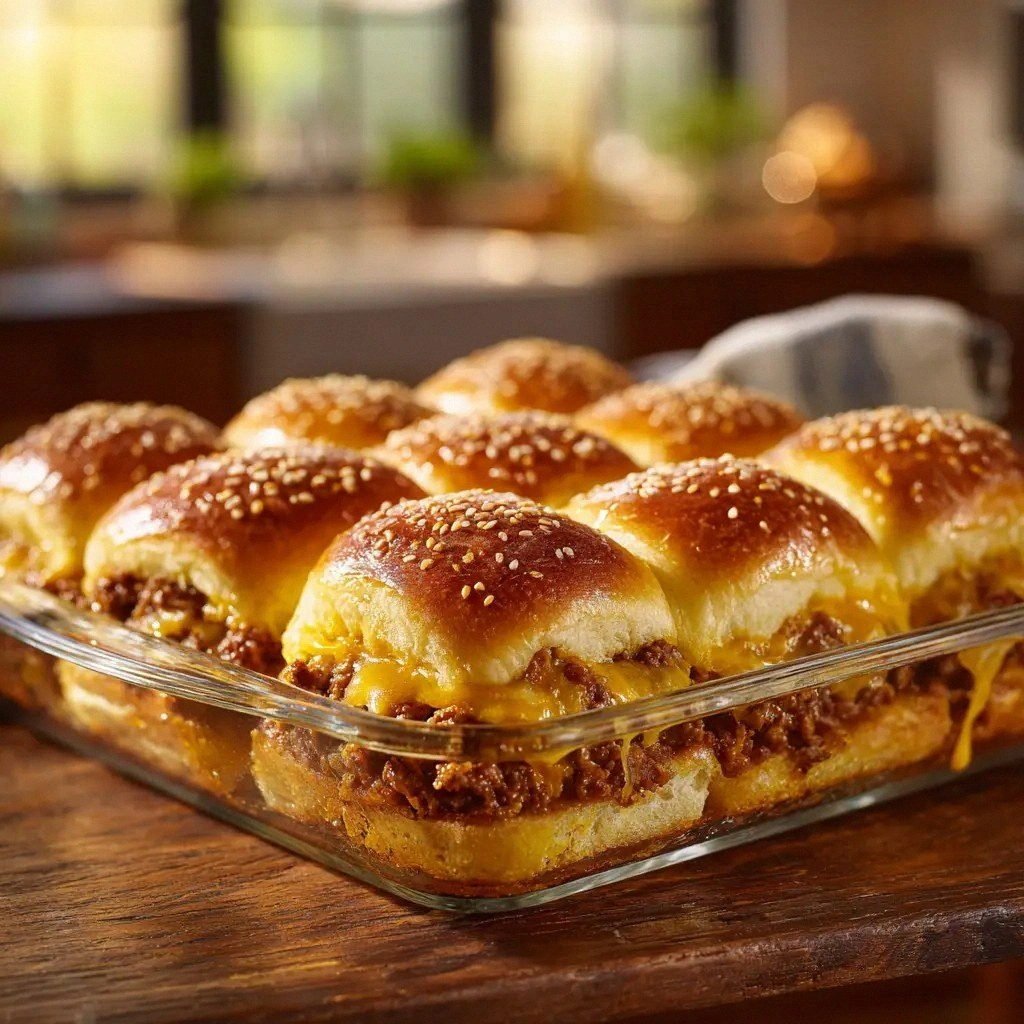
Picture this: you’re in a cramped kitchen, the oven timer beeping like a nagging alarm clock, and the smell of sizzling meat is already teasing your senses. I was halfway through a dinner party when my friend dared me to whip up a batch of sliders that would have everyone begging for seconds. I stared at the stack of Hawaiian rolls, the gleam of cheddar slices, and the promise of that secret sauce that could turn ordinary burgers into a carnival of flavor. I had no idea how this simple dare would morph into a culinary obsession that would later earn me the nickname “Slider Savant” among my foodie friends.
I remember the first bite: the beef was perfectly seasoned, the cheese melted into a silky blanket, and the mayo‑ketchup‑mustard blend coated every crumb like velvet. The rolls were toasted to a golden crisp, yet still soft enough to hold the juicy meat without cracking. The sesame seeds added a whisper of crunch that cut through the richness, and the dill pickle relish brought a bright, tangy counterpoint that kept the palate from drowning in fat. That single moment of pure satisfaction made me swear that this version would forever be the gold standard for sliders.
What sets this recipe apart isn’t just the ingredients—it’s the way each component is elevated to play its part in a symphony of textures and flavors. The beef is ground to a 80/20 ratio to keep it moist, the onions are caramelized to a deep amber to add sweetness, and the sauce is balanced so that no single element overwhelms the others. I’ve spent months tweaking the proportions, testing different cheeses, and experimenting with different types of rolls until I found the perfect marriage of taste, texture, and visual appeal. The result? A slider that feels like a mini‑restaurant experience in the comfort of your own kitchen.
Now, I’m going to walk you through every single step, from the initial prep to the final plating, so that by the end you’ll wonder how you ever made sliders any other way. I’ll share the little tricks that make a difference, the ingredients that might surprise you, and the hacks that will save you time and effort. Get ready to become the host everyone remembers—because this is hands down the best version you’ll ever make at home.
What Makes This Version Stand Out
- Flavor Balance: The sauce isn’t just a condiment—it’s a flavor anchor that ties the beef, cheese, and buns together. The mayo provides creaminess, the ketchup adds sweetness, and the mustard brings a subtle bite that keeps the sliders from feeling too heavy.
- Texture Contrast: Each bite delivers a satisfying crunch from the toasted rolls, a silky melt from the cheddar, and a juicy burst from the beef. The sesame seeds add a final pop that lingers on the tongue.
- Ingredient Quality: Using a high‑fat ground beef keeps the sliders moist, while fresh onions and garlic bring brightness. The Hawaiian rolls offer a soft, slightly sweet base that complements the savory filling.
- Ease of Assembly: The sliders come together in under 30 minutes, making them perfect for last‑minute gatherings or game day.
- Make‑Ahead Friendly: The burgers can be formed and refrigerated for up to 24 hours, and the sauce can be pre‑mixed and stored in the fridge for a quick reheat.
- Crowd‑Pleaser Factor: Whether it’s a backyard barbecue or a family dinner, these sliders get the crowd talking. I dare you to taste this and not go back for seconds.
- Visual Appeal: The golden cheese pull, the glossy sauce, and the toasted buns create a mouth‑watering presentation that’s Instagram‑ready.
- Scalability: The recipe scales linearly, so you can whip up a small batch for a date or a large batch for a party without compromising quality.
Alright, let’s break down exactly what goes into this masterpiece…
Inside the Ingredient List
The Flavor Base
Ground beef is the heart of any burger, and for sliders it must be juicy. I use a 80/20 blend (80% lean, 20% fat) so the meat stays moist even when cooked quickly. The onions and garlic are sautéed until they’re translucent and fragrant, releasing a natural sweetness that balances the savory beef. If you skip the aromatics, the sliders will feel flat and lack depth.
The sauce is a revelation. Mayonnaise, ketchup, mustard, and pickle relish combine to create a creamy, tangy, and slightly sweet coating that lingers on the tongue. The mayo provides a silky base, the ketchup adds a subtle caramel note, mustard gives a bright bite, and the relish brings a crunchy, vinegary zing. A missing pinch of any of these will alter the overall profile, so keep them all in the mix.
The Texture Crew
The Hawaiian sweet rolls are chosen for their soft interior and subtle sweetness. When toasted, they develop a golden crust that holds the meat without becoming soggy. Butter is brushed on the cut sides of the rolls before toasting to add richness and help achieve that perfect golden color. If you prefer a firmer bite, substitute brioche or pretzel rolls for a different flavor profile.
Cheddar cheese is sliced thin enough to melt quickly but thick enough to create that satisfying gooey pull. The cheese not only adds flavor but also helps bind the meat together during cooking. A sharp cheddar will give a sharper bite, while a milder cheddar will let the beef shine. Experiment with smoked cheddar for an extra layer of complexity.
The Unexpected Star
Sesame seeds might seem trivial, but they add a subtle nutty crunch that lifts the entire slider. Sprinkle them over the burgers before cooking, and they’ll toast slightly, releasing a fragrant aroma that signals the sliders are ready. If you’re allergic or just don’t like them, you can omit them entirely without compromising the core experience.
Worcestershire sauce is the secret weapon that gives the beef a depth reminiscent of a slow‑cooked barbecue sauce. A tablespoon is enough to infuse the meat with umami without overpowering it. If you’re avoiding MSG or want a milder flavor, use a low‑sodium or organic variety.
Everything’s prepped? Good. Let’s get into the real action…
The Method — Step by Step
- Begin by heating a large skillet over medium‑high heat. As the pan heats, add a splash of oil and let it shimmer. When the oil is hot, add the ground beef in a single layer, spreading it out to ensure even cooking. Press the beef gently with a spatula to form a uniform patty shape. The goal is a nice sear on the outside while keeping the inside juicy.
- Season the beef with salt and black pepper, then let it cook for 2–3 minutes on one side. Flip the patty only once to preserve moisture. While the first side is browning, sauté the onions and garlic in a separate pan until they’re golden. The aroma at this stage is a prelude to the deliciousness that’s about to unfold.
- Add the sautéed onions and garlic to the beef, stirring to combine. Sprinkle Worcestershire sauce over the mixture, letting the liquid reduce slightly. This step infuses the meat with umami depth and a subtle tang that sets the sliders apart from ordinary burgers.
- Lay a slice of cheddar cheese over each patty and let it melt for about 30 seconds. The cheese will create a gooey blanket that ties the beef to the bun. If you like a sharper bite, choose a sharper cheddar; if you prefer a milder flavor, opt for a mild cheddar.
- While the cheese melts, toast the Hawaiian rolls on a griddle or in a toaster oven. Brush the cut sides with melted butter for a golden crust. The buttery toast adds richness and a satisfying crunch that contrasts with the softness of the bun’s interior.
- In a small bowl, combine mayonnaise, ketchup, yellow mustard, and dill pickle relish. Whisk until the mixture is smooth and slightly thick. This sauce will coat the sliders like velvet, adding a sweet, tangy, and creamy dimension to every bite.
- Spread a generous amount of the sauce on the bottom half of each roll. Spoon the melted-cheese beef patty onto the sauce, then sprinkle sesame seeds over the top. The seeds toast slightly, releasing a nutty aroma that signals the sliders are ready.
- Cover the burgers with the top half of the roll, pressing gently to ensure the sauce stays in place. Arrange the assembled sliders on a platter and serve immediately. If you’re preparing them ahead of time, cover tightly with plastic wrap and refrigerate until ready to serve.
- To keep the sliders moist after serving, you can wrap them in foil and warm them in a 300°F oven for 5 minutes. The heat will re‑activate the cheese and keep the beef from drying out. This trick is especially useful when you’re feeding a large crowd and want to maintain quality.
That’s it— you did it. But hold on, I’ve got a few more tricks that will take this to another level…
Insider Tricks for Flawless Results
The Temperature Rule Nobody Follows
Many people cook burgers on high heat, but I’ve found that a medium‑high setting (around 375°F) gives a perfect crust while keeping the inside juicy. Use a meat thermometer; the internal temperature should hit 160°F for safe consumption. If you’re a fan of a slightly pink center, aim for 150°F and enjoy the melt‑in‑your-mouth texture.
Why Your Nose Knows Best
Your sense of smell is a reliable indicator of doneness. When the beef emits a rich, savory aroma, it’s ready. The caramelized onions add a sweet scent that signals the pan is hot enough to sear properly. Trust your nose, and you’ll avoid overcooking.
The 5‑Minute Rest That Changes Everything
After removing the patties from the skillet, let them rest for five minutes. This allows the juices to redistribute, preventing them from spilling onto the pan and drying out the meat. A short rest also lets the cheese set slightly, making the sliders easier to handle.
Keep the Rolls Fresh
If you’re making the sliders ahead of time, store the un‑assembled rolls in a paper bag at room temperature. Paper absorbs excess moisture, keeping the buns crisp. When you’re ready to serve, just toast them again to restore that buttery crunch.
The Sauce is a Game‑Changer
The mayo‑ketchup‑mustard blend is the secret sauce that elevates the sliders. To make it even more robust, add a pinch of smoked paprika or a dash of hot sauce for heat. I’ve used this sauce on everything from grilled chicken to roasted veggies, and it always brings a wow factor.
Creative Twists and Variations
This recipe is a playground. Here are some of my favorite ways to switch things up:
The BBQ Twist
Swap the mayo‑ketchup‑mustard sauce for a smoky BBQ sauce and top the patties with crispy onion rings. The result is a Southern‑inspired slider that’s perfect for a summer cookout. The sweet‑spicy flavor pairs wonderfully with the buttery rolls.
The Tex‑Mex Kick
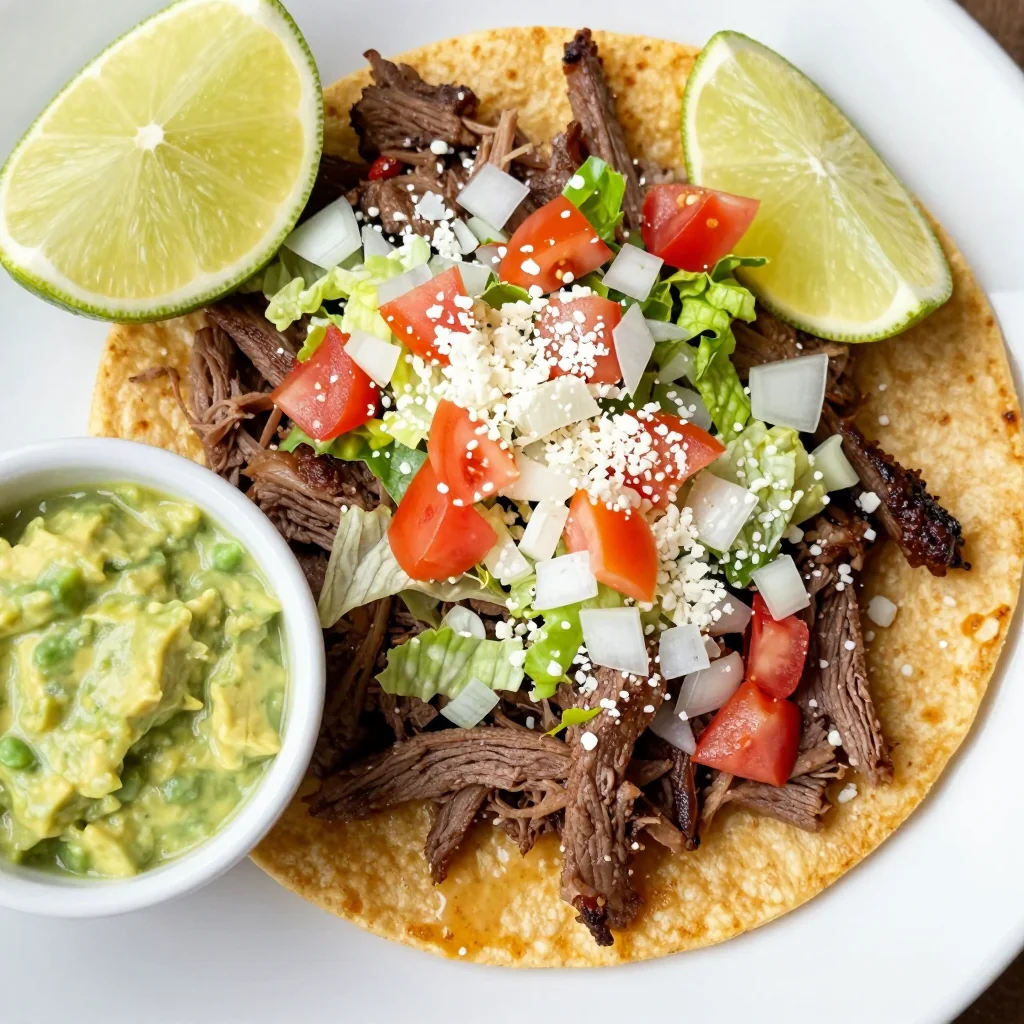
Add a sprinkle of taco seasoning to the beef and serve the sliders on mini corn tortillas instead of rolls. Finish with a dollop of guacamole and a squeeze of lime. This variation turns the sliders into a fiesta‑ready bite.
The Veggie Upgrade
Replace the ground beef with a hearty blend of lentils, diced mushrooms, and finely chopped spinach. Use a vegan cheese alternative and serve on whole‑grain buns. These sliders are a plant‑based delight that still delivers the comforting hug of a classic burger.
The Mediterranean Flair
Swap cheddar for feta cheese and add sliced kalamata olives and a drizzle of tzatziki sauce. Use pita pockets as the base, and you’ve got a Mediterranean‑inspired slider that’s both fresh and indulgent. The briny olives give a punch that cuts through the richness.
The Breakfast Slider
Cook the patties with a beaten egg and a sprinkle of chives, then top with a fried egg and a slice of sharp cheddar. Serve on a toasted English muffin instead of a roll. This breakfast version is a hearty, protein‑packed start to the day.
The Sweet & Spicy Finale
Add a thin layer of sriracha mayo to the sauce and sprinkle crushed red pepper flakes over the top. The heat adds a dramatic contrast to the sweet Hawaiian rolls, making each bite an adventure.
Storing and Bringing It Back to Life
Fridge Storage
Store assembled sliders in an airtight container in the refrigerator for up to 48 hours. Keep the sauce separate if you’re sensitive to sogginess; add it right before serving. Wrap the rolls in parchment paper to maintain their crispness. This method ensures the sliders stay fresh and flavorful.
Freezer Friendly
To freeze, wrap each slider tightly in foil and place them in a freezer bag. They’ll keep for up to 3 months. When you’re ready to serve, thaw overnight in the fridge and then reheat in a 350°F oven for 10 minutes. The buttered rolls will regain their golden crunch.
Best Reheating Method
Reheat the sliders in a toaster oven or skillet, brushing with a little water or broth before covering with foil. The moisture helps the cheese stay gooey and prevents the beef from drying out. A quick 5‑minute reheat is all you need to bring them back to life.