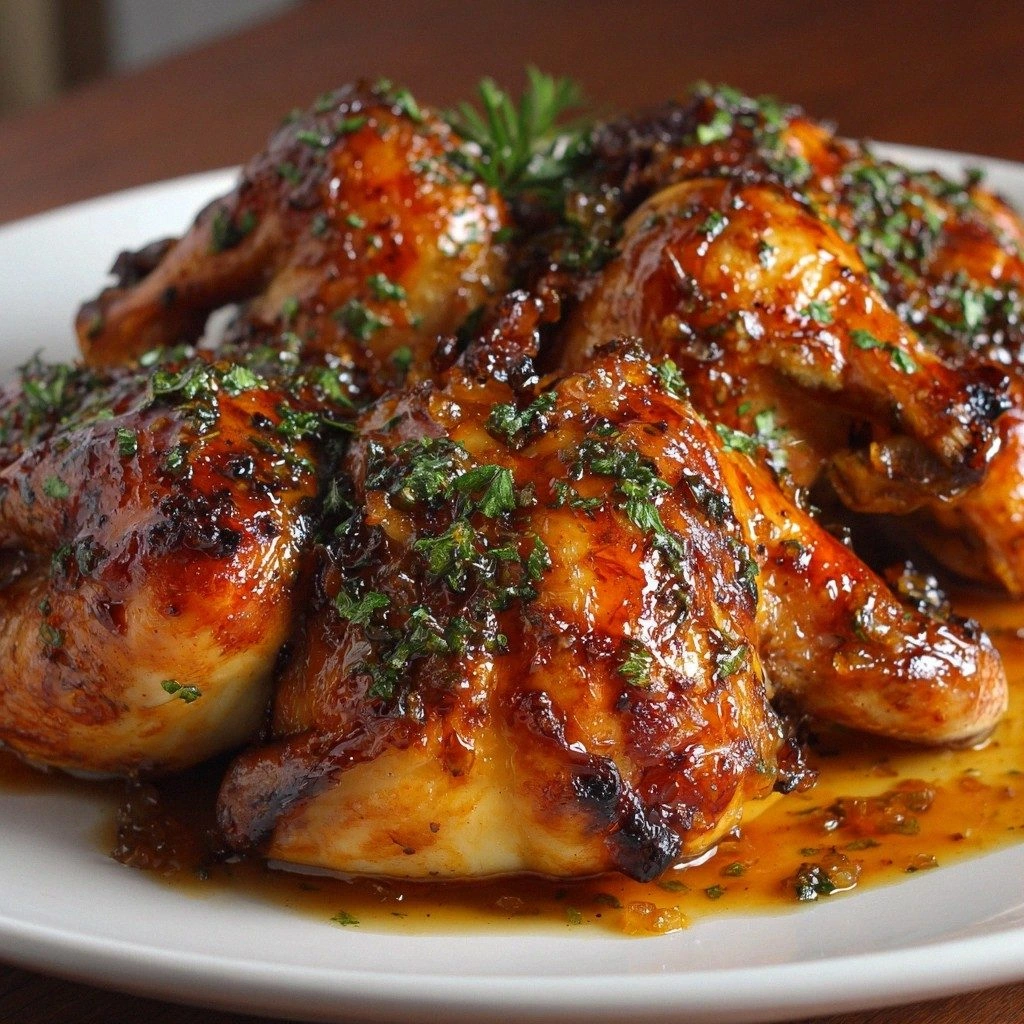
Apricot-Glazed Cornish Game He
Picture this: it’s a rainy Saturday, the kitchen lights flicker, and I’m staring at a pile of frozen Cornish Game Hens in the freezer. My friend throws a challenge my way: “Make something that will make even the most seasoned foodie swoon.” I’m not going to let that be a kitchen disaster. I’ll turn those little birds into a showstopper that will have everyone asking for the recipe. That’s the spark that lit the fire for this dish.
I opened the freezer, pulled out the hens, and the scent of woodsmoke from the grill that night lingered in the air. I could almost hear the crackle of the oven as I imagined the apricot glaze caramelizing into a glossy coat. The sound of a sizzling pan is a siren call for a chef, and I knew I had to answer it. My taste buds were already dancing in anticipation of the sweet‑savory fusion that would emerge. The anticipation is the first bite of this culinary adventure.
What makes this version stand out? It’s not just the apricot glaze; it’s the way I combine umami, spice, and a touch of herbaceousness. The glaze’s natural sweetness balances the savory depth of soy sauce and the sharp bite of Dijon mustard. The hens’ tender meat is a canvas that absorbs every note, and the roasted veggies add a colorful crunch that makes the dish Instagram‑worthy. The secret sauce? A micro‑challenge that I dare you to taste and not go back for seconds. It’s hands down the best version you’ll ever make at home.
I’ll walk you through every single step. By the end, you’ll wonder how you ever made it any other way. I’ve packed this recipe with techniques that will elevate your game, tricks to avoid common pitfalls, and creative twists that will keep the dish fresh week after week. If you’ve ever struggled with roasting game birds, you’re not alone — and I’ve got the fix. Ready? Let’s dive in.
What Makes This Version Stand Out
- Flavor Depth: The blend of apricot preserves, soy sauce, and Dijon mustard creates a complex profile that lingers on the palate, far beyond the usual sweet glaze.
- Texture Contrast: Crispy edges on the hens meet the tender interior, while baby carrots and Brussels sprouts provide a satisfying bite that breaks up the richness.
- Simplicity: No need for exotic spices or time‑consuming marinades; the glaze works in minutes, and the hens roast in a single pan.
- Unique Twist: The addition of minced garlic and dried thyme gives the dish an aromatic lift that most recipes overlook.
- Crowd‑Pleaser: Whether you’re feeding a family or hosting a dinner party, the dish’s visual appeal and flavor complexity guarantee rave reviews.
- Make‑Ahead Friendly: You can prepare the glaze a day in advance and refrigerate it; the hens can be marinated overnight for extra depth.
Alright, let’s break down exactly what goes into this masterpiece…
Inside the Ingredient List
The Flavor Base
The apricot preserves form the sweet heart of the glaze, giving it a natural caramelization when heated. Soy sauce introduces a savory umami undertone that counters the sugar’s bite, creating a balanced flavor profile. Dijon mustard adds a subtle tang that cuts through the richness, preventing the dish from feeling overly sweet. If you skip the mustard, the glaze will lean too heavily on the apricots, losing that sharp contrast. A good tip: use a Dijon with a moderate heat level to keep the glaze from becoming overpowering.
The Texture Crew
Baby carrots are chosen for their inherent sweetness and vibrant color, which brighten the plate and add a crisp texture. Brussels sprouts, when halved, develop a caramelized exterior while maintaining a tender interior, providing a delightful bite. The hens’ small size ensures even cooking and juicy meat; larger birds may require extended roasting time or a lower temperature to avoid drying out. If you’re short on carrots, substitute with parsnips or sweet potatoes for a similar sweetness.
The Unexpected Star
Dried thyme brings an earthy, aromatic note that complements the apricot glaze. Its subtle herbaceousness adds depth without overpowering the other flavors. A pinch of thyme is sufficient; too much can mask the glaze’s sweetness. For a fresher profile, replace dried thyme with fresh thyme sprigs, but remember to remove the stems before serving.
The Final Flourish
Seasoning, including salt, pepper, and optional spices, is crucial for bringing out the best in every ingredient. Salt amplifies flavor, pepper adds a mild heat, and thyme provides a herbaceous lift. A small pinch of salt is enough; over-seasoning can make the glaze taste flat. If you prefer a smoky edge, add a dash of smoked paprika to the seasoning mix.
Everything's prepped? Good. Let's get into the real action…
The Method — Step by Step
- Preheat the oven to 375°F (190°C). While the oven warms, pat the hens dry with paper towels; moisture on the skin will prevent crisping. I love to sprinkle a light dusting of salt and pepper to season the meat. This step sets the foundation for a juicy interior and a crisp exterior. Once the oven is ready, place a baking sheet on the middle rack; the heat will circulate evenly around the hens.
- Prepare the glaze by combining apricot preserves, soy sauce, Dijon mustard, minced garlic, and dried thyme in a small saucepan over medium heat. Stir until the mixture thickens slightly, about 3–4 minutes. The glaze should bubble gently, not boil. If it appears too thick, add a splash of water to thin it out. This is the moment where the sweet and savory notes mingle.
- Coat the hens with the glaze, using a brush to cover each bird evenly. Reserve a small amount of glaze for basting during roasting. The glaze’s sugars will caramelize, creating a glossy, flavorful crust. I often let the hens marinate in the glaze for 10–15 minutes to deepen the flavor, but this is optional.
- Arrange the hens on the prepared baking sheet, breast side up. Surround them with baby carrots and Brussels sprouts, tossed lightly in olive oil, salt, and pepper. The veggies absorb the glaze, adding flavor and color. The hens’ juices will basting the vegetables, creating a unified flavor profile. Arrange the birds so they have room to breathe; overcrowding can cause steaming instead of roasting.
- Roast in the oven for 35–40 minutes, or until the internal temperature reaches 165°F (74°C). About halfway through, baste the hens with the reserved glaze to deepen the crust. The skin should be golden brown and slightly crisp. Keep an eye on the glaze; if it starts to burn, reduce the oven temperature slightly. This step is the moment of truth—watch the transformation unfold.
- Rest the hens for 5–10 minutes after removing them from the oven. This allows the juices to redistribute, ensuring each bite is moist. While resting, you can finish the glaze by simmering the remaining sauce on the stovetop until it thickens to a glaze consistency. This final touch will coat the hens with a glossy finish that’s impossible to resist.
- Serve and enjoy the hens with the caramelized vegetables on the side. Drizzle the finished glaze over the whole plate for an extra burst of flavor. Pair the dish with a light white wine or a crisp rosé for a balanced meal. If you’re in a hurry, serve the hens whole; the glaze will keep them moist even after cutting. This final presentation is the moment that turns a simple dinner into a memorable experience.
That's it — you did it. But hold on, I've got a few more tricks that'll take this to another level…
Insider Tricks for Flawless Results
The Temperature Rule Nobody Follows
Many cooks roast at a high temperature for a quick crust, but this can dry out the hens. I recommend maintaining a steady 375°F (190°C) and using a meat thermometer to ensure the internal temperature hits 165°F (74°C). This approach guarantees a juicy interior while still achieving a crisp skin. A friend once tried a higher heat and ended up with a dry bird; the lesson was clear: temperature consistency beats speed.
Why Your Nose Knows Best
Before you pull the hens out of the oven, give them a sniff. The aroma should be sweet, caramelized, and slightly smoky. If it smells more like burnt sugar, lower the heat. Your nose is a reliable indicator of how the glaze is developing. I’ve used this trick to avoid overcooking and to perfect the caramelization. Trust your senses; they’re your best ally in the kitchen.
The 5-Minute Rest That Changes Everything
Resting the hens for 5–10 minutes after roasting is not just a formality. It allows the juices to redistribute, preventing them from spilling onto the plate. During this time, the glaze thickens slightly, making it easier to coat the hens evenly. I’ve seen many people skip this step, resulting in a dry bird; the rest is the secret to a succulent finish. Remember: patience pays off.
Keep the Glaze from Burning
If the glaze starts to darken too quickly, reduce the heat and add a splash of water or broth. Stirring frequently also helps prevent sticking. A friend once had a glaze that charred on the bottom; the solution was to lower the temperature to 350°F (175°C) and cover the pan with foil. This simple adjustment keeps the glaze smooth and sweet.
Serve With a Side of Fresh Greens
A handful of arugula or spinach tossed in a light vinaigrette balances the richness of the hens and the glaze. The peppery greens cut through the sweetness, creating a harmonious flavor profile. This addition also adds a pop of color to the plate, making the dish even more Instagram‑ready. I’ve found that even a simple green salad elevates the meal to a gourmet level.
Creative Twists and Variations
This recipe is a playground. Here are some of my favorite ways to switch things up:
Smoky BBQ Version
Swap the apricot preserves for a smoky BBQ sauce and add a pinch of chipotle powder. The result is a tangy, smoky glaze that pairs beautifully with grilled corn. This variation works well for summer cookouts.
Herb‑Infused Twist
Add fresh rosemary and sage to the glaze for an aromatic depth. The herbs complement the thyme and give the dish a forest‑meadow vibe. Serve with roasted root vegetables for a hearty meal.
Spicy Kick
Incorporate crushed red pepper flakes or a splash of sriracha into the glaze. The heat balances the sweetness and adds an exciting layer of flavor. This version is perfect for those who like a bit of spice.
Vegan Game Hens
Use plant‑based chicken substitutes or stuffed tofu rounds. The glaze still works, and the dish remains savory and sweet. Pair with quinoa or couscous for a complete meal.
Festive Holiday Twist
Add dried cranberries and a splash of orange juice to the glaze for a holiday‑seasoned version. The citrus adds brightness, and the cranberries bring a pop of color. This is ideal for Christmas or Thanksgiving gatherings.
Quick Pan‑Sear Alternative
If you’re short on time, sear the hens in a hot skillet until the skin is crisp, then finish in the oven for 10 minutes. The glaze will still caramelize, and the dish will be ready in under 30 minutes.
Storing and Bringing It Back to Life
Fridge Storage
Cool the leftovers to room temperature, then refrigerate in an airtight container for up to 3 days. The glaze may thicken slightly; stir before reheating. For best flavor, consume within 24 hours.
Freezer Friendly
Pack the hens and glazed vegetables in a freezer‑safe bag, removing as much air as possible. Freeze for up to 2 months. Thaw overnight in the fridge before reheating. The texture remains firm, and the glaze stays flavorful.
Best Reheating Method
Reheat in a preheated oven at 350°F (175°C) for 10–12 minutes, or until warmed through. Add a splash of water or broth to keep the hens moist. A quick microwave step is fine, but the oven preserves the crisp skin and caramelized glaze.